Skype (Windows / macOS / mobile)
As widely mentioned in the opening of the post, Skype, starting from version 8, integrates a function to record calls and video calls within it: this means that it is possible to record calls and video chats in a free, easy and fast way without resorting to external solutions. Recordings are saved as MP4 video, they are automatically saved to the cloud but can be downloaded locally with a simple click. Once created, they appear on the chat screen, where they remain available for 30 days.
register Skype from the computer, start the official client of the service for Windows or macOS (if you have not yet installed it, find out how to do it through my guide dedicated to the topic), select the contact with whom to start a conversation and call him, pressing the button of the call (the handset) or of video call (the video camera). Once the conversation has started, click on the button + che si trova in basso a destra e seleciona la voce Start recording give the menu check if you press.

Within a few seconds, the recording will start and both you and your interlocutor will receive a notification of the thing (since, for privacy reasons, all participants in a recorded conversation must be notified of the thing). When you have finished your chat, to stop recording, click on the item Stop recording located at the top left or, alternatively, click the button + located at the bottom right and choose the option Stop recording give the menu check if you press.
As already mentioned, the recordings are displayed in the form of video within the chat. To play them, simply click on their thumbnail. To download them, instead, click on the ⋮ button located at the top right (after selecting them or positioning the mouse on their thumbnails) and select the item Save with name give the menu to compare.
The recording function has also been included in the Skype mobile app for Android, iOS and Windows 10 Mobile. To use it, start a call or a video call, press the button + located at the bottom and select the item Start recording give the menu check if you press.
Once the chat is over or in any case when you want to choke the recording, press the button again + and select the item Stop recording give the menu check if you press.
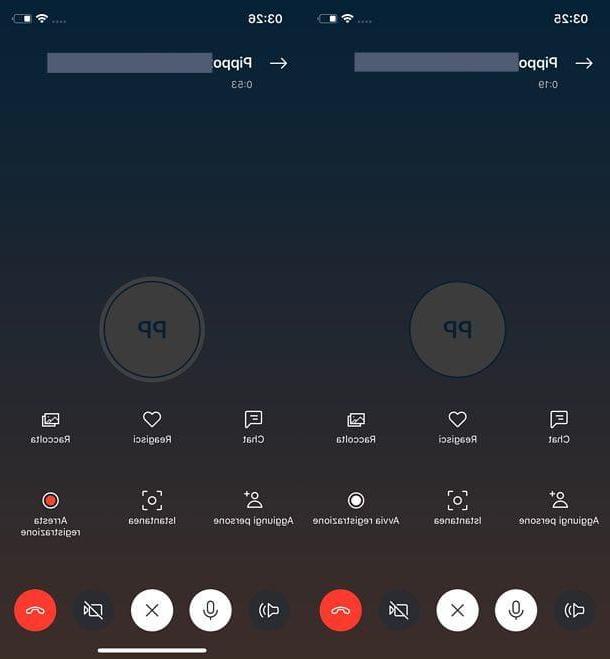
As well as on desktop, even in the mobile environment, Skype recordings remain available for 30 days on the conversation screen. To reproduce them, just tap on their thumbnails. To save them, however, you have to press the icon (...) or icon of sharing (the up arrow on iOS or the three connected dots on Android).
Please note: Since Skype's recording function is cloud-based, its appearance on some devices may be delayed compared to its appearance on other devices. Another important thing to underline is that, sometimes, the recordings do not appear immediately in the chat screen, you have to wait a few minutes and / or close and reopen Skype.
Callnote (Windows / macOS)
If you are not satisfied with the recording feature included in Skype, try some third-party solutions. The first alternative program that I invite you to try to register Skype is Callnote. It is a software available for free (with 10 registrations per month, to remove this limit you need to purchase one of the paid versions of the software, starting at $ 9,95 / year) and usable both on PC Windows both MacOS thanks to which it is possible to record both audio and video of calls made through the famous VoIP client. In addition to recording Skype, this software can also be used in conjunction with Facebook, Viber and various other services to make and receive video calls. The program is not localized in your language but is still perfectly understandable.
So if you are interested in finding out how to record Skype calls with Callnote, the first operation you need to do is to click here so that you can immediately connect to the main web page of the software. Once this is done, press the green button Download, by pressing the button Download for related to Callnote (in correspondence with the logo of the operating system in use on the computer, in the left column) and fill out the form that is shown to you by typing your name, your surname and your e-mail address and then presses the button Download. Then wait a few moments for the software download to start and complete.
When the download is complete, double-click on the file callnote-install-xxxexe obtained then click on OK and then Next four times in a row. To conclude it first presses on install and then Finish.

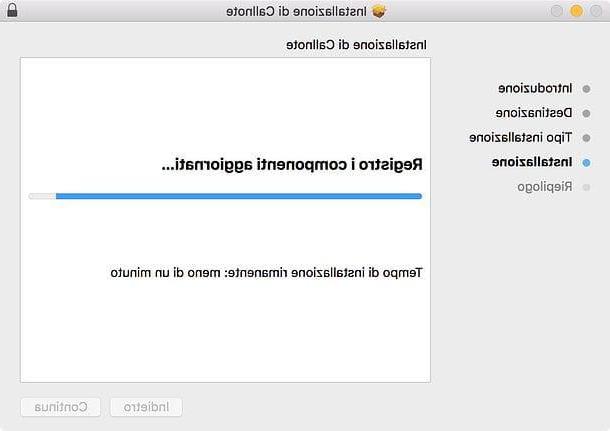
If you are using a Mac, launch the package pkg Callnote, click on the button Continue twice in a row and then on Install. and Continue installation. Then type the administration password of the Mac and finish the setup by pressing first on Install software and then Restart (the computer will restart).
When installation is complete, wait a few moments for the software window to be visible on the desktop and then press the button Allow access (to authorize access to the network in the Windows firewall). Now type the e-mail address you specified on the software website when you started the Callnote download and then press the button Sign In.
Now, start Skype by pressing on its icon and, if required, click on the button Allow access which is shown to you in the upper part of the program window, near the entry Callnote.exe wants to use Skype in such a way as to authorize the newly installed software to establish a connection with the VoIP client.
Proceed now by bringing the mouse cursor back to the Callnote window and presses the Skype icon located at the top. Then put a check mark next to the item Always start recording when call starts in such a way as to automatically start recording calls on Skype without you doing anything (option available only for Skype 7 and earlier). Please note that by default the software only records the audio of calls made on Skype. If you are interested in recording video in addition to audio, put a check mark next to the item Video record.
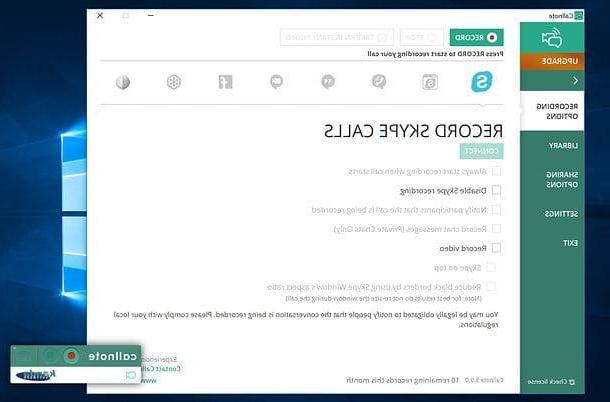
If you are using Skype 8 or later, to start recording a call, you need to click on the button REC present in the Callnote widget (the floating window of the program) e
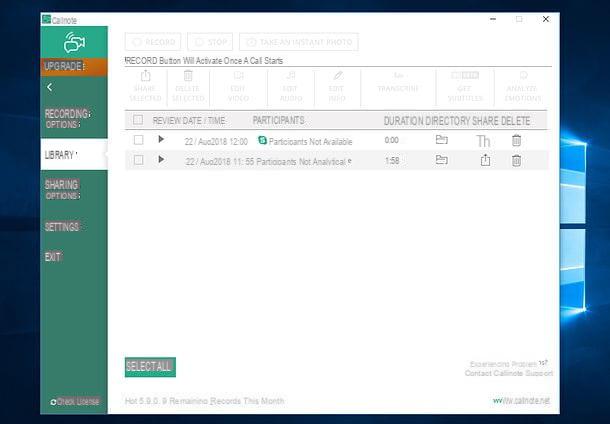
You can then view and listen to all the recordings made by starting Callnote, pressing on the voice Library located on the left and then clicking on the ▶ ︎ button relating to the registration of your interest. Alternatively, you can access the recordings made by the program by going to the folder Callnote which you can find in the folder Documents Of computer.
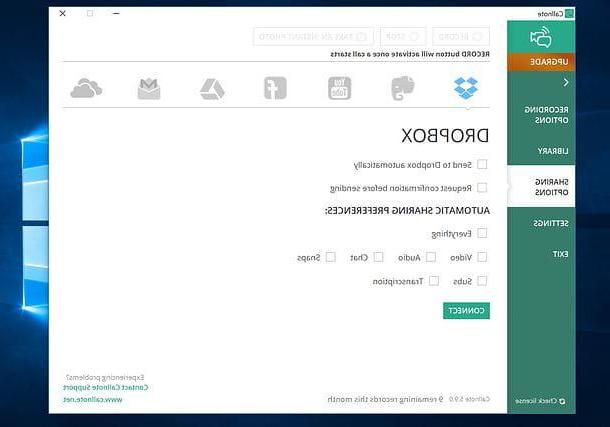
Finally, know that thanks to Callnote you can also automatically archive recorded Skype conversations on Evernote, dropbox, Google Drive o OneDrive and you can share them on Facebook e YouTube (the free version of the program, however, only supports Dropbox).
To do this, simply press on the item Sharing options located in the left part of the program window, click on the name of the service that you intend to use in conjunction with Callnote, press the button Connect and provide the login credentials referring to your account for the chosen service.
Next, check the item Send to [service name] automatically to automatically send Skype recordings to the indicated service and then put a check mark next to the items Video, Audio, Chatand / or Snaps based on your preferences and needs.
Free video Call Recorder for Skype (Windows)
If you need to record a Skype call, you have a PC Windows and you are using a version of Skype earlier than 8, you can also resort to using Free video Call Recorder for Skype. It is a free program that, as the name suggests, allows you to record video calls made via Skype by saving them in MP4 or MP3 (audio only) format on your computer.
So if it is your intention to find out how to record Skype with Skype with Free Video Call Recorder for Skype the first thing you need to do is to click here in order to connect to the program download web page. Once this is done, press the blue button with the wording on it Download located at the top right.
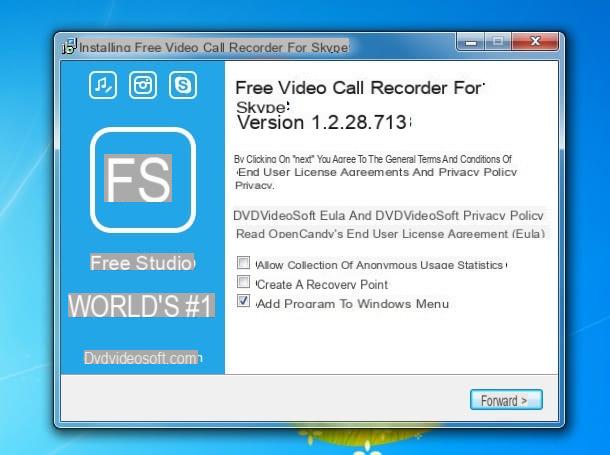
Then wait a few moments for the software download to be started and completed, then open the file FreeVideoCallRecorder_xx.exe that has been downloaded to your computer to start the software installation procedure.
In the window displayed on the screen, then presses on Si and then OK then press the button NEXT twice in a row and click end to finish the setup. Please note that during the installation procedure of the program you may be offered the download of some extra programs: refuse by removing the check mark where appropriate.
When installation is complete, wait a few moments for the software window to be visible on the desktop and then press the button Continue. Now, expand the drop-down menu located under the heading Registration mode to select an operation through which to record Skype: if you intend to record Skype both from the side of the call and from that of the receiver, press the option Record all parts. If, on the other hand, you prefer to record only the video of whoever receives the video call, press the option Record only other part. Finally, there is the option Only audio to record call audio only.

Next, launch Skype on your computer, wait for a video call to be received or start one yourself by simply selecting the contact you want to interact with and then pressing the button depicting a camera.
When the video call has started, presses the button depicting a red dot in the Free Video Call Recorder for Skype window in order to start the procedure by which to register Skype.
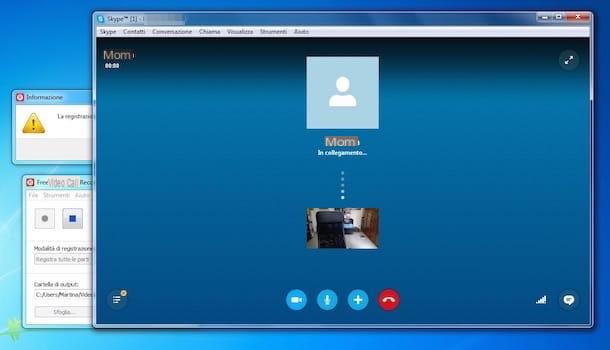
At the end of the video call you can interrupt the registration procedure by pressing the appropriate stop button attached to the software window.
Then you can see the video of the recorded video call (or listen to the audio file of the voice recording) by accessing the folder Video Windows used as the program's default output folder. If you wish, you can also change the folder in which Free Video Call Recorder for Skype automatically saves the recordings by pressing the button Sfoglia ... present under the heading Output folder in the program window.
Other solutions to record Skype
If the resources to register Skype that I proposed in the previous lines were not to your liking or if you are still looking for some tool that allows you to reach your goal, I invite you to take a look at my tutorial Programs for Skype . In the tutorial you will not only find additional programs and tools with which to record Skype, but also various other tools that may be useful during your conversations through Microsoft's famous VoIP client.
How to register Skype