IMAP / POP3 parameters for Aruba email

To configure Aruba mail in an email management program or app, you first need to decide which protocol to use for the configuration, choosing between IMAP e POP3.
If you are not aware of it, know that the protocol IMAP (which is what I recommend you to use) is the most modern one, as it allows the use of the same account on multiple devices at the same time, keeping messages synchronized (both incoming and outgoing) on all workstations.
The protocol POP3, on the other hand, it is older and requires the use of the e-mail service on a single device, in fact it deletes messages from remote servers as soon as they are downloaded (except for the activation of special backup functions).
With that distinction, what you need to know are the configuration parameters IMAP o POP3: you can find them indicated below both as regards the e-mail boxes linked to the domain (of the type [email protected]) and for e-mail boxes of the type @ aruba.com o @ technet.com.
IMAP
- Incoming mail server (IMAP): imaps.aruba.com
- Port: 993
- Requires SSL: yes
- Requires authentication: yes
- Outgoing mail server (SMTP): smtps.aruba.com
- Port: 465
- Requires SSL: yes
- Requires authentication: yes
- Full name or display name: [Your name]
- Account Name or Username: Aruba e-mail address (e.g. [email protected])
- Email address: Aruba e-mail address (e.g. [email protected])
- Password: password chosen when creating the Aruba mailbox
POP3
- Incoming mail server (POP3): pop3s.aruba.com
- Port: 995
- Requires SSL: yes
- Requires authentication: yes
- Outgoing mail server (SMTP): smtps.aruba.com
- Port: 465
- Requires SSL: yes
- Requires authentication: yes
- Full name or display name: [Your name]
- Account Name or Username: Aruba e-mail address (e.g. [email protected])
- Email address: Aruba e-mail address (e.g. [email protected])
- Password: password chosen when creating the Aruba mailbox
In case of configuration problems, refer to the IMAP / POP3 parameters indicated in the official Aruba guide.
IMAP / POP 3 parameters for the PEC Aruba

The ones listed below are, instead, the IMAP / POP3 parameters that you must use if you have purchased an Aruba PEC mailbox (with suffix @ pec.com). The latter are also valid for PEC boxes linked to other domains (for example those with suffix @ pec.nomedominio.xx).
IMAP
- Incoming mail server (IMAP): imaps.pec.aruba.com
- Port: 993
- Requires SSL: yes
- Requires authentication: yes
- Outgoing mail server (SMTP): smtps.pec.aruba.com
- Port: 465
- Requires SSL: yes
- Requires authentication: yes
- Full name or display name: [Your name]
- Account Name or Username: Aruba certified e-mail address (e.g. [email protected])
- Email address: Aruba PEC e-mail address (e.g. [email protected])
- Password: password chosen when creating the Aruba PEC account
POP3
- Incoming mail server (IMAP): pop3s.pec.aruba.com
- Port: 995
- Requires SSL: yes
- Requires authentication: yes
- Outgoing mail server (SMTP): smtps.pec.aruba.com
- Port: 465
- Requires SSL: yes
- Requires authentication: yes
- Full name or display name: [Your name]
- Account Name or Username: Aruba PEC e-mail address (e.g. [email protected])
- Email address: Aruba PEC e-mail address (e.g. [email protected])
- Password: password chosen when creating the Aruba PEC account
In case of doubts or problems relating to the configuration of the Aruba PEC, consult the official guide of the service in which the IMAP / POP3 parameters are indicated.
Set up Aruba mail on a computer
If you intend to configure the traditional mailbox or the PEC (Aruba Mail o Aruba PEC) using a client for Windows or macOS computers, the first thing you need to do is start the program you have installed and intend to use, by double clicking on its icon.
Once this is done, you can configure the Aruba mail through the wizard for adding a new email address (usually displayed at the first start) and following the instructions you find in the next lines.
- Outlook (Windows / macOS) - in the client Outlook for Windows 10 press the button Fillet located at the top left and, on the next screen, click on the button Add account. In case you do not see the indicated button, click on Account settings twice in a row and then on New. Then fill out the proposed form with the IMAP / POP3 parameters for Aruba Mail or Aruba PEC.
- Mail (Windows 10) - if you use software Mail on Windows 10, click the button (☰) located at the top left, then tap on the items Accounts> Add account and select the item Other Account in the context menu. Fill in the text fields email address, send messages with this name e Password and click Log in, to subsequently enter the IMAP / POP3 parameters for Aruba Mail or Aruba PEC.
- Mail (macOS) - if you are using the default macOS email client, tap on the item Mail located at the top left and then click on the wording Add account. On the next screen, tap on the item Other mail account ... and enter the configuration parameters indicated for Aruba Mail or Aruba PEC in the proposed form.
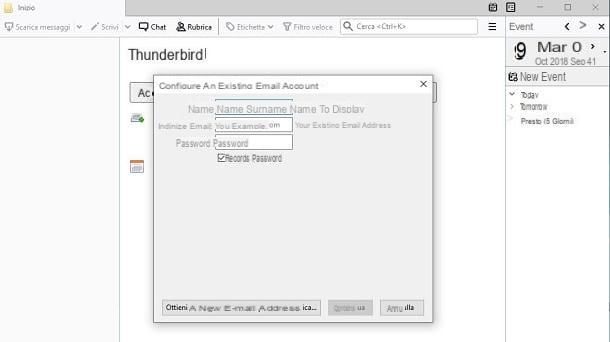
- Mozilla Thunderbird (Windows / macOS / Linux) - start the program and, when it opens, you will be shown a screen for configuring an e-mail address. Then use the field Your name, to type the name you want to display for the PEC or traditional email box, then enter the e-mail address (or the PEC one) and the Password associated with the account. Then press on Continue and then enter the parameters IMAP/POP3 e SMTP previously provide you for the configuration of Aruba Mail or the Aruba PEC.
Configure Aruba mail on smartphones and tablets
If you intend to take advantage of Aruba's e-mail, using applications to manage e-mail on a smartphone or tablet, the first thing you need to do is access the home screen of your device, search for the app you want to use and start it, by pressing on its icon. Then proceed following the instructions that you find below, to carry out the configuration in the correct way.
Do you prefer to use a different email app than the one mentioned above? No problem: take a look at the instructions you find in the following lines, to find out how to configure Aruba mail through apps such as for example Outlook, Mail, Spark o gmail.
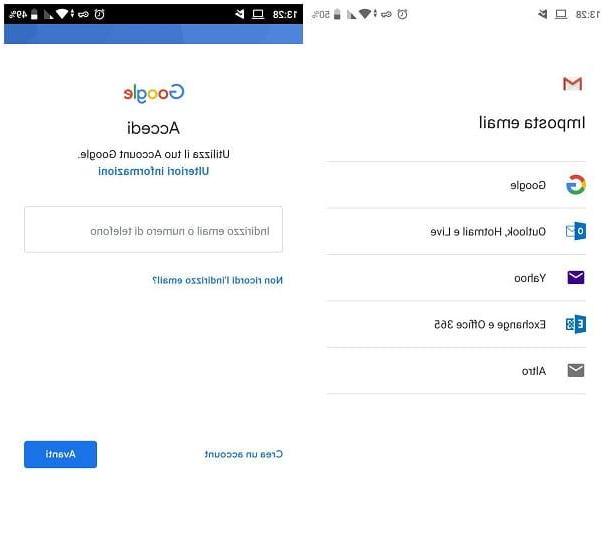
- gmail (Android / iOS) - after starting the app, you can configure your Aruba mailbox within it. To do this, click on Log in then on the item + Add account and, on the next screen, select the item Other (IMAP). Enter the email address of Aruba Mail o Aruba PEC, awarded his NEXT and, in the next displayed text field, type the Password. Then use the IMAP / POP3 configuration data for Aruba Mail or Aruba PEC and click on NEXT to finish the configuration.
- Outlook (Android / iOS) - if you have decided to use Microsoft's mail app, after downloading and running it, type e-mail address in the text field on the screen and press the button Add Account. On the next screen, move up ON the levetta Advanced Settings and fill in all the text fields related to Visualized name, To Password and to the IMAP / POP3 configuration for Aruba Mail or Aruba PEC, then click on Log in to finish the configuration.
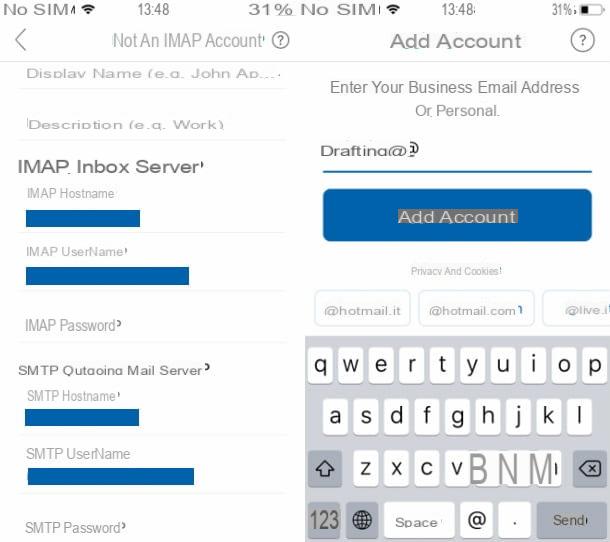
- Mail (iOS) - if you use an iPhone or iPad and want to take advantage Mail, the default iOS email service, tap on the item Other that you see on the main screen of the app and, on the next screen, filling in the fields displayed on the screen with the information relating to the name, email address, Password e Description for the email to be configured. Then press on NEXT to enter the IMAP / POP3 configuration parameters for Aruba Mail or Aruba PEC. You can carry out the same procedure by going to the section Settings> Passwords and Accounts> Add Account (on iOS 14 and later you have to go up Settings> Mail or Settings> Contacts) and then pressing on the item Other, on the next screen.
- Spark (iOS) - when the application is running, enter theemail address in the text field of the same name, press on NEXT, after placing the check mark on the item I agree with Spark's terms of use and privacy policy. Dopodiché type the Password in the next text field, tap on the wording Advanced Settings and enter the IMAP / POP3 configuration parameters for Aruba Mail or Aruba PEC. Finally, go back via the button (<) I awarded her Log in, to finish.
- Blue mail (Android / iOS) - this is a client that supports all major email services via IMAP and POP3. After downloading and running it on your device, press the button Log in with Email and then on the voice Other Email you see in the next screen. Now, in the context menu displayed, enter theemail address and Password of the email, click on NEXT, then, in the following text fields, type the name and Description for the account to be configured. To finish, click on end and then Done. In case it does not automatically take the configuration parameters, you may be asked to enter them manually. Also, once the main screen of BlueMail, you can also enter or modify the parameters by pressing the icon (...) at the bottom right and going to the section Manage Account Settings. Then press on account name, on the item Inbound / outbound settings and use the appropriate text fields to type the IMAP / POP3 parameters for Aruba Mail or Aruba PEC.
At this point you should finally be able to configure Aruba mail on your computer or smartphone / tablet, through the use of one of the clients or apps indicated. Do you want to check that everything went well? Take a look at the section Incoming mail o inbox, to make sure your email messages are present. Alternatively, try to send a new email, following the instructions I gave you in my guide on how to send a PEC with Aruba which are also valid for sending traditional emails.
In the event that, following the Aruba mail configuration procedure, you should see an error message, I invite you to verify the correct insertion of the configuration parameters, returning to the previous chapters of this guide dedicated to Aruba Mail or Aruba PEC.
Access Aruba mail without configuration
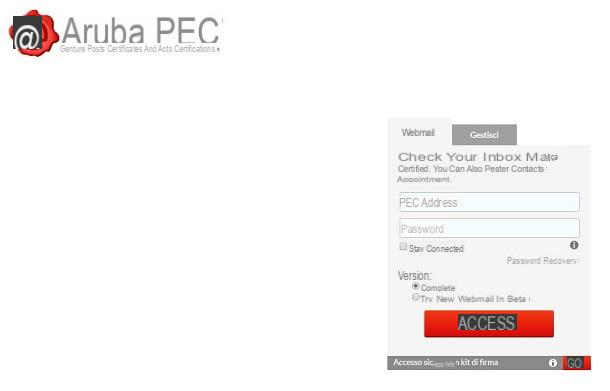
If you want to access Aruba mail, but do not want to carry out the configuration procedures, you can simply use the specific Webmail service for Aruba Mail or Aruba PEC which is accessible from a web browser for computers but also for smartphones or tablets. Alternatively, the official apps are available for free Aruba webmail (Android / iOS) and Aruba PEC Mobile (Android and iOS).
In the first case, to access the Webmail service from a computer or smartphone / tablet, connected to the home page of the service you have chosen via the link provided, fill in the text fields Email address o PEC address e Password, then put the check mark on the item Complete and finally, press the button Log in to login.
If you want to use applications instead Aruba PEC Mobile o Aruba webmail, after downloading them on your device, start the app of your choice by pressing its icon on the home screen or in the drawer. Once this is done, enter in the text fields Email e Password login data for Aruba Mail o Aruba PEC (depending on the app launched) and press the button Log in. Facile, see?
How to set up Aruba mail