Skype (Windows / macOS / mobile)

Starting with version 8, Skype allows you to record calls and video calls thanks to an integrated recording system which is based on the cloud: this means that you can record any conversation simply by pressing a couple of buttons. The recordings are then saved in the form of MP4 video and are shown in the chat screen, ready to be listened to, viewed or downloaded to the PC (operations that must be done within 30 days, after which the files are deleted from the Skype cloud).
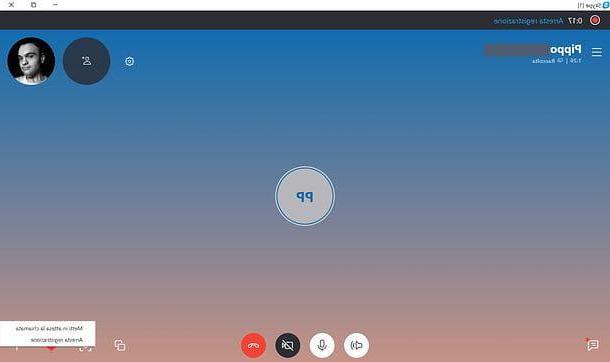
To take advantage of the recording function included in Skype, start the official client of the service for Windows or macOS, select the contact with whom you want to start a call or a video chat and call him. After this has answered, click on the button + che si trova in basso a destra e seleciona la voce Start recording from the menu that opens. Within a few seconds you and your interlocutor will see a notification message and registration will begin.
At the end of the registration, click on the item Stop recording which is located at the top left or, alternatively, presses the button again + e seleziona l'opzione Stop recording from the menu that opens. The recording, as already mentioned, will be made available as a video in the chat screen: to play it, click on its thumbnail. To download it, instead, click on the button ⋮ located at the top right and choose the item Save with name give the menu that you come purpose.
If you want, you can also record Skype calls and video calls through the service application for smartphones and tablets (which is compatible with Android, iOS and Windows 10 Mobile). To take advantage of this feature you must follow a procedure very similar to that seen for desktop systems: start Skype, call a person, press the button + located at the bottom and choose the item Start recording give the menu check if you press.
Then, to end the recording, tap the + button again and select the item Stop recording from the menu that opens. The recording will be shown in the form of a video on the chat screen: to play it, press on its thumbnail. To save it, instead, select it and press the icon (...) or icon of sharing (the three connected dots on Android or the up arrow on iOS).
Callnote (Windows / macOS)
The first external program to consider for record Skype calls è Callnote: it is a free software that, in addition to allowing the recording of calls on Skype, Facebook and Vibes, allows them to be uploaded to cloud services such as dropbox, Google Drive, OneNote and many others. It is available for both Windows and macOS.
To download Callnote on your computer, connected to the website of the software manufacturer, press the button Download present under the heading Callnote Premium and click on one of the options available between For Mac e For Windows (depending on whether you are using a Mac or a Windows PC). Now, enter your details in the fields First name, Last name e Email e pulsing sul pulsating Download to download the software.
Download completed, if you are using a PC Windows, double-click the file callnote-install- [version] .exe to start the program installation. Then press the button Run, set the language Callnote by choosing one of the available voices (English, German, Spanish, French, Chinese, Japanese) via the drop-down menu and presses the button OK, then press the button four times Next and click on your voice install. Wait for the installation to complete and press the button Finish to close the window and open Callnote.
If you use a Mac, double-click the file callnote-install- [version] .pkg, presses the button twice Continue and press on the items Install e Continue installation. When you see the message The installation was successful, pigia sul pulsating Restart to restart your computer and complete the installation, then start Callnote pressing on its icon present in the Applications of your Mac, enter the email you previously used to download the program in the field Enter your email to activate Callnote e pulsing sul pulsating Sign in.

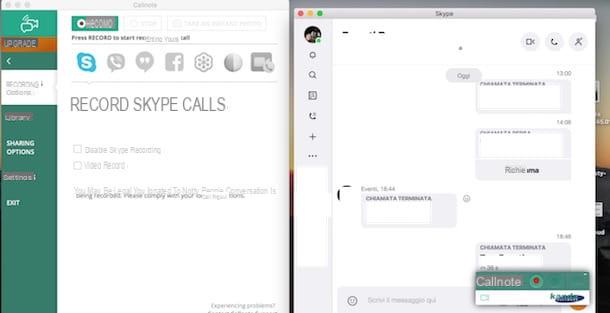
Now, you are ready to record Skype calls with Callnote. First, make sure the top menu is selected Skype logo, then open Skype, start the call and a new Callnote window will automatically appear at the bottom right: click on the red circle to start recording and on white square to stop it.
To view the list of recordings, click on the item Library present in the Callnote menu, otherwise click on the item Settings to view the path of the folder that contains recordings in MP3 format, visible next to the entry Callnote directory. By pressing, instead, on the option Sharing options, you can set up automatic saving of recordings to your Dropbox account. Then put the check mark next to the item Send to Dropbox automatically e Audio and click sul pulsating Connect, then enter your account details and that's it.
You should know that the free version of Callnote allows 10 monthly registrations. To have no limits and get new features, such as recording video calls and the ability to connect your Google Drive, OneNote or YouTube account, you need to switch to Callnote PRO ($ 39,95 / year) or Callnote Premium ($ 9,95 / year). For more information, click on the item Upgrade present at the top of the Callnote window, then choose the version of your interest and follow the activation procedure.
Amolto Call Recorder (Windows)
Among the solutions to record calls on Skype there is also Amolto Call Recorder, a program for Windows which, in its free version, allows you to make unlimited recordings. The paid version offers the possibility to record video calls as well.
To download the free version of the program, connected to the Amolto Call Recorder website, click on the button Download and wait for the download to complete. Now, double click on the file AmoltoCallRecorder.msi just downloaded, then presses the button Run and, in the new open window, double click on the button Next on your pulse install, then wait a few moments and press the button Finish to complete the installation.
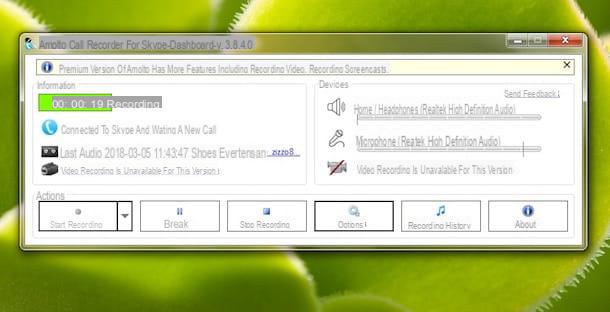
To record a Skype call with Amolto Call Recorder, open the two programs and start a call. Automatically, Amolto Call Recorder will record and save the conversation in MP3 format. Click on the option Recording History to view the library of recordings.

If you want to disable the automatic recording function when starting a call, press the voice Options, select the option General in the left menu, locate the section Autostart recording and click on the entry Configure actions for incoming / outgoing Skype call.
Now, using the drop-down menus next to the items Action for incoming Skype call e Action for outgoing Skype call, click sull'opzione do nothing: in doing so, when starting a new call, you will have to click on the item Start recording to start recording and on voice Stop recording to stop it.
iFree Skype Recorder (Windows)
Another free solution to consider for recording Skype calls is iFree Skype Recorder, a simple free recorder that allows you to record audio calls on Skype without any limitations. It allows you to save your recordings in MP3 format, choosing whether to record calls automatically or manually and in mono or stereo format.
If you think this is the right solution for your needs, go to the iFree Skype Recorder website and click on the button free Download to download the program to your computer. Once the download is complete, double-click the file iFreeRecorder.exe to start the software installation, press the buttons Yes, Next e install, wait a few seconds and press the button Finish to conclude the setup.
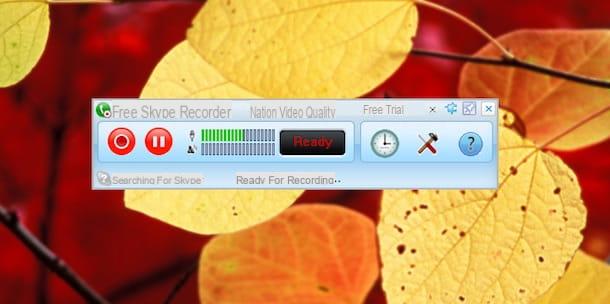
Now, start iFree Skype Recorder and press the button Start recording (The red circle) to record the call on Skype, then click the button Stop recording (The square) to stop and save the recording. You can view the list of recorded calls by clicking on theclock, while to access the options of iFree Skype Recorder, click on the martello.
Through the section Options, you can choose the audio quality of the recording (by clicking on the option MP3 Quality), while selecting the tab Call Recording you can set automatic or manual recording and choose whether to record the audio of the caller, the receiver or both.
Other solutions to record Skype calls
You should know that there are also numerous other programs that allow you to record calls on Skype: here are some that you can consider.
- Vodburner (Windows): allows you to easily record audio and video calls in MP4 or WMV format. It is free and without registration limits.
- MP3 Skype Recorder (Windows): software with a simple and intuitive interface that allows you to record incoming and outgoing calls for free and without limits, in MP3 format. Allows you to set up automatic and manual recordings. It is also available in a PRO version for commercial use.
- Evaer (Windows): program that allows you to record audio and video of Skype calls in MP3, MP4 and AVI format. In addition, it supports the recording of group calls and video calls for up to 10 people and saves the recordings directly to your computer, with the possibility of choosing the quality. It is available in a free version with a 5-minute limit per registration and in a paid version, at a cost of $ 19,95 for the standard license and $ 29,95 for the professional license.
- eCamm (macOS): allows you to record Skype calls and video calls in high quality, save them on your computer, on cloud services like Evernote and Dropbox and on sites like YouTube and Vimeo. Its cost is $ 39,95 and a trial version is also available that allows you to try eCamm for free for 7 days.
- G-Recorder (Windows / macOS): another interesting solution to record calls which, unlike the others, allows you to save files both on your computer and in your e-mail box, with the possibility of forwarding the registration to the selected contacts. In addition, it allows you to access your recordings at any time, even when you are away from your computer. G-Recorder is available in a trial version that allows you to try the program for 14 days, after which it costs $ 24,99 for the private use version and $ 39,99 for the commercial license.