How to Record PC Screen with Audio on Windows 10

If you need record PC screen with audio on Windows 10, know that you can do it both through tools integrated into the operating system and through third-party applications (more powerful and flexible): the choice is yours. Below, therefore, I'll explain how to record PC screen with audio for free making use of these solutions.
How to record PC screen with sound without programs
In PCs with Windows 10 there is a solution to record the screen with audio directly integrated into the operating system: I am referring to theXbox application.
You may have missed it, but this Microsoft-signed application is capable of capturing the PC screen and at the same time keeping the audio of what is happening on it. It is no coincidence that it is a solution born for the purpose of recording video game gameplay videos, but not for this reason it should be used only for this purpose.
To use the application, the first step is to make sure you have a suitable computer according to minimum system requirements required.
- AMD Radeon HD 7700 series.
- AMD Radeon HD 7700M series.
- AMD Radeon HD 8500 series.
- AMD Radeon HD 8500M series.
- AMD Radeon R7 / R9 series or later.
- NVIDIA GeForce 600 or later.
- NVIDIA GeForce 800M or later.
If you have difficulty in identifying your video card, feel free to help yourself with my article focused on the topic, then proceed to open the application by clicking on the button Home (the flag icon located in the lower left corner of the screen), by typing "Xbox" in the menu that opens and choosing the relevant result from those proposed.
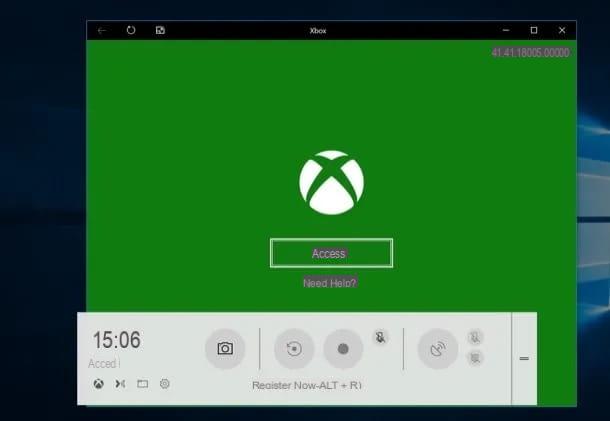
Now you just have to start the screen recording by pressing the key combination at the same time Win + G and answering the question if it is a game (by pressing the key It is a game).
When you want to start the registration, then click on Register now, while when you want to stop it, press the key Stop recording.
You have thus learned to record the video shown on the screen, so I will immediately explain how you can customize the audio source to be recorded to get more exciting captures! A first setting is the one concerning which device connected to the PC you want to use to record the voice (for example between microphone and webcam).
This preference can be expressed by clicking on the tab YOU of the widget Audio application (if you don't see it click on the Xbox Game Bar speaker icon). To switch from one capture device to another, click on the button with the symbol ⌵ and then on the name of the device to use. Once this is done, go back to the card MIX to adjust the volumes and outputs of all audio sources (programs, games, system and apps).
From the menu Settings placed at the end of the Xbox Game Bar (easily recognizable by the gear icon) additional audio recording choices are available.
After clicking this button, click on the tab Acquisition and in the section AUDIO TO RECORD express your preference between Game (program / game audio and microphone), Tutto (program / game audio, microphone, app and system) e Nobody (disables audio recording completely).
The recorded videos will be saved in a special folder contained in the path Video of the PC.
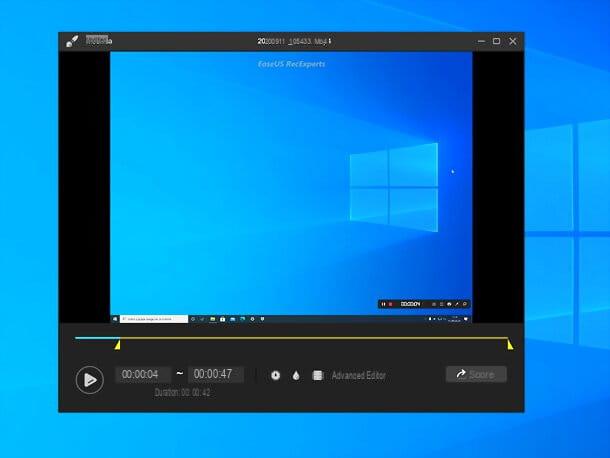
EaseUS RecExperts

One of the best programs you can use to record your PC screen and audio is definitely there EaseUS RecExperts which is able to capture the entire desktop of the computer, a portion of it, the window of a specific application (remaining anchored to the latter, regardless of what happens on the PC) and webcam shooting. On the audio side, it can record both system sounds and the voice coming from the microphone, also offering a sophisticated one noise reduction technology.
It also includes zoom and highlight effects to better illustrate what is happening on the screen. Furthermore, thanks to theintegrated editor, allows you to refine your recordings by inserting texts, lines, arrows and images. Videos can be exported to formats like MP4, WMV, AVI, MOV, FLV, ASF, etc. and uploaded online to services such as YouTube. Then there is full support for the 4K / UltraHD resolution and at high framerates, which makes EaseUS RecExperts ideal for recording i video gameplay of games.
The program, which is compatible with all versions of Windows (from Windows 7 onwards) and has a interface completely in your language, you can download and use it for free in a version that allows you to create recordings up to 2 minutes long, with watermark and without the possibility of editing them with the integrated editor. To remove these limitations and access all the features of EaseUS RecExperts, you need to purchase the full version of the software for € 17,95. That said, let's take action.
To download EaseUS RecExperts, connected to the official website of the program and click on the button Free trial. Once the download is complete, open the .exe file obtained and complete the setup by first clicking on Yes and then OK, NEXT (four consecutive times), Install e end.

Once you have installed EaseUS RecExperts, you can use it to record your PC screen in a very simple way: start the program, follow the brief initial tutorial and use its main window to set the type of recording you intend to use.
Through the drop down menu located at the top left you can choose whether to record screen, audio, webcam o game, while with the three icons placed in the center you can choose from which sources to capture video and audio: by clicking on the monitor you can choose whether to record it full screen, a specific area of the same, one prefixed region (choosing one of the available resolutions or setting a custom one) or one lock window (i.e. a specific window, to be followed regardless of what happens on the PC desktop); clicking on the icon sound waves you can choose whether to capture system sound, microphone, both or record without audio (with the possibility of adjusting the options altogether); while clicking on the icon webcam you can choose if and which webcam to include in the recording.
Finally, through i buttons located at the bottom you can access the video list recently made, set one automatic stop for registration e schedule a recording automatic. L'icona dell'ingranaggio present at the top right instead allows you to access all the program options, then to adjust the video / audio output format, visibility of the mouse pointer, keyboard shortcuts and more.
That said, when you are ready to start your registration, click on the button REC of EaseUS RecExperts and, if you are using the free version of the software, click on the button Race to continue. At the end of the recording, to stop filming, recall the program toolbar from the lower right corner of the desktop and press the button Stop present on it. On the same bar there are also buttons to activate the reflector, the zoom, capture snapshots of the screen and insert annotations.
To conclude, you just have to select the video just registered from the main window of EaseUS RecExperts and choose what to do. For example, to edit it with the built-in editor, click on the brush present at the bottom left.
This will open the EaseUS RecExperts editor, through which you can cut the video, adjust its playback speed, insert graphic or text watermarks and insert intro or closing videos.
The other icons at the bottom of the video list in EaseUS RecExperts allow you to instead visualize the selected video, compress it, share it, delete it e open the folder in which it is saved. Very simple, right?
OBS
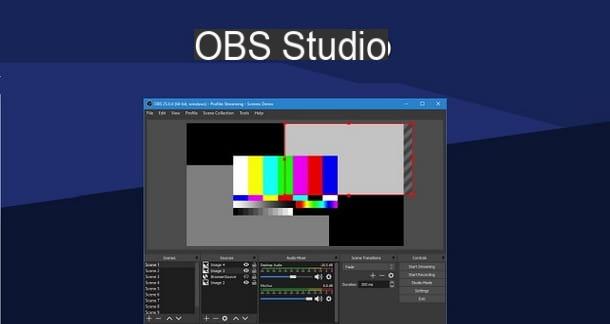
One of the most used third-party solutions to record the PC screen is definitely OBS, an acronym for Open Broadcaster Software.
It is a free, open source and multi-platform program (compatible with Windows, macOS and Linux) much appreciated by its users for the versatility and richness of functions it contains, so much so that it is considered as a virtual control room. .
It is no coincidence that, also thanks to the fact of being able to insert the webcam in the shot, OBS is of great help to youtubers, twitchers and more generally to those who stream video content. Yes, because OBS can be used with a dual purpose: to transmit live streaming video streams and record videos to save them on the PC.
Using OBS is not complicated, but the large variety of settings and functions usually discourage new users. Don't worry, you don't have to study any manuals before you know how to use OBS. It is true that the possibilities of use are many, however the functions of screen capture e audio output, including other functions how to record PC screen with audio and webcam, they are really easy to learn.
To get OBS, connected to this address and click on the button Windows, in order to download the .exe file to install the program. Once the download is complete, go to the folder where you downloaded it and open it with a double click. Then complete the setup by clicking on the buttons Yes, Next, I Agree, Next, install e Finish.
The program starts automatically: proceed, then, by clicking on the button OK, then on the button Yes and you will have access to its setup wizard. Follow the onscreen instructions and remember to select the second option Optimize for recordings only, I don't do direct.
You might as well start screen recording now, but I strongly suggest you set the directory where your recordings will be saved first. How to do? I'll explain it to you right away. Select the item Settings proposed in the form of a button at the bottom of the menu Controls, click on the button Exit and enter the path where you want to save the files of your recordings, in the appropriate box next to the item Registration path, and also choose the recording format (eg. MP4 o MKV) through the appropriate drop-down menu. When you are done, click on the button OK.
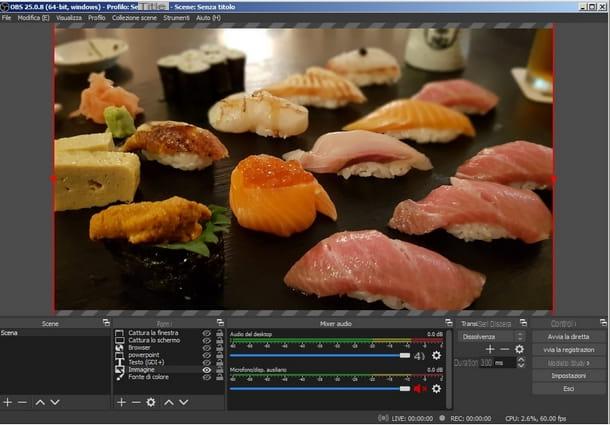
Now you need to set up screen capture by selecting the video and audio sources from which to capture the signal. To do this, click on the button [+] in the menu of References e scegli l'opzione Screen capture (Or Capture the window, to capture a single window), then assign an optional name to the source and click the button OK. Express your preferences among the available options, such as that of Capture the mouse cursor and fai clic sul tasto OK when you have finished.
In the central part of the program is now displayed what you also see on the desktop, but you can very well change the area that occupies this source using the selection rectangle. By doing this you have successfully set the video source, but the audio source is still missing. Here's how to proceed.
The source to add, again by clicking on the button [+] is that called Cattura l'audio in entrata, or Cattura l'audio in uscita. You can also add both audio sources at the same time, the difference is that the first captures what your speakers play (everything), the second just what you say into the microphone (or with another audio capture device).
Once you have chosen the type of audio source to add, you are asked to assign an optional name to it and to click on the button OK. From the new window you can choose the Device audio (for example you can choose whether to record the audio of a specific program, of the whole PC or of the webcam) and adjust the volume from the appropriate mix. Once you have finished configuring the source, click on the button OK down.
Everything is finally ready to record, so use the menu one more time Controls, in the lower right corner, and click on the button Start recording. From now on, everything you do on screen (including audio) will be recorded in a file in the directory you have chosen to use as the destination. When you want to stop shooting, simply click on the button Stop recording and the file will be processed and acquired by the program.
Speaking of capture, I have already told you that thanks to OBS it is possible to record the PC screen and the webcam in the same screen, so let me explain to you too how to insert the webcam into the shot.
The button to click to add a source is always the one with the symbol [+], then choose the item Video cattura device, then choose a possible name of the source and click on the button OK lower place.
In the new screen you see, select from the drop-down menu Device the name of your webcam connected to the PC. To understand if you have configured everything correctly, the program itself shows you the shot of your webcam on the screen. So if you see correctly what you are filming, you can click on the button OK and place the webcam capture box where you see fit with respect to the scene.
As you have seen yourself, the possibilities offered by this tool are truly endless. If you feel intrigued and want to learn more about the subject by discovering more OBS functions, then I refer you to my complete guide on how it works.
Other solutions to record PC screen with audio
If you think that the solutions I told you about in the previous chapters are not for you, don't worry: I thought I'd also offer you additional software to record your PC screen with audio. Here's what they are.
- Camtasia Studio - this program is one of the best available for PC screen capture. In addition to the ability to set the recording area in desktop or window mode, the program also contains tools for video editing and editing. Camstasia Studio is a paid program, but a free trial version for a period of 30 days is also available. More info here.
- Screencast-o-Matic - the convenience of this solution lies in the fact that it is an online service capable of recording the screen by installing only a small application on the PC and thus avoiding long installation processes and any compatibility problems. The service is available free of charge and for a fee at a price of 1,65 dollars / month, with the difference that the maximum recording duration is 15 minutes free of charge, and the recorded videos have a watermark. More info here.
- Fraps - born specifically for the recording of video game gameplay, Fraps can still be used to record what happens on the PC screen. The feature of this program is that it consumes few resources, making the recording experience smooth. This is a paid software, but a free trial version is also available for download. More info here.
How to Record PC Screen with Mac Audio
Be an utente Mac and you want to record your PC computer screen with audio, here are some of the best solutions you can rely on, both included "standard" in the operating system and made by third parties.
Snapshot Screen
Did you know that you can record the screen of MacOS with a feature built into the system, called Screenshot? This feature was introduced with version 10.14 of macOS (Mojave) and is very simple to use,
To capture the screen with Snapshot, you have to press the key combination cmd + shift + 5 on the keyboard or search for the application in the Launchpad or Spotlight, so as to open the relative toolbar at the bottom of the screen.
Now you can click on the middle button Record the entire screen, to record everything you see on your computer, or on Record your selection, to capture only a portion of the screen.
After this trivial setting, you can immediately start recording by clicking on the button Register and then anywhere on the screen to see the mouse cursor "transformed" into a camera icon. You can then stop the recording at any time by clicking on the button Stop located at the top right (in the menu bar).
Upon completion of registration, you will be shown apreview of the result located in the lower right corner, which you can open by clicking on it. The final video is still saved in the default screen capture folder (which should be the Desktop).
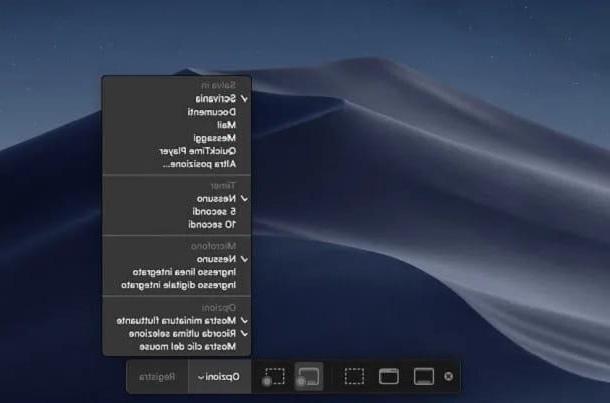
I point out that the function Screenshot allows you to adjust some capture settings from the menu options. For example, you can change the video saving directory by clicking on the options under the heading Save in, or set your audio recording preferences by clicking the options under the heading Microphone and choosing between Nobody, Integrated line input o Integrated digital input.
As an example, to record your voice from the microphone or webcam you can choose these settings. Among those available, however, the possibility of recording the audio reproduced by the Mac (such as that of a movie or a game being played) is missing, unless of course you do not use the microphone and capture it from the computer speakers (with results of dubious quality) .
So how to record a video of the Mac screen including system audio? In that case, you need to turn to external solutions that make system audio a source available in programs like Snapshot: one of the most popular is Soundflower, which I also told you about here, which is free but does not work properly on the most recent versions of macOS. Alternatively there are BlackHole (free) and Audio Hijack (paid, which I told you about here), which I recommend you try.
Other solutions to record Mac screen with audio
Doesn't the Snapshot function satisfy your recording needs? Don't worry then, below you will find further solutions that I think are equally valid. I hope they are to your liking!
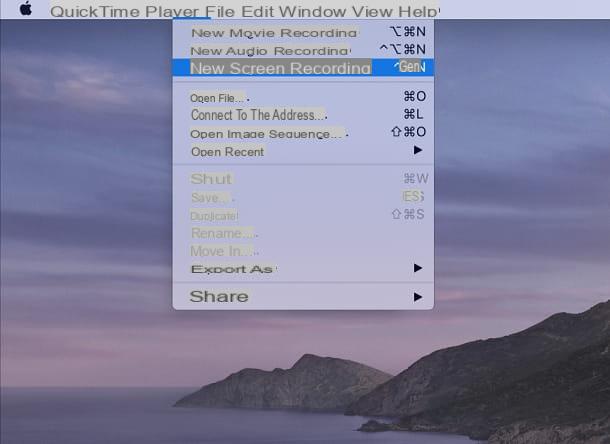
- QuickTime Player - you probably already know this application for playing multimedia files, as it comes pre-installed on macOS. Well, QuickTime is able to record the screen not only of the Mac, but also of any iOS / iPadOS device connected to the computer. To open the application and access its registration features, you can click on its icon in the Launchpad and go to the menu File> New Screen Recording, top left. Remember to also specify the audio source to capture by clicking on the icon ⌵. More info here.
- OBS - is the excellent software I told you about in detail in the chapter dedicated to Windows. It allows you to record the screen with audio and make live streaming with ease.
- Screenflow - a high quality software to record the Mac screen. Available at a price of $ 129 in full version and in free trial version (upon registration) which has no time limit but affixes a watermark in the recordings. Also interesting is the presence of professional video editing tools which, if used wisely, return excellent results. More info here.
- Screencast-o-matic - being a Web service, Screencast-o-matic is also perfectly compatible with Macs. It is available in a full paid version, starting at $ 1,65 a month, and a free version with a 15-minute limit and watermark impressed on the video. Screencast-o-matic allows you to shoot with the webcam and record audio for inclusion in screen recordings. More info here.
If you have already tried the solutions I told you about for capturing the PC screen with audio and you do not feel fully satisfied, maybe you could find the ideal program for your purpose by consulting my guide on programs to record.
How to record PC screen with audio