Preliminary information

Before taking action by going to find out how to make android games, it is my duty to make some clarifications.
First of all, know that the tools you can use to develop games for Android (and more generally for mobile platforms) are divided into two categories: SDK and independent commercial software.
- SDK (Acronym for Software Development Kit) are those that are made available to developers by those who make mobile systems (Google, in this case). They allow you to make the most of the platform to which they are addressed, to manage every single detail, to make sure that each function is optimized and to carry out various tests, even by virtually emulating the end devices. In general, however, they are a little less intuitive than some third-party commercial solutions.
I independent commercial software (otherwise known as Game Engine), on the other hand, are those that, as the definition itself suggests, are released by third-party companies and through which content can be developed within an integrated environment. Depending on the license, they allow you to export games in different formats intended for as many operating systems. It should be noted, then, that they are characterized by a usually low level of difficulty of use and allow you to create a single project (and all the related resources) that can be exported as a package compatible with different platforms, depending on the license owned.
In either case, to develop games for Android you need to know at least a minimum of what they are programming languages most popular for the purpose in question, such as Java e XML. To learn more, I refer you to reading my guides focused specifically on how to start programming, how to create a program and how to learn Java.
How to make Android games with Unity
Having made the necessary clarifications above, let's move on to the actual action. The first resource I want to invite you to consider is Unity. In case you've never heard of it, this is a cross-platform integrated development environment dedicated to creating numerous 3D and 2D simulations. It allows, therefore, to develop video games of any kind, offering a high level of customization and a high quality rate of the software generated.
It is available for Windows and macOS and there are several versions: the free one, called Personnel, it's free, but only if the legal entity representing the user does not generate any income or fundraising in excess of $ 100.000. If not, you need to purchase a license More o For (with costs starting at $ 25 / month with annual billing).
To download Unity Personal on your computer, visit the official website of the program and click on the button Get Started, then locate the wording Personnel and press pulsating Try Personal. Then tick the entry Accept terms and click your bottone Download Unity Hub.
When the download is complete, if you are using Windows, april il .exe file obtained and, in the window that opens, first click on the button Yes e poi quello Next. Then check the box next to the item I accept the terms of the License Agreement, click on the button three times in a row Next and, finally, click on the button install.
Se, invece, stai using MacOS, april il package .dmg downloaded and drag theprogram icon inside the folder Applications Of computer. Afterwards, right click on it, select the item apri from the context menu and press the button apri in the window that appears on the screen, in such a way as to go around the restrictions imposed by Apple on applications from non-certified developers (an operation that must be carried out only at the first start).
Now that, regardless of the operating system you are using, you see the program window on your desktop, log in with your Unity account. If you don't have one yet, skip this step by clicking on the button Work Offline. Next, click on the button New located at the top right, type the name of your project in the first text box and select a template from the list below, choosing between 2D e 3D. Then press the button Create project, located at the bottom right.
At this point, you will find yourself in front of the Unity editor, which is divided into three large areas, each of which is dedicated to a different component of the workflow: the panel Hierarchy, That Inspector and the panel Project.
The first is located in the left part of the window and allows you to manage the elements present on the scene. To create a new element, right-click inside the panel in question and choose, using the appropriate menu that is shown to you, the category and the object to create.
On the right, however, there is the panel Inspector, which allows you to view and modify the properties of the elements selected in the first panel. The area Project, then, it is intended for the management of the resources that make up the project: by right clicking inside it and selecting the item Import New Axist from the menu that appears, you can add all the materials you need to your project, such as audio sequences, images or decorative motifs.
To create new scenes, i.e. new levels or new game environments, select the item Fillet is that New Scene from the Unity menu bar. To test the game, instead, click on the button Play, which is located at the top. Then remember to press it again to exit the test mode, so that you can make any further changes to the project.
When you want, you can export your game by selecting the item Fillet from the menu bar, by clicking on the wording Build Settings, selecting the item Android in the window that opens and clicking on the buttons Switch Platform e Build. Finally, assign a name to the file and proceed with saving, indicating the output location and pressing the appropriate button.
Please note that all the components necessary for game development, such as libraries, add-on modules or software, are not always available on your computer. If so, you won't find the button Switch Platform in the program editor, but that Open Download Page and, by clicking on it, you will be immediately redirected to the page that provides instructions on the missing modules and the details of their installation.
For further details and insights about Unity operation, you can refer to the official manual on the software website.
How to create games with Android Studio
Let's see now how to create games for Android using Android Studio, the suite that integrates Android SDK made available directly by Google. It includes a special editor through which developers can create apps and games for Android. It also allows you to decompile APK files and view their contents.
It's free and can be used on Windows, macOS and Linux. Note that unless you want to program everything manually, usually the games are not created directly in Android Studio but you use an editor that allows you to create the virtual world that the game engine will then have to manage.
That said, to download Android Studio on your computer, visit the program's website and click on the button Download Android Studio that you find in the center of the page displayed. In the form that opens, check the box next to the item I have read and agree with the above terms and conditions and click on blue button located at the bottom, to proceed with the download.
A scaricamento ultimato, is stai using Windows, april il .exe file obtained and, in the window that opens on the desktop, click the button Yes. On the next screen, click on the button Next three consecutive times and complete the setup by pressing the button Finish.
Se, invece, stai using MacOS, april il package .dmg got it, move theandroid studio icon in the folder Applications on your Mac, right-click on it and select the item apri from the menu that is shown to you, in order to start the application going to circumvent the limitations imposed by Apple on applications from non-certified developers (an operation that must be performed only at the first start).
Then, regardless of the operating system you are using, click on the button OK in the screen that appears, click the button Next three times in a row and waits for the download of all the components necessary for the functioning of the program to be started and completed. Then click on the button Finish, to display the main Android Studio window.
At this point, select the option Start a new Android Studio project to create a new project and start programming, choose the module to start from, assign a name to your game project and select the SDK version to use, using the dedicated drop-down menu. Then click the button Next and indicate which of the available preset bases you wish to use, then configure the values or leave the default ones and confirm everything by clicking on the button Finish.
Then use the editor that is proposed to you to develop your game. On the left you will find the structure, while on the right is the actual editor. At the top, however, there are the buttons to insert objects, cut, copy and paste parts of code etc., while even further above you find the menu bar.
When necessary, you can save the game project by calling up the appropriate attached item in the menu Fillet , located at the top left. For more details and to learn more about how the program works, I recommend reading the Android Studio user guide provided directly by Google.
How to make Android games without programming
It is possible to create games for Android even without programming: to do this, you can rely on special Web Apps, which allow you to develop apps and games in a simple way, acting through a visual editor, using a practical drag-and- drop to insert the various elements of interest.
Among the various Web Apps available on the square, I suggest you rely on MIT App Inventor, which is free and quite popular. Note, however, that in order to take advantage of it, you need to log in with your Google account.
To use it, go to its home page, log in with your Google account, press the button Start new project at the top, type the name you want to assign to the game and click the button OK.
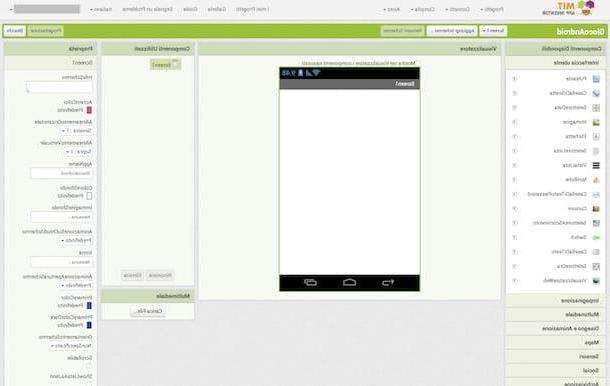
At this point, select thecityno from the drop-down menu located at the top right, in order to translate the interface of the service into the city, and start using the visual editor on the screen to create your game.
The editor is divided into several sections: on the left you will find the list of elements and objects that you can add to the interface from the game (Components available), in the center is the screen that shows you the preview of the final result (Viewer), while on the right there is a list of the various elements (Components used), the menu with the properties of the selected objects (Property) and the button to upload multimedia files (multimedia).
To start adding elements to the game interface, select them from the list on the left and drag them to the center, dropping them where you prefer. To modify their properties, instead, select them and use the appropriate section, located on the right. To add more screens to your game, click on the button Add Screen placed at the top, while to remove them use that Remove Screen, which you find next to it.
To add one or more items to the app interface, select them from the list on the left and drag them to the center viewer, wherever you like. To change their properties, select them and intervene through the appropriate section on the right. To add more screens to the app, click on the button Add Screen located at the top, while to remove them use the button Remove Screen adjacent.
Once you have finished developing your game, save it by clicking on the entry Projects located at the top left and selecting the item Save project from the menu that appears. To download it to your computer, instead, select the option, again from the same menu Export the selected project (.aia).
How to make Android games and make money

After having managed to create your game for Android devices, using the tools I told you about in the previous lines and following the relative instructions for use, you can finally think about its distribution on the Play Store Google, the official application store for devices based on the mobile platform of the green robot, and possibly also its monetization.
To do this, you need to open a account as a developer, associate the latter with yours Google profile at the cost of dollars 25 and send the game you created to “big G”. To complete the steps in question, simply visit the registration page at Google Play Console.
After doing this, you can proceed with uploading the APK file of your games. At this stage, you will first need to manage the metadata of the games you have developed, then versioning and system requirements, and then think about the part commercial, namely the title, description, screenshots and price. For more information, I refer you to the consultation of the official Play Console guide.
How to make Android games