Preliminary operation

To configurare un router TP-Link It is essential to access, through any browser (preferably a computer), the Web interface of the operating system, through which you can control all aspects of the same - from the Internet connection parameters to the Wi-Fi settings, passing through the door opening, access management and much, much more.
To begin with, if you haven't done so yet, connect the router to thepower supply and insertion il ADSL / Fiber cable in the hall WAN/Internet located on the back of the network device, unless you want to set it up as a repeater. Next, connect the router to the computer using a Ethernet cable or, if this is not possible, check the availability of any Wi-Fi network present "factory": the access credentials are generally printed on the label located on the bottom of the router.
Once the physical connections have been established, open the navigation program of your choice and connect to the address 192.168.1.1: if everything went well, you should see the login page of the administration panel of the device. If you see an error message, try connecting to the addresses 192.168.0.1, http://tplinkwifi.net, http://tplinklogin.net or, again, http://tplinkmodem.net: should you continue to receive errors , try to find the IP address of the router yourself, following the instructions I gave you in my tutorial on the subject.
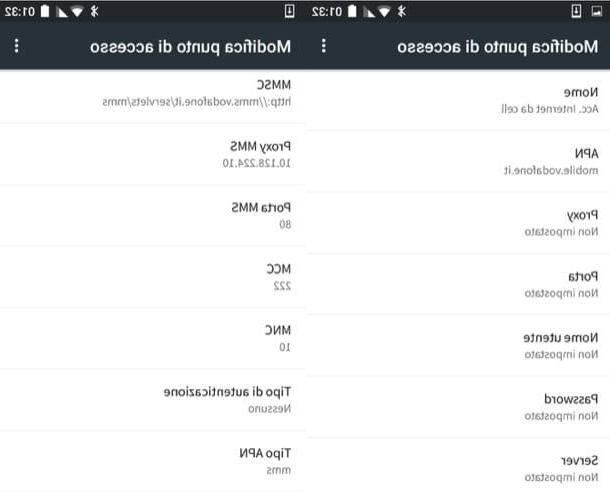
To complete the login, you must enter the combination of username and password of the router, inside the boxes you see on the screen: generally, this corresponds to admin / password or admin / admin. If you are unable to log in, try looking for the correct “coordinates” on the label printed on the router, on the one affixed to the sales package or in the pages of the device's user manual. In case of problems, I refer you to reading my tutorial on how to see the modem password, in which I have given you precise instructions on what to do.
Come configurare router TP Link
Once you have accessed the router configuration panel, you can configure it in all its aspects, using the buttons, menus and options available. The main features of the operating system installed on TP-Link network devices are illustrated below.
Overview
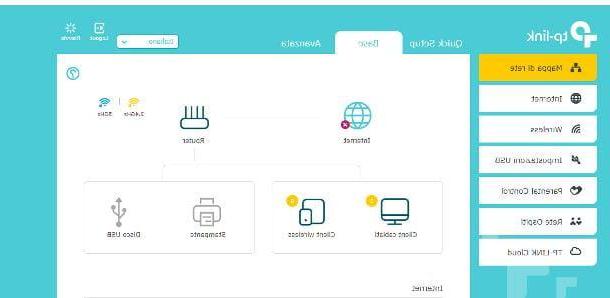
The TP-Link router management panel is usually divided into two large sections: the upper one, which allows you to perform quick configuration and to choose between the view dedicated to the basic options and that for the advanced options; and the side one, which instead allows you to navigate between the various menus and functions of the router.
By clicking on the tab Quick Setup you can start the first configuration procedure of the network device, during which you have to set up your own Country of residence, the time zone and Internet connection parameters. Many TP-Link modem routers have a automatic recognition, through which it is possible to instantly obtain the correct parameters to be used for connection to the network managed by your service provider.
Alternatively, you can manually specify the connection parameters, based on the "coordinates" suitable for the specific service provider: for example, you can find those of TIM on this page, those of Vodafone on this other page, those of WINDTRE on this site and those of Fastweb on its official website.
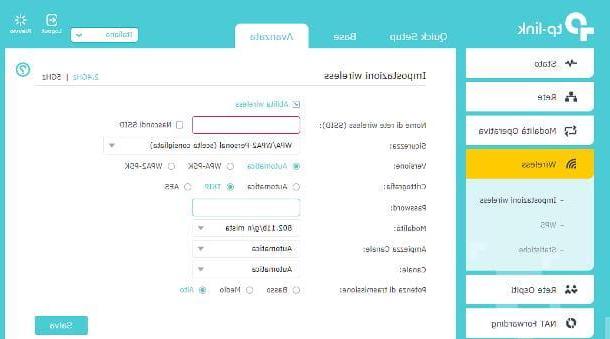
Once the Internet access configuration has been completed, the TP-Link initial configuration procedure ends with the adjustment of the parameters for the WIFI network: Using the menus and text boxes on the screen, you can specify the name of the wireless network, the operating band (2.4GHz, 5GHz or both), the network key to be used to protect it and, if necessary, the wireless channel.
Now let's move on to the functional options of the router: as you can imagine, the mode Basic / Basic allows you to access a set of limited settings, strictly essential for the basic configuration of the device; the mode Advanced / Advancedinstead, it displays all available options. Let me give you a comprehensive overview of the menu items available for the two modes.
- Network map (Basic): allows you to view the status of the Internet connection, the number of devices connected to the modem and their type.
- Internet (Basic): allows you to set the connection to the Internet by the router, automatically or by manually entering the parameters relating to your service provider.
- wireless (Basic / Advanced): Allows you to customize the name of the Wi-Fi networks generated by the router, the network password and the frequency band. In Advanced mode, you can also choose the channel for each network, activate / deactivate the WPS system and view the connection statistics.
- USB settings (Basic / Advanced): Configure the use of storage devices and printers connected to the router.
- parental control (Basic / Advanced): allows you to apply restrictions on navigation and network usage period for one or more connected devices.
- Guest network (Basic / Advanced): Allows you to configure “Guest” access, which is a separate and restricted Wi-Fi network, to be used to allow Internet access to guests and people outside your household.
- State (Advanced): Provides a comprehensive overview of the network interfaces configured in the router, the status of the Internet connection, that of connected devices, and so on.
- Network (Advanced): using the submenus present in this item, it is possible to configure Internet access by the router, its IP address, the settings relating to the LAN network profiles, the behavior of the DHCP server, the use of dynamic DNS and additional advanced routing options.
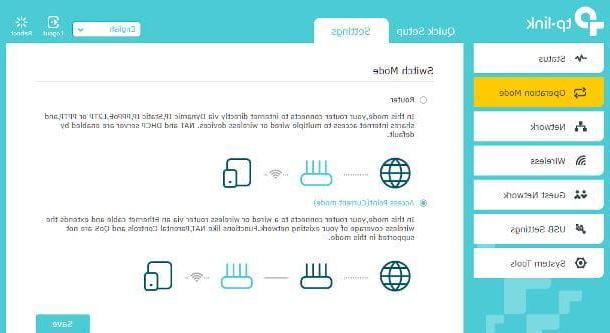
- Operative mode (Advanced): allows you to change the way the appliance is used: router, Access Point or Range Extender (where available).
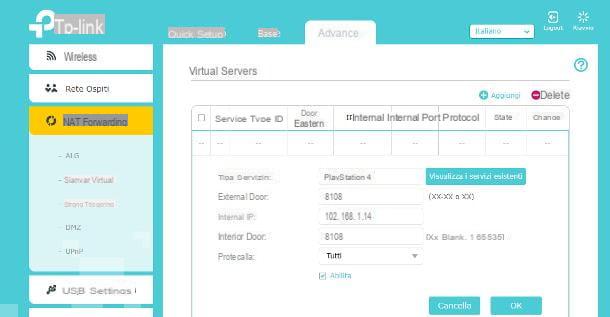
- NAT Forwarding (Advanced): This section allows you to open router ports with the use of virtual servers or triggering rules, define a demilitarized IP and configure automatic port opening via UPnP.
- QoS (Advanced): this is the section dedicated to setting the QoS mechanism integrated in the router, with the possibility of defining the rules manually.
- Safety (Advanced): Allows you to enable / disable the router's firewall, the DoS protection mechanism, allow / deny access to the network by certain devices, and to bind between IP and Mac, i.e. assigning a static IP address to a specific physical address.
- Server VPN (Advanced): Create a VPN server through the router.
- System tools (Advanced): Allows you to modify router parameters that are independent of Internet / network connections, such as date / time settings, turn on or turn off LEDs, updates, reset, and so on.
Opening the doors
Open the doors in a router it means unlocking the communication channels that some software and some devices use to communicate with the outside. The most common cases, at the time of writing this guide, are those of game servers and consoles. If you do not unlock the ports, it is not possible to host matches from outside, due to the NAT system.
To open the ports in your TP-Link router, you need to access the device administration panel, click on the tab advanced and select items NAT Forwarding > Server virtuali from the left sidebar. After that you have to click on the item Add and you have to fill in the form that is proposed to you with the "coordinates" relating to the door you want to open.
- In the field Type of service you must specify the name of the service for which you intend to unlock the door (eg PS4).
- In fields External door e Internal door you must enter the number of the door to open.
- In the field Internal IP you have to type the IP address of the device for which to unlock the door. If you don't know what it is, find out how to view IP address by reading the tutorial I wrote on the subject.
- In the menu Protocol you have to select the protocol of the port to open (TCP, UDP or All / ALL, for both protocols).
When the operation is completed, to make the rule operational immediately, put the check mark next to the wording Enable and his bottone award OK, in order to apply it. If you need to open the ports for commonly used software (e.g. FTP client, e-mail client, etc.) you can use the predefined rules accessible by clicking on the button View existing services.
How to configure TP Link router for Eolo
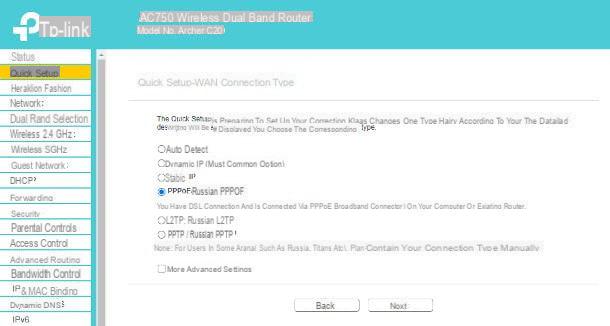
configurare router TP Link per Eolo, proceed as follows: after logging in to the router, click on the tab Quick setup, indicates the language and time zone to use and press the button NEXT.
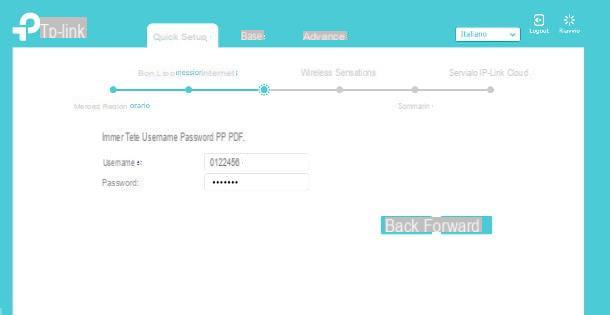
Pray, select the voice PPPoE/PPPoE Russia from the screen Connection typeclick on your button NEXT and indicate how username e Password those that were provided to you by Eolo during the connection phase.
Afterwards, press the button again NEXT and, if prompted, set the option NAT su Active; to finish, press the button again NEXT, define the name and Password of the Wi-Fi network generated by the router, using the options on the screen and finish everything by clicking on the buttons NEXT e end, to start the Internet connection test and finish the process.
How to configure TP Link router with Telecom
If you need to configure the TP-Link router for use with services Telecom, or rather, of TIM, make sure that its firmware is updated to the latest version available so that you can use the default profile of the network device and further simplify configuration.
Therefore, after inserting the cable coming from thetelephone entrance inside the door Internet of the router, access the latter as seen previously, use the drop-down menu located at the top right to set the language to cityno (if possible) and click on the tab Quick Setup, located at the top, or to the side.
Now, use the menus displayed to set the Region (presumably city) And the time zone (presumably GMT + 01.00 h) of membership, click on the button NEXT and select the item TIM/Alice_xDSL give menu to tendin ISP List, in order to choose the appropriate configuration profile.
Fatto ciò, click on your button NEXT and use the options offered to you, for configure the Wi-Fi connection (name e Password of the network, operating band and so on). Once all the necessary adjustments have been made, press the button again NEXT, wait for the Internet connection test to be successful and press the button Salta to avoid VoIP configuration (for which you will necessarily have to contact TIM, in order to receive the access credentials and adjustment parameters suitable for your line). Finally, click on the button end to complete the router configuration and finally make it operational.
If, for some reason, you are unable to use the router's preset TIM profile, do this: after specifying the language and time zone to apply, put the check mark next to the option PPPoE/PPPoE Russia visible on the screen Connection type, award-winning NEXT and indicate how username e Password connection, respectively, the phone number assigned to your line and word timadsl.
Afterwards, press the button again NEXT and, if necessary, type the value 835 in the field VLAN and imposta l'opzione NAT su Active; now, press the button again NEXT, set the WIFI network of the router in the way you deem appropriate and click again on the buttons NEXT e end, to end the process.
How to configure TP Link router as a repeater
Do you want to “recycle” your TP-Link router and use it as wireless repeater? No problem: almost all modern network devices produced by the Chinese company have this possibility. However, before proceeding, you must carefully check the data sheet of the router in your possession, to identify the supported connection mode: for example, almost all routers with modem functions (therefore connected directly to the ADSL, VDSL or FTTC network) can be used as Wi-Fi repeaters in mode Access Point, but they must be connected to the main modem via a Ethernet cable of good quality, better if Cat7 or higher.
See offer on Amazon See offer on Amazon See offer on AmazonInstead, there are routers of the TP-Link family that can be used with real functions range extender: in this case, it is sufficient to use the integrated functionality to connect the router to the main wireless network, without the need to put the two network devices in physical communication.
Before starting, I recommend that you get an Ethernet cable through which to connect the TP-Link router to be configured and the computer from which you are going to make adjustments.
If your TP-Link device only supports Access Point mode, you will also need a second Ethernet cable, long enough, to connect the router with the main modem. Below I'll explain everything in detail.
Access Point Mode (Ethernet connection)
To start, place the TP-Link router with Access Point functions in the position you think is most congenial, insert one end of the long Ethernet cable in the door Internet / WAN on the back of the router and connect the second end to one of the ports Ethernet present on the main router (the one directly connected to the Internet).
Once this is done, insert either end of the second network cable into one of the ports Ethernet of the TP-Link router with access point functions, connect the second end of the cable to the Ethernet port of the computer and turn on the network device, if you haven't done so yet.
Now, open the browser of your choice, access the router configuration panel as I showed you at the beginning of this guide, click on the tab Settings located at the top and then on the item Operative mode, visible in the sidebar of the router management interface. Once this is done, put the check mark next to the item Access Point and click on the button Save, to restart the router and change its operating mode.
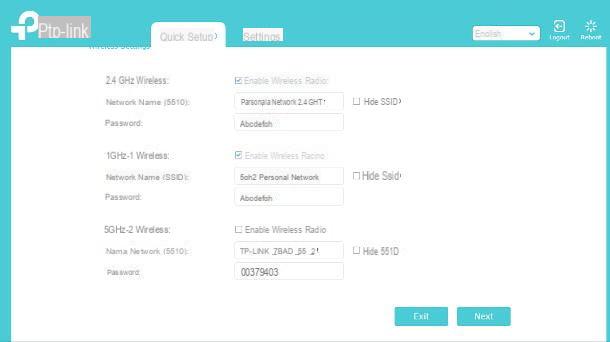
At the end of the restart, enter the TP-Link router management interface again, this time click on the tab Quick Setup and use the form that is proposed to you to specify the name the wireless network generated by the Access Point, together with the network key to be used to access it; remember to check the box Enable wireless, to activate the corresponding connection. Finally, make sure the boxes Hide SSID are not selected, otherwise the respective networks will not be visible.
To conclude, click on your button NEXT, take a look at the summary of the configured networks to verify that the parameters are correct and finally press the button Save, to save the network configuration and make the new Access Point operational, which should be able to take advantage of the Internet connection generated by the main router, making it available to the various devices (smartphones, tablets, PCs and so on) that will connect to newly configured Wi-Fi networks.
Range Extender mode (Wi-Fi connection)
If you're interested configurare router TP Link TL-WR940N in mode range Extender, everything is even simpler: the only requirement, in this case, is to position the device in question where the strength of the Wi-Fi signal to be “replicated” is high enough, about 60%. Please note that the procedure is valid, except for the system language and the position of the menu items, also for other TP-Link devices of the families TL ed Archer.
Once you have positioned the future Range Extender appropriately, connect the computer to it using the Ethernet cable, turn on the router (if you have not already done so) and open its management panel, as I indicated in the chapter beginning of this guide.
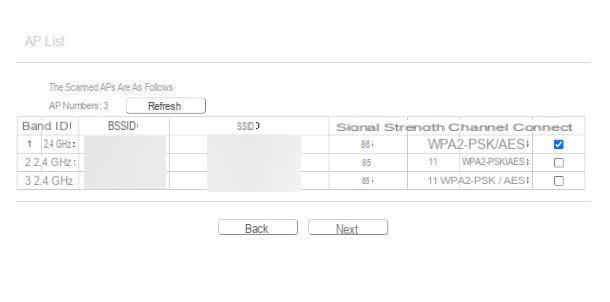
Now, click on the item Quick Setup visible in the left sidebar (or at the top), put the check mark next to the item range Extender and click on the button Next, to go to the next step.
Once this is done, put the check mark inside the box corresponding to name of the Wi-Fi network to extend (corresponding to the box Connect), check that the signal is strong enough by looking at the information visible in the field Signal Strength (must be at least 60%) and click on the button Next.
After this step too, put the check mark in the box next to the wording Enable and corresponding to the type - or types - of Wi-Fi network to be created (2.4GHz and / or 5GHz) and specifies the access key of the original wireless network, within the range Password.
Now, if you intend to make the extended network name identical to that of the original network, put the check mark next to the item Copy from Root AP; otherwise, check the box next to the wording Customize and assign the name you prefer to the extended network (s) (the access key will remain identical to that of the original network).
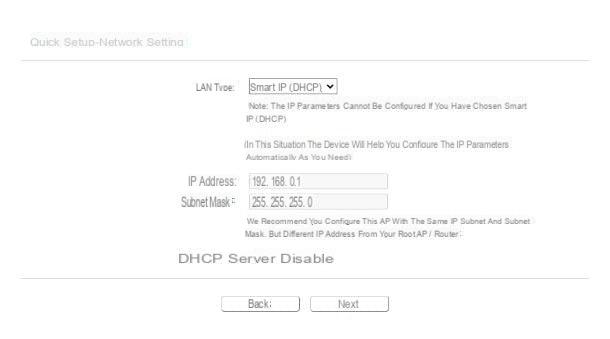
To conclude, click on the button again Next, set the drop-down menu LAN Type on the option Smart IP (so that the Access Point can configure its own IP address on its own) and click on the buttons Next e Finish, to complete the configuration and make the new Access Point operational.
How to configure TP-Link router