Audacity (Windows / Mac / Linux)
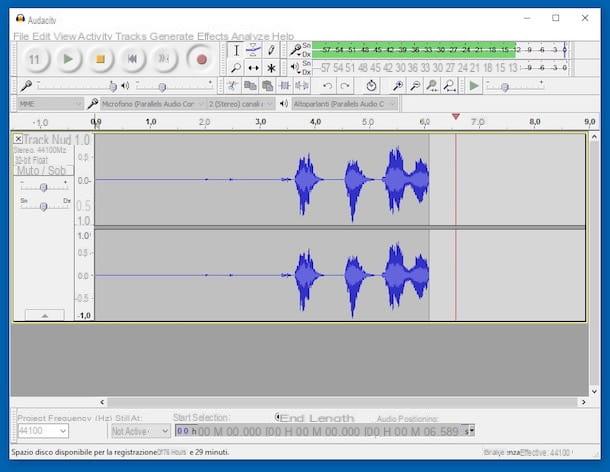
The first of the useful tools I want to talk to you about is Audacity. It is a terrific free and open source program for doing audio editing. It is available for Windows, Mac and Linux. With it, you can play, edit and revolutionize any type of music or audio file very quickly and easily.
Among its infinite features, there are also those that allow you to record the voice through the microphone of the PC and mix it with music or other audio narrations. To save the final result in MP3, you need to install an ad hoc plug-in (for more info on this, read my tutorial dedicated to the subject).
You ask me what to do to be able to use it for your purpose? I'll point it out to you right away. First, go to the program download page and click the button Download, so as to start downloading the version of Audacity suitable for the operating system you are using on your computer.
Once the download is complete, if you are using Windows open the executable file obtained (eg. audacity-win-2.1.0.exe), cheap with Run, its Si and OK, its NEXT five times in a row and up Install. Then complete the setup by pressing on end.
If, on the other hand, what you are using is a Mac, open the .dmg package obtained and drag the folder Audacity in the folder Applications of macOS. Then start the program by opening the Launcher and clicking on its icon. If, in doing so, a window relating to the use of plugins appears, click on OK.
Regardless of the operating system used, now that you see the Audcity window on the screen, presses the button Register which is at the top, in order to start the audio recording. During the work you can help you with the recording monitor that is at the top right to keep track of the progress of the same.
If necessary, both during and after recording you can intervene on parameters such as balance and gain by moving the curious special ones that you find on the adjustment bars on the left. You can also adjust the audio volume by moving the slider on the relationship bar with the next to microphone which is located at the top.
When you want, you can stop the registration by simply clicking on the button Ferme which is always on top. If, on the other hand, you want to stop it momentarily, you have to worry about the button Pause, while to listen to it again you have to click on the button Play, both present on the toolbar.
To save the recording on your computer, just click on the menu Fillet, to choose Export audio ..., indicate position, title and format of the output file and press on Save.
Evernote (Windows / Mac)
Evernote it is not audio processing software, but one of the most popular services for taking and managing annotations on multiple devices while keeping data synchronized online. In addition to the classic notes, however, it offers the possibility of making audio memos using the microphone of the PC, which is why I have chosen to tell you about it in my guide dedicated to programs to record the voice.
The application is free but there are also paid plans for the most demanding. It is compatible with all major operating systems for computers, tablets and smartphones and all notes, including audio, are automatically synchronized on the various devices used over the Internet.
To use it on your computer, go to the Evernote download page and wait for the software download to start and finish.
When the download is complete, if you are using Windows open the .exe file obtained, press on Si, select the voice I accept the terms of the license agreementpiggy back his Install and complete the setup by pressing on Ends.
If, on the other hand, what you are using is a Mac, open the .dmg package you just obtained, press on Agree and drag the app icon to the folder Applications of macOS. Then double click on it and select apri in response to the warning you see appearing on the screen.
At this point, regardless of the operating system you are using, you need to register for a free account in order to start using the program. Then fill in the fields E-mail: e Password: that you find in the Evernote window with the required data and click on Subscribe.
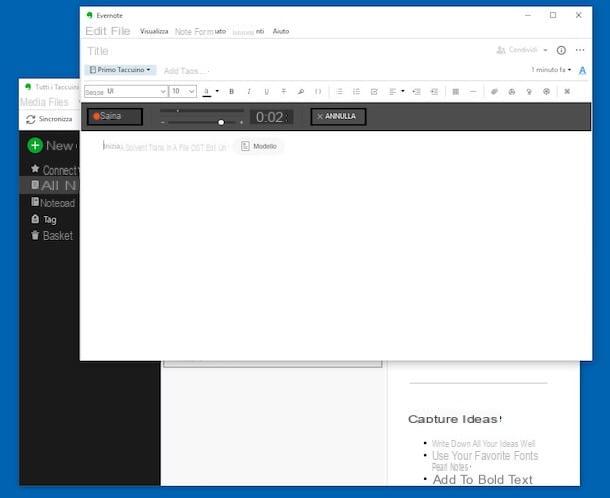
When you see the main window of the software you can finally begin to serve your purpose. To create a voice note, click on the button New note at the top left, click on the button with the microphone which is on the toolbar in the window that has opened and presses the button Register.
While recording, you can adjust the audio level by moving the slider next to the symbols [+] e [-]. When you want to, you can stop recording by clicking on the button Save. The recording will then be added to the note being created as a WAV file. To save the note, simply close the relevant window.
FREE Hi-Q Recorder (Windows)
FREE Hi-Q Recorder is one of the few free voice recording programs (but possibly available in a paid version, with extra functions) designed specifically for this purpose.
It is ideal for creating podcasts, recording meetings or audio commentary of various kinds. It allows you to record not only the voice from the PC microphone but also the audio from many other internal and external sources to the PC. It only works on Windows.
To use it, connected to the relevant download page on the Softpedia website, click on the button Download Now which is in the upper left and then up Softpedia Miror (US) in the window that opens, in order to start the software download on your computer.
When the download is complete, open the .exe file you just obtained, click on Si and Next. Select the voice I accept the agreement and click to anchor your Next five times in a row, come on install and finally presses on Finish. When the installation process is complete, the computer will restart.
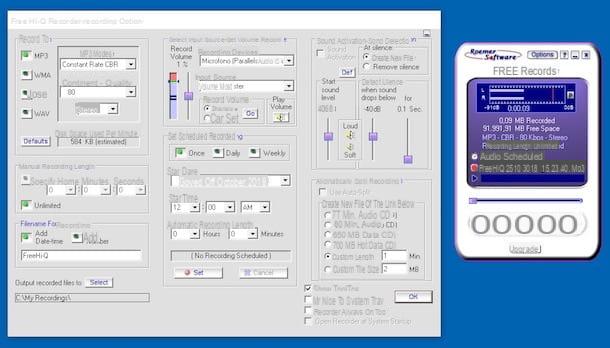
At the next login, go to Start menu and start the program by clicking on the link attached to it. Once the FREE Hi-Q Recorder window is displayed on the desktop, press the button to start recording Record.
To stop it, just press the button Stop. If you want to pause it, you have to press the button Pause. After stopping the recording you can listen to it again by simply clicking on the button Play.
By clicking on the button Options which is at the top right you can instead access the program settings and choose the format in which to save the audio recording performed, the output folder, adjust the microphone audio level, set automatic recording on specific days and times and much even more.
mp3DirectCut (Windows)
mp3DirectCut it is undoubtedly the ideal solution for those who love to go straight to the point without too many frills. It is in fact a free program with reduced graphics that allows you to cut and record MP3s, as you can guess from the name itself, using the computer microphone.
It is only for Windows and its interface is completely translated into your language. The only thing that needs to be taken into account is also in this case the same plugin needed for Audacity is required to export the recordings to MP3 (which must be installed following the instructions proposed automatically when starting the software).
To use it, first visit the program website, locate the section Download mp3DirectCut and click on one of the links below (eg. fosshub.com), in order to start downloading the software on your computer. If the download does not start automatically, click on the link or button to proceed with the download.
When the download is complete, open the .exe file you just obtained and click on Run and Next twice. If in doing this an error message or access denied message appears, open the file with administrative privileges by right clicking on it and choosing the item Run as administrator give the menu to compare.
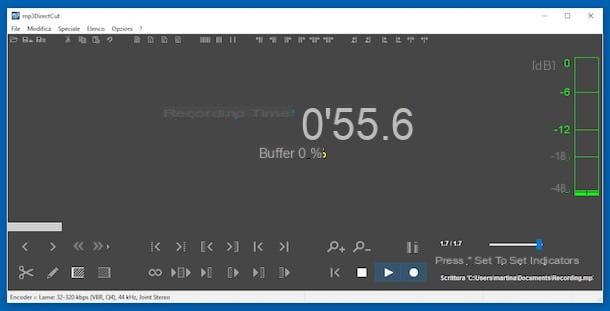
Once the installation is complete, start the program by clicking on the relative link that has been added to Start menu then select thecityno from the drop-down menu for choosing the language in the window you see appear and presses the button Use and stay, in such a way as to translate the program interface.
Once the main window of the software is displayed, to start recording the voice click on the button with the circlet which is at the bottom right and on the button Play adjacent. To stop playback, press the button with the square which is always at the bottom right.
To listen to the recorded audio, just press the button Play. Note that all recordings are automatically saved in the folder Documents of Windows.
Solway's Audio Recorder (Windows)
Another essential but extremely useful and feature-rich program is Solway's Audio Recorder. It allows you to record your own voice or sounds from PC, CD / DVD, VCR, etc. quickly and easily in different quality grades.
Recordings can be made directly to MP3, WMA or OGG using the real-time conversion function included in the software. It also allows you to capture streaming audio and works with all versions of Windows.
To download it to your PC, connect to the program's website and click on the link Click here to download the latest version placed on top.
When the download is complete, open the .exe file obtained, click on Si, its Next and install. Then complete the setup by pressing on Finish.
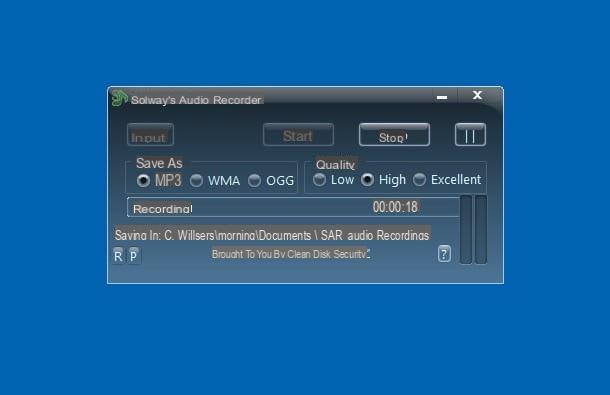
Now that you see the software window on your desktop, select the format in which you want to save the recording by choosing the option you prefer among those available under the heading Save as and set the quality by choosing from the options under the heading Quality. Then click on the button input to set the recording source and to Home to start it.
When the operation is complete, just click on the button Stop. By default the files are saved in the folder Documents. If you just want to pause the recording, press the button with the two perpendicular bars which is on the right.
QuickTime Player (Mac)
Maybe not everyone knows but QuickTime Player, the software included "standard" in macOS to play video files, is also fully eligible among the programs to record the voice as it includes a special function used precisely for the purpose in question.
It is in fact capable of capturing audio from the Mac's microphone and, more generally, from any audio input device connected to the computer. All recordings made are saved in M4A format.
To use it in this way, first start the application by clicking on its icon in the folder Other of Launchpad then select the menu Fillet and choose the item New audio recording.
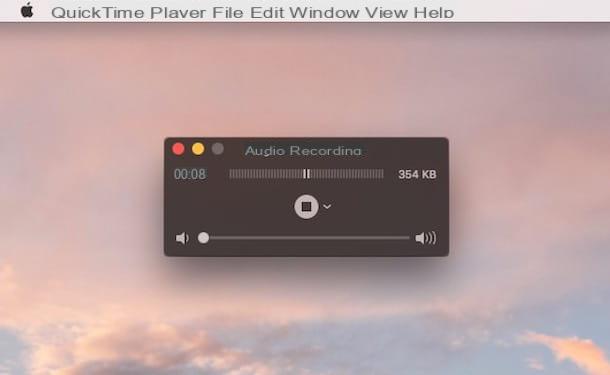
Then click on down arrow which stands next to the pulsating circolare rosso, select the device from which to record audio (eg. Microphone internal) e cheap with REC to start audio recording.
When you see fit, you can stop recording by clicking on the button Stop. At the end of the recording, you can also listen to the audio again by clicking on the button Play.
To proceed with saving the audio file instead, go to the menu Filletclick your Export, select the option Only audio… and indicate the folder where you want to save the file. Done!
Programs to record your voice