Create a hidden partition on Windows
Be vuoi scoprire how to create a hidden partition and use a PC Windows, the first step you need to take is to access the disk management utility, through which you will then create the partition to hide.
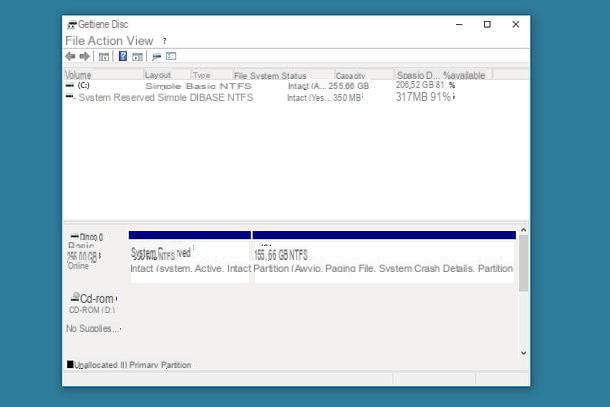
Clicca, quindi, sul pulsating Home (the flag icon located in the lower left corner of the screen), search for the term "partitions" in the menu that opens and select the icon Create and format hard drive partitions from the search results.
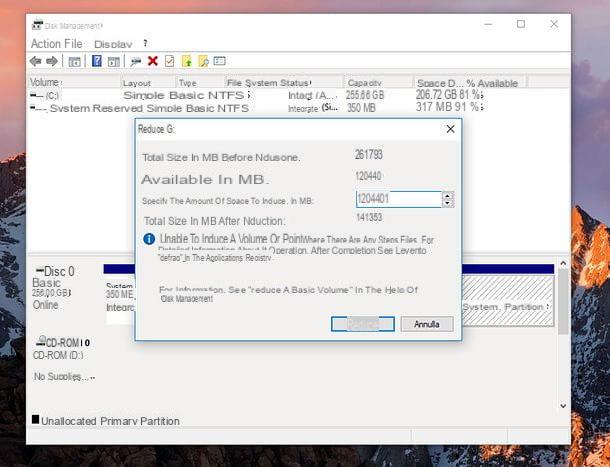
In the window that appears on the screen, right-click on the box for the volume you want to shrink to create the new partition (presumably C:) and select the item Turn down volume from the context menu. At this point, wait a few seconds for the disk structure to be examined and use the field Specify the amount of space to shrink, in MB to specify the size of the new partition (i.e. the amount of space to subtract from the currently selected partition). Then click on the button Reduce And that's it.
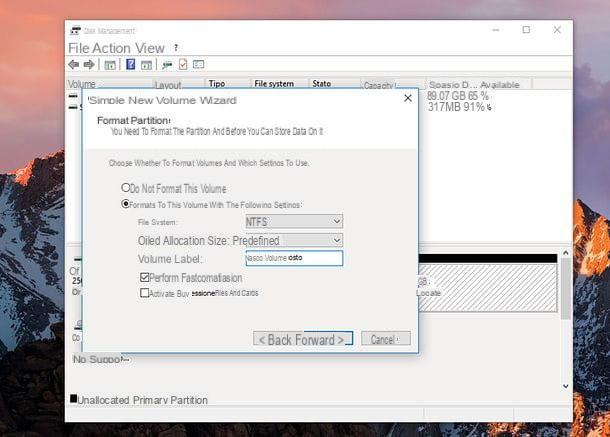
You will get an amount of unallocated space to use for creating your partition. To create the new partition, right click on the box for the unallocated space and select the item New simple volume from the menu that appears. In the window that appears on the screen, click the button NEXT, specify the amount of space to allocate to the partition using the field Simple volume size in MB (I advise you to use all the unallocated space) and go again forward.
At this point, choose the drive letter to be assigned to the new partition using the appropriate drop-down menu, presses on NEXT, choose the file system (Eg. NTFS) And the name to assign to the volume and click on NEXT e end but I will complete the procedure.
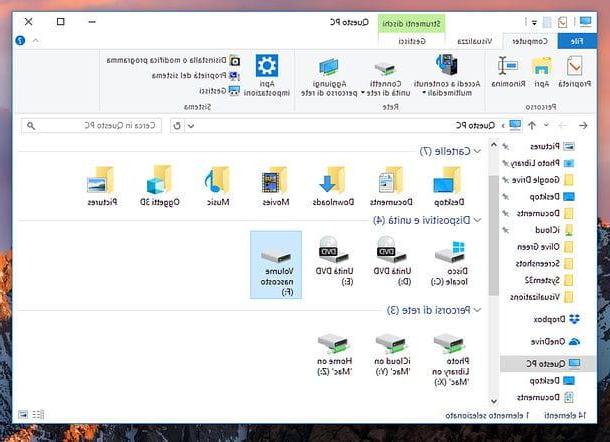
Perfect: now you have the partition to hide… but you haven't hidden it yet! To perform this operation and therefore make it invisible inside theFile Explorer Windows, you need to remove its drive letter. There are two paths you can take to achieve this: use the disk management utility or give some commands from the Prompt of Windows.
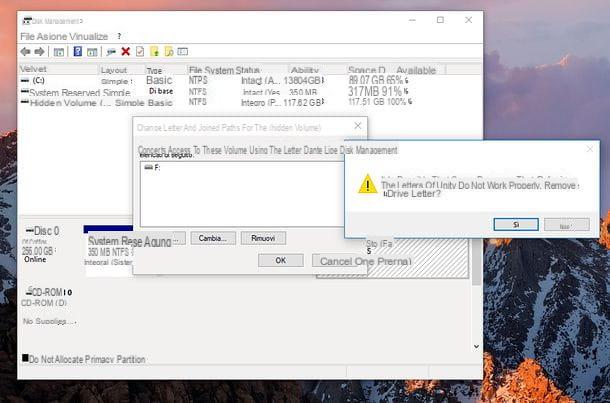
To act directly from the disk management utility, right-click on the box relating to the partition to hide and select the item Change drive letter and path from the context menu. In the window that opens, select the letter currently assigned to the drive, click on the button Remove and confirm by pressing the button Yes.
Mission accomplished! From now on, the partition will be visible in the disk management utility but not in the File Explorer and in most programs used on the PC (as it does not have a drive letter). To go back and make the partition visible again, you need to assign it a drive letter again.
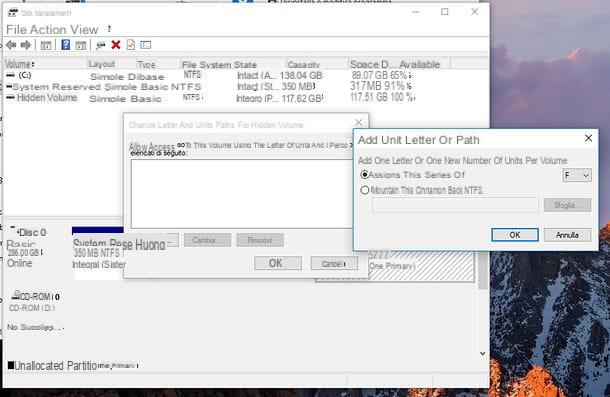
Then go back to the disk management utility, right-click on the box relating to the partition to be restored and select the item Change drive letter and path from the context menu. In the window that opens, click on the button Add, select the letter to be assigned to the drive through the appropriate drop-down menu and save the changes by clicking on the button OK.
Do you prefer to act from Command Prompt instead of the Windows disk management utility? Then click on the button Home (the flag icon located in the lower left corner of the screen), search cmd in the menu that opens, right-click on the first search result and select the item Run as administrator from the menu that appears on the screen, to launch the Command Prompt with administrator privileges.
In the window that opens, give the command diskpart and then the command list volume (both followed by pressing the key Submit on the PC keyboard), in order to display the list of all partitions available on the computer.
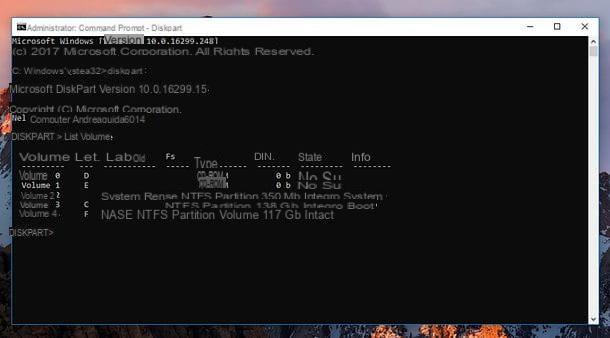
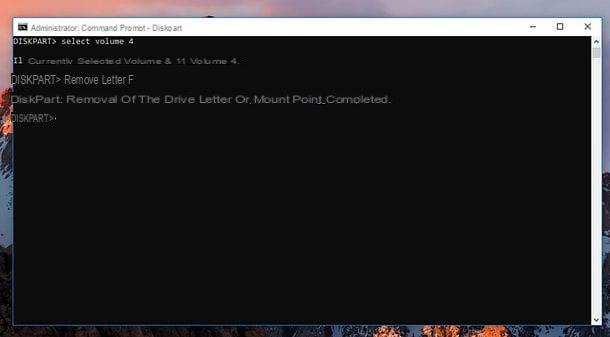
At this point, enter the command select volume x (where instead of x you have to type the number for the partition to hide), come on Submit and use the command remove letter x (where instead of x you have to type the drive letter to hide) to remove the letter of the selected partition and thus make it inaccessible from the File Explorer and other programs running on the PC.
From now on, the hidden drive will only be visible in the utility diskpart Command Prompt and partition management software (e.g. the partitioning utility included with Windows). In File Explorer and all other programs, it will be invisible as it lacks a drive letter.
To restore its view and access all the files inside it, just reopen the Command Prompt with administrator privileges and give the following commands.
- diskpart - to start the disk management utility in the prompt.
- list volume - to view the list of all partitions available on your computer.
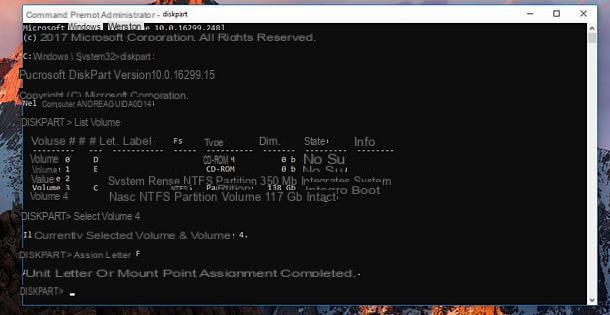
- select volume x (where instead of x you have to type the number of the partition to be restored) - to select the partition to be made visible again.
- assign letter x (where instead of x you have to type the drive letter to assign to the partition to be restored) - to restore the partition and make it visible again in the File Explorer.
You can repeat this "game" whenever you want. The files inside the partition will always remain in place.
Create a hidden partition on Mac
I use a Mac? No problem, you can also create a hidden partition on your computer and keep your files away from nosy nosers. To do this, first start theDisk Utility located in the folder Other of Launchpad (the rocket icon found on the Dock bar) or that you can find by searching in Spotlight (the magnifying glass icon located at the top right).
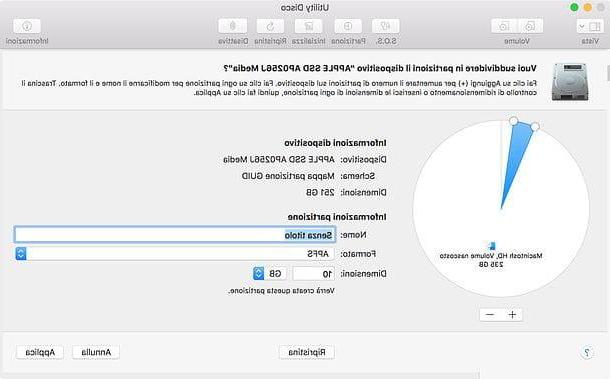
In the window that opens, select the disk you want to partition (presumably Macintosh HD) from the left sidebar and click on the button Partition which is located at the top. After that, if you are using a recent version of macOS and have formatted your drive with the APFS file system, choose to create a new volume (in order to create a new volume that shares the storage space with the main volume, without actually partitioning the disk), otherwise choose the item partition and proceed with disk partitioning.
If you have chosen to create a new volume, type the name you want to assign to it in the appropriate field that appears on the screen, set the option APFS in the drop-down menu Size and click on the button Add to complete the operation.

If, on the other hand, you have chosen to partition the disk, press the button [+] present in the window that appeared on the screen, set the dimensions and name to assign to the partition in the appropriate text fields, choose the option APFS in the drop-down menu Size and click on the button Apply to complete the operation.
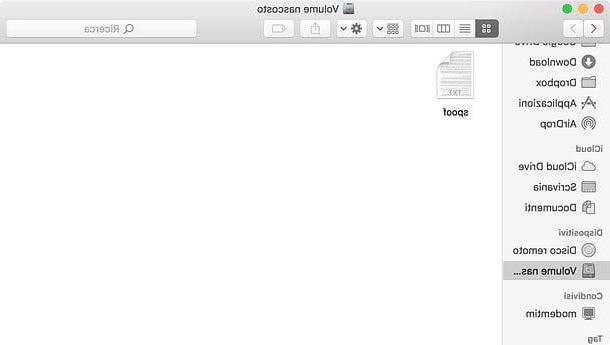
Now you just have to temporarily deactivate the partition you want to keep hidden, so that it does not appear on the macOS desktop or in the Finder. To achieve this, all you have to do is open Disk Utility, select the volume from the left sidebar and click the button disable present at the top.
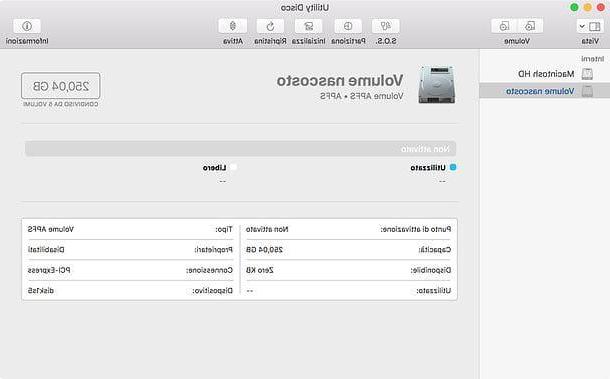
Subsequently, to make the partition visible and usable again, you have to go back to Disk Utility, select it from the left sidebar and press the button activate. All files on the partition will remain in place.
Other solutions to create a hidden partition
Don't the solutions I just suggested to you seem advanced enough? Indeed you are right. If your nosy friends or relatives have above average computer skills, they could easily trace hidden partitions and access their content. If you want to prevent this from happening, you have to resort to more drastic measures and try your hand at using programs for data encryption.
My advice, in particular, is to create a encrypted volume password protected with all your most important files inside. To achieve this you can use VeraCrypt: a free and open source program available for Windows, macOS and Linux, which allows you to create encrypted volumes (therefore container files, not real disk partitions) and mount them if necessary (after entering the right password) to view and edit the files inside them. Now I'll explain how to use it.
To download VeraCrypt on your computer, connected to the official website of the program and click on the item VeraCrypt Setup xx.exe if you use a Windows PC or on voice VeraCrypt_xx.dmg if you are using a Mac. If you are using a Mac, you must also download the program OSXFUSE necessary for VeraCrypt to work by connecting to this Web page and clicking on the item FUSE for macOS xx located in the right sidebar.
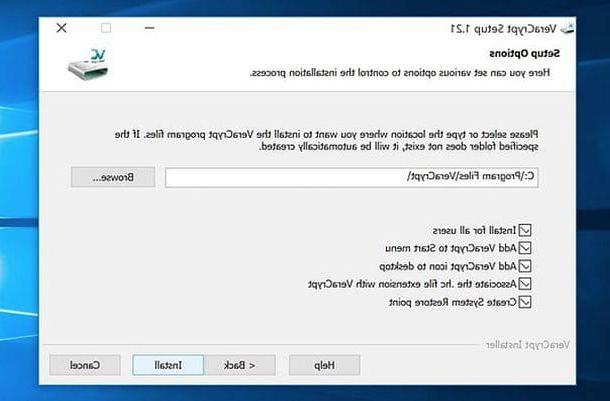
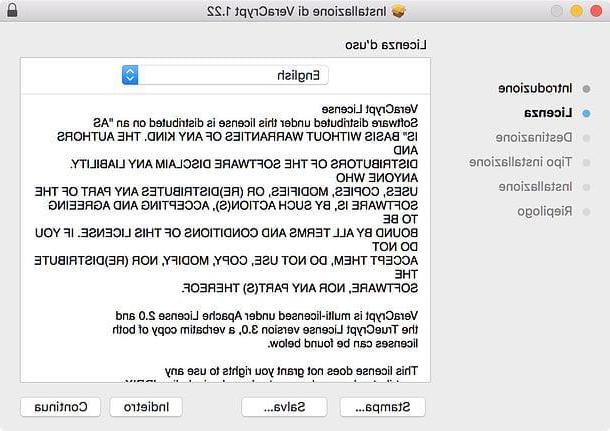
When the download is complete, if you use Windows, open the VeraCrypt installation package and click on the button Yes. Then place the check mark next to the item I accept the license terms and complete the setup by clicking on the buttons Next, Next, install, OK, Finish e No.
It was used MacOSInstead, open the FUSE for macOS installation package and click the button first Continue three consecutive times and then on Accept, yet Continue e Install. After that type in the admin password of the Mac, click on the buttons Install software, OK e Open Security & Privacy System Preferences, pigia sul pulsating Allow that appears in the System Preferences window and finish the setup by clicking on Close e Move.
When the OSXFUSE installation is complete, open the VeraCrypt installation package and click on the button first Continue twice in a row and then on Accept e Install. At this point, enter the Mac administration password and complete the setup by clicking on Install software, Close e Move.
Once the VeraCrypt installation is complete, start the program and translate the program interface into your language by going to the menu Settings> Language, selecting the item cityno from the window that opens and clicking on the button OK.
(the operation is feasible only on Windows, on macOS there is only the English language).
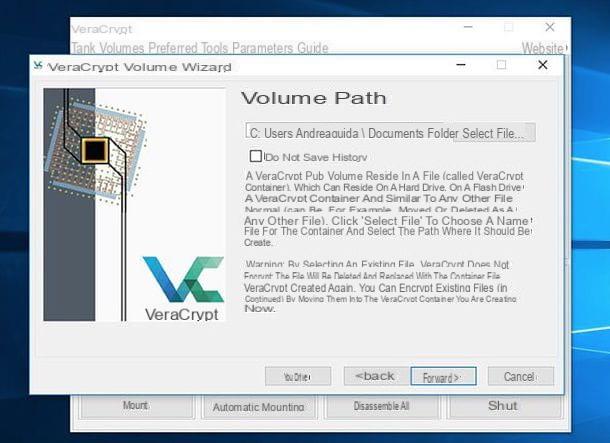
At this point, press the button Create a volume, select the voice Create a crypto fileclick your NEXT and choose to create a standard VeraCrypt volume. Then use the button Select file to choose the folder in which to save the encrypted volume and click on the button NEXT I will continue.
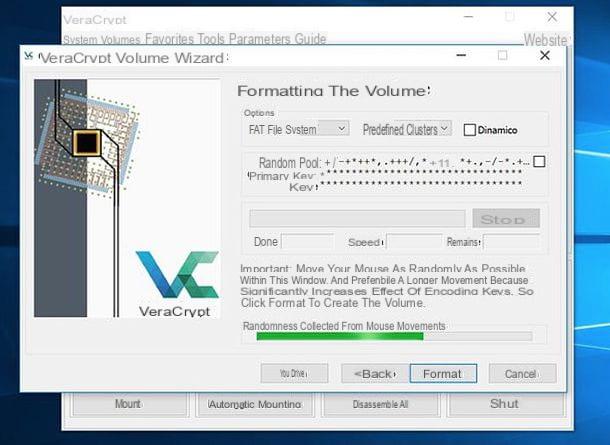
Now you have to choose thecoding algorithm el 'confusion algorithm to use to encrypt the volume: if you don't know where to put the manuals, leave the default settings active (BEA e SHA-512), Go forward and choose the maximum dimensions which must have the volume using the appropriate text field.
Once this choice has been made, set the Password to use to access the files on the volume, choose the file system to use (prefer exFAT if you intend to use the volume on both Windows and macOS without having to submit to the 4GB per file limitation typical of the FAT32 file system) and that's it.
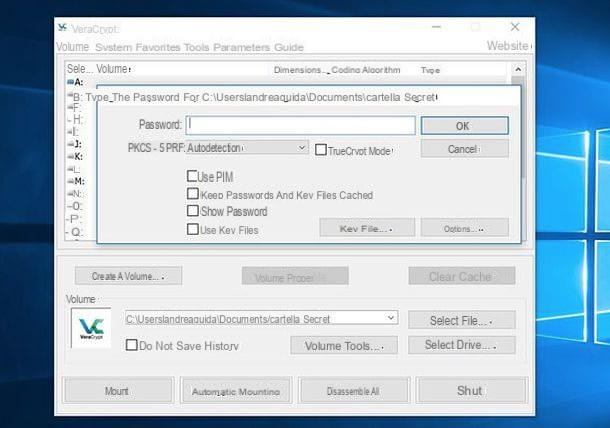
Once the creation of the encrypted volume is complete, to mount it and insert files inside it, open VeraCrypt, select one drive letter from the appropriate drop-down menu, click on the button Select file and select the volume file. Then press the button Monta, type the Password volume unlock button and click on OK to access the latter via theFile Explorer Windows or the Finder Mac. When finished, you can unmount the volume by clicking on the button Disassemble by VeraCrypt. Easy, right ?!
If you still have any doubts about how VeraCrypt works, consult my tutorial on how to hide a folder on your PC where I told you in more detail about the program.
How to create a hidden partition