How to create ISO files from CD / DVD
Would you create ISO files starting from yours CD or DVD but you don't know which resources to rely on? Then use the ones that I will point out below, following the relevant instructions for use. I assure you it's much simpler than you might think.
CDBurnerXP (Windows)
If you want to create an ISO image of your CDs or DVDs without wasting time, I recommend you try CDBurnerXP: This is a free burning software available for systems Windows which can be started without installing and offers many interesting functions, first of all the one to transfer the contents of a disk into an ISO file.
If you are ready to take action, download CDBurnerXP by connecting to its official website and clicking on the item first More download options and, subsequently, on the link 64bit or on that 32-bit (x64 compatible), depending on the version of Windows installed on your PC, which you find in correspondence with the wording Portable version.
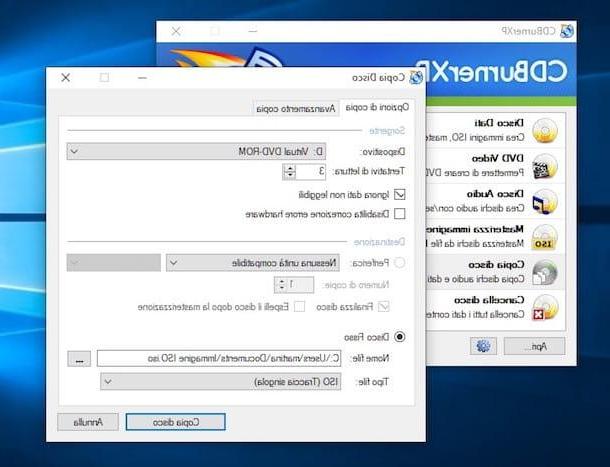
When the download is complete, open theZIP archive just obtained and extract the contents to any folder. Then start the file cdbxpp.execlick on your bottone OK to confirm the use of the your language and select the item Disc copy from the window that opens.
Insert, therefore, the CD / DVD of which you want to obtain the ISO image in the burner connected to the computer and put the check mark next to the items Ignore unreadable data e HDD in the CDBurnerXP window.
At this point, award your bottone [...], select the folder in which to save the ISO image of your CD / DVD, make sure that in the drop-down menu File type the option is set ISO (otherwise you can do it yourself) and click on the button Disc copy to start creating the image file. It will take a few minutes. In case of reading errors the file will be created anyway "skipping" the defective points.
ImgBurn (Windows)
Another tool you can rely on to create ISO files is ImgBurn. Haven't you ever heard of it? Strange, it is quite a famous program. Either way, no problem: we fix it instantly. ImgBurn is a freeware program for operating systems only Windows which allows you to perform various copying and burning operations and which, among the many functions offered, also allows you to create ISO images from CDs and DVDs.
To download it to your PC, go to the program's website, select the link Mirror x - Provided by MajorGeeks and, on the new page that is shown to you, click on the wording Download @ MajorGeeks. Then, go to this other web page and download the file for the your language translation of the program (by default, the ImgBurn interface is in English).
At this point, open the .exe file obtained previously and, in the window you see appear on the desktop, click on the buttons Yes e Next. Then put the check mark on the box I accept the terms of the License Agreement, click the button again Next four times in a row and finish the setup by pressing the buttons Yes e Close.
Now, extract the file in your languagen.lng of the translation fromZIP archive you previously downloaded and move it to the path C: Program FilesImgBurnLanguages Windows. If you are asked for confirmation to complete the operation, click the button Continue.
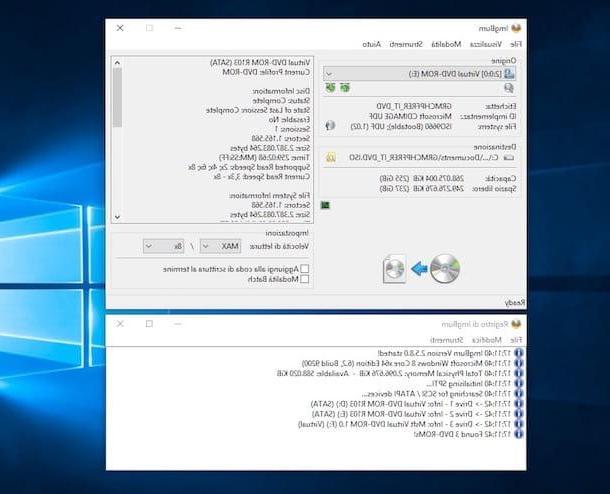
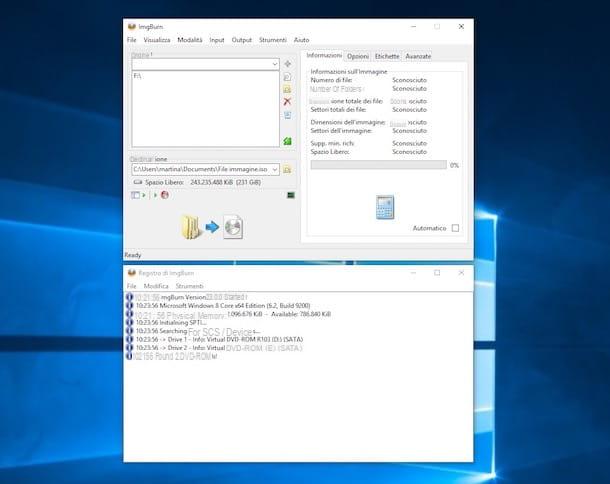
Now, start ImgBurn via the collegamento added to desktop or from Start menu, insert the CD / DVD of your interest in the drive connected to your computer and, in the software window displayed on the screen, click on the button Create a disk image.
Then select the drive for your burner from the drop-down menu Origini located at the top, indicates the path in which to save the ISO file that will be created and the name you want to assign to it after clicking on the gialla poster (placed a little lower) and start the procedure to create the ISO image by clicking on the button with i two CDs at the bottom left.
Utility Disk (macOS)
I use a Mac? In that case, you can rely on aa to create ISO files Disk Utility, the disk and partition management tool included by default in all versions of MacOS.
To use it, start it by clicking on its icon (the one with the hard disk and the stethoscope) found in the folder Other of Launchpad. Alternatively, you can open Disk Utility from the path Applications> Utilities say macOS, using Spotlight or by exploiting Crab.
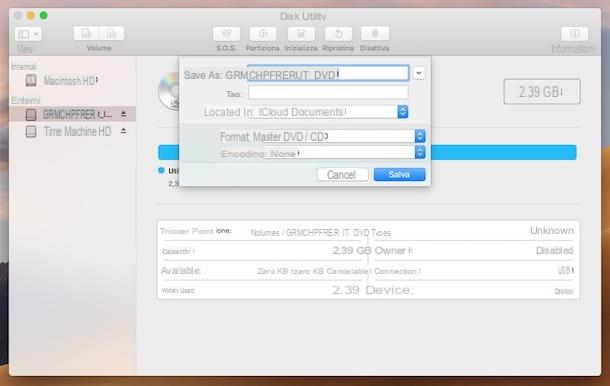
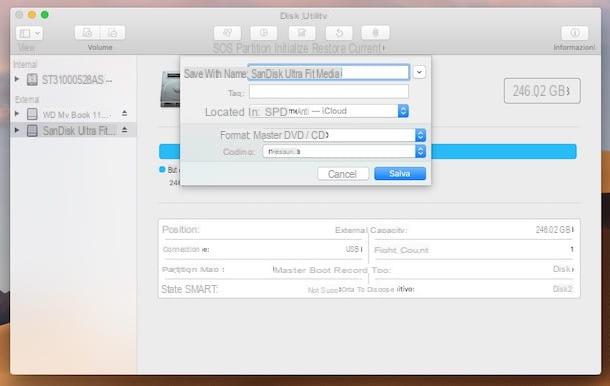
Once the Disk Utility window is displayed on the desktop, insert the CD / DVD from which you want to obtain the ISO image into the burner connected to the Mac, select the name of the latter in the left sidebar of the program window, click on the item Fillet attached to the menu bar (top left) and select the wording New image, then choose the option Image from "[disc name]".
Then type the name you want to give the ISO file you are about to create in the field Save as, specify the location where you want to save it using the drop-down menu located in, scegli l'opzione DVD / CD master from the menu Size, the voice none from the menu Encode and click sul pulsating Save.
Once this is done, the creation of the image file will start. Eventually, however, you will find yourself in the presence of a CDR file which you can easily transform into ISO by issuing a specific command from terminal.
So, open it by clicking on its icon (Quella with the black window and the command line) present in the folder Other of Launchpad, or recall it from the path Applications> Utilities say macOS, using Spotlight or through the Launchpad and, in the window you see appear on the screen, type the following command.
sudo hdiutil makehybrid -iso -joliet -o [ISO path] [CDR path]
Replace the values [ISO path] and [CDR path] with, respectively, the complete path of the ISO file to be created and of the source CDR file. Finally, hit the button Submit on your Mac keyboard and type the Password of your user account on macOS. Done!
Burn (macOS)
Always if you are using MacOS, as an alternative to Disk Utility you can turn to Burn Energy Drink to create your ISO files: it is a free application that allows you to carry out any type of burning operation as well as to fulfill the purpose of this guide. Unfortunately it has not been updated for some time, but it is also fully functional on the most recent versions of the Apple operating system.
To download it to your Mac, visit the program's website and select the link Download 64-bit version which is on the right. Once the download is complete, extract theZIP archive obtained and move theBurn icon in the folder Applications of macOS. Then right click on it, select the item apri from the menu that appears and press the button apri in the window on the screen, in such a way as to start the software, however, going around the limitations imposed by Apple on applications from non-certified developers (operation that must be carried out only at the first start).
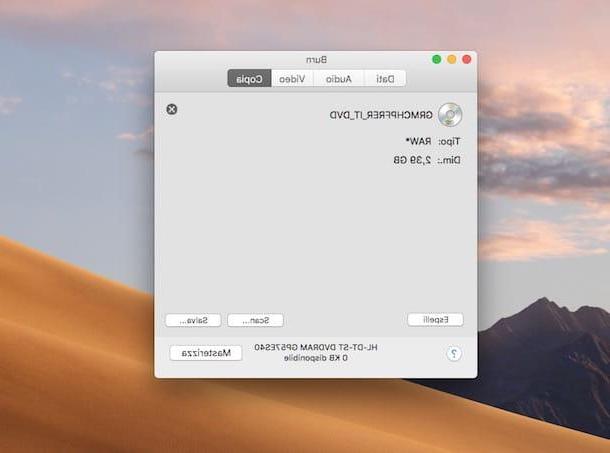
Now that you see the main screen of the software, insert the CD / DVD from which you want to obtain the ISO file into the burner connected to your Mac, select the tab Copy and click sul pulsating Scan located at the bottom right.
Finally, indicate the drive of your CD / DVD player from the dedicated drop-down menu and click on the button Save. The generated ISO file will be saved in the folder Documents> Temporary Burning from the Mac.
How to create ISO files from USB
As I told you at the beginning of the guide, it is also possible to create ISO files starting from the content of one USB pendrive. If this interests you, below you will find indicated which tools you can use to succeed and how to use them.
ImgBurn (Windows)
To create ISO files from USB on Windows you can take advantage of ImgBurn, the program I told you about in the chapter at the beginning of the article. To exploit it for the purpose in question, start the program, connect the pendrive on which you want to intervene to the computer and, in the program window that has appeared on the screen, select the option Create a new image.
At this point, drag in the ImgBurn window thependrive icon found in the sidebar of File Explorer Windows (you can access it by pressing the icon of the gialla poster on taskbar), indicate the location where you want to save the ISO file to be generated by clicking on the icon with the yellow folder and the magnifying glass that you find in correspondence of the field Destination, and press the button with the folder and disk located at the bottom, to start the procedure.
If a warning appears that you have not specified a label for the volume, click the button Yes to allow ImgBurn to create it automatically and wait for the procedure to be completed. Then press the button OK And that's it.
Utility Disk (macOS)
Also on MacOS you can create ISO files starting from the pendrives that you connect to the computer using a resource I have already told you about: Disk Utility, the tool included "standard" in the Apple operating system described in the step in the first part of this guide.
To use it for the purpose in question, start Disk Utility, connect the key from which you want to obtain the ISO image to the Mac, select the name of the device in the left sidebar of the program window, click on the item Fillet attached to the menu bar (top left) and select options New image e Image from "[disc name]".
At this point, the steps you need to take to complete the procedure are practically the same as I have already indicated in the previous lines, as regards CDs and DVDs.
How to create ISO files from folder
Finally, I want to explain to you how to create ISO files starting from one folder. To do this, use the tools he will report to you below and follow the relevant instructions for use.
ImgBurn (Windows)
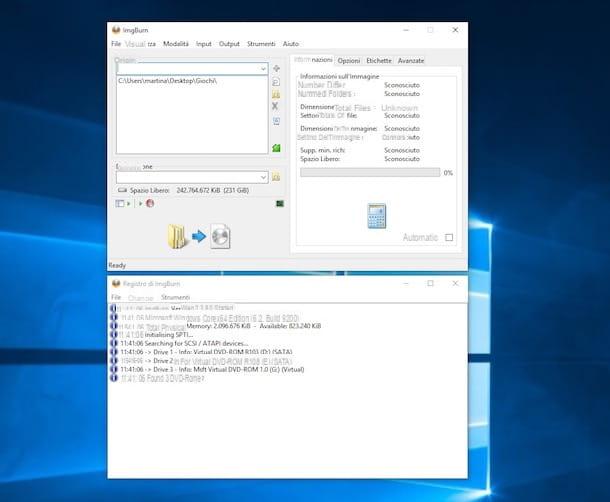
As for the operating systems Windows, you can turn to the aforementioned ImgBurn. To use it for this purpose, start the software, select the option Create a new image in the program window and drag the folder you want to convert to ISO over it.
Now specify the location on your computer where you want to save the ISO file you are about to generate by clicking on the icon with the yellow folder and the magnifying glass that you find in correspondence of the field Destination, and press the button with the folder and disk (located below) to start the procedure.
Utility Disk (macOS)
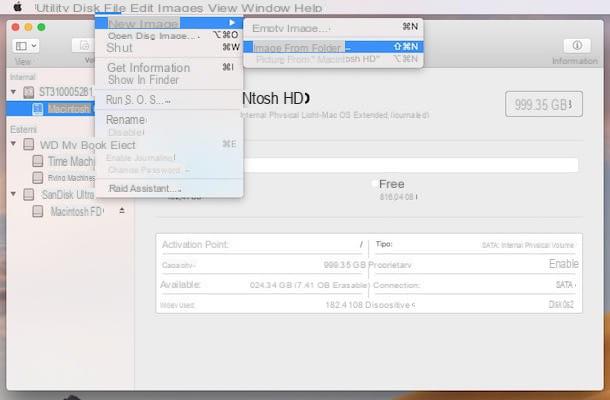
Su MacOSinstead, to create an ISO file from a folder, you can take advantage of a function included in Disk Utility, the default tool of all Macs that I have already described to you in the chapter at the beginning of the article. So, in that case, what you need to do is start Disk Utility, select the item item Fillet attached at the top left of the menu bar, choose the option New image and, later, that Image from folder.
Then select the folder you are interested in using the Finder that has opened and continue in a similar way to how I indicated in the previous lines for what concerns the creation of ISO files starting from CD and DVD: the steps to be performed are the same.
How to use ISO files
Once you have created the image files in ISO format, you may be wondering how to access their contents and how to transfer them to new disks if necessary: nothing could be easier, believe me.
As for the one alone aperture, you can follow the directions I gave you in my tutorial on how to open ISO files. As for the burningInstead, find all the instructions on what to do in my tutorial on how to burn ISO files.
How to create ISO files