Open the doors of eMule
Before getting into the tutorial and seeing, together, how to configure eMule, we need to understand what is causing your problem. In most cases, this is an incorrect port configuration that the program uses to connect to the Internet in the router's firewall.
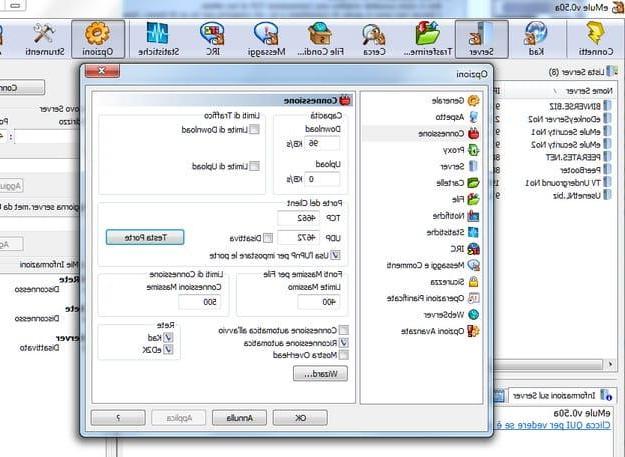
To find out if the doors of eMule are accessible without obstacles by the program, start the program and click on the button options located at the top right. In the window that opens, select the item Connection from the left sidebar and click on the button Head doors.
At this point, a browser page will open in which eMule will test the ports. If, as probable, the result is negative, a message like Il will appear TCP port test failed! The UDP port test will not be performed.

Once the source of the problem is ascertained, you can move on to its resolution. Then go back to the eMule settings menu and write down the values you find in the fields TCP e UDP: these are the ports used by the program to receive incoming connections and communicate with the outside world. If the port numbers currently used by your eMule are equal to 4662 e 4672, I advise you to modify them with higher values (eg. 28823 e 5643) to avoid any restrictions on P2P traffic applied by the Internet provider.
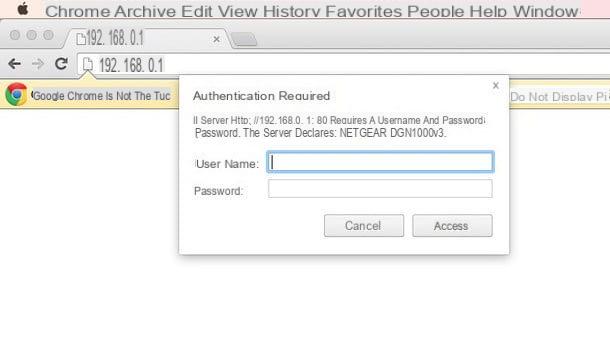
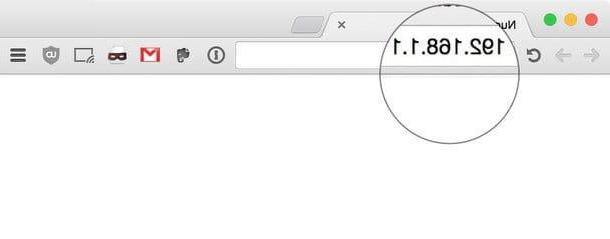
Now, to open the eMule ports in your router's firewall, you need to access the control panel of the latter by starting Chrome (or any other browser) and connecting to the address 192.168.1.1 or 192.168.0.1. If you are asked to enter login details and you don't know them, try admin / admin o admin / password and you should be in no time at all in front of your router's configuration panel.
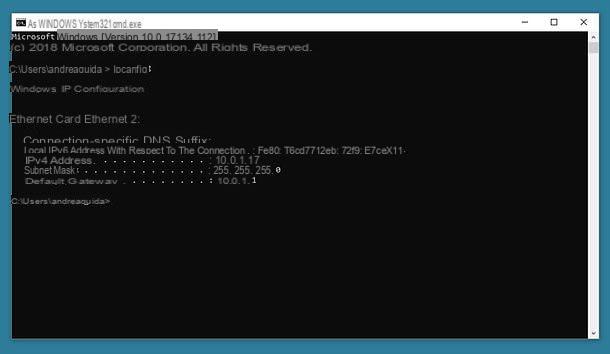
If neither of the two numeric addresses listed above provides access to the router's internal panel, your router is obviously configured to be accessible from another address. To find out which one, start the Command Prompt from the menu HomeWindows (the flag icon located in the lower left corner of the screen) and give the command ipconfig / all. The address of your router is the one described next to the wording Default gateway. If, on the other hand, you do not remember the password to access the panel, check the manual of the device or my tutorial on how to enter the router.
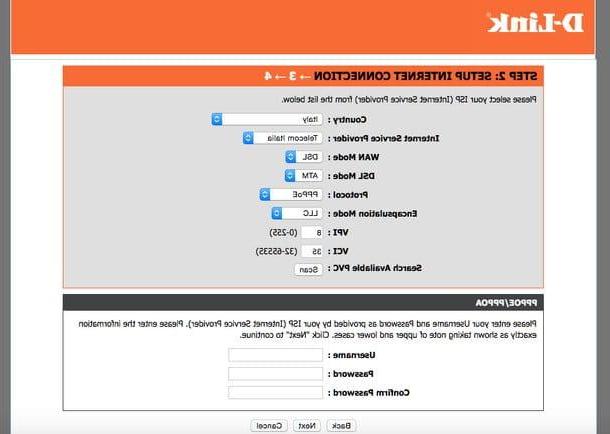
Now that you have access to the router control panel, you need to open the eMule ports. To do this, you need to locate the section Port forwarding, Port forwarding, Configure LAN or Virtual Server (the words change from router to router) and click on the button for create a new rule or new virtual server. At this point, fill out the form that is proposed to you as follows.
- Inner (or leading) port - the number of one of the two doors of eMule.
- External (or final) door - the number of one of the two eMule doors (the same value entered in the field relating to the internal door).
- Protocol or Port Type - the type of port you are configuring, then TCP or UDP.
- Destination IP (or Server IP Address) - the local IP address of the computer on which eMule is present. If you don't know which one it is, read my tutorial on how to find out your computer's IP address.
- Name (or description) - the name to be assigned to the rule created (eg "eMule TCP" or "eMule UDP").

Once the rule has been created, save it by clicking on the appropriate button on the router management panel and create the rule for the other port of eMule. At the end of the procedure, restart eMule, try to connect to the eD2K network or to the Kad one and the program should work correctly.
If not, you may also need to enable UPnP (a protocol that allows different devices to connect to each other by creating a peer-to-peer network) to make eMule work with your router. Then put the check mark next to the item Use UPnP to set ports in the section Options> Connection of eMule and activates the use of technology UPnP in your router panel to make sure everything is working fine.
If any of the steps are not clear to you (unfortunately I could not provide you with super-precise indications, as each brand of router has a management panel structured in a different way), try following the tutorials in which I explained in detail how to act on the administration panels of the various routers.
- How will I configure Netgear router
- How to configure D-Link router
- How to configure TP-Link router
- How to configure TIM router
- How will I configure Infostrada router
- How to configure Fastweb router
Also take a look at my specific guide on how to open the doors of eMule, in which I have dealt with the subject in more depth.
Update the eMule servers
Configuring eMule correctly also means using i "right" servers to connect to the network eD2K (one of the two peer-to-peer networks used by the program, along with Kad, which I will tell you more about in the next chapter of this guide). By "right" servers, I mean secure, up-to-date and working servers, which allow users to find files on the eD2K network without spying on their activities.
To use secure servers in your eMule, you must first delete the server list currently set in the program. Then go to the card Server & Hosting (top center), right click on an “empty” spot in the current server list, select the item Delete all servers from the menu that pops up and answer Yes notice that appears on the screen.
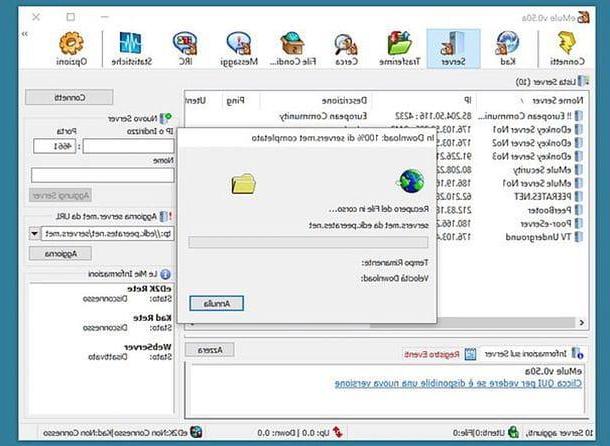
At this point, paste in the field Update server.met from address (in the right sidebar) one of the addresses listed below and presses the button Update to start downloading a list of safe servers.
- http://edk.peerates.net/servers.met
- http://www.gruk.org/server.met
- http://update.adunanza.net/servers.met (solo per eMule AdunanzA)
Mission accomplished! Now double-click on a server name and, within a few seconds, the eMule indicator relating to the eD2K network (the arrow located in the lower right corner of the program window) should turn green.
If this is not the case, check the router settings as I explained to you in the previous chapter of the tutorial or, if you deem it appropriate, consult my specific guide on how to download a server list in eMule.
Connect to the eMule Kad network
The network Kad, as mentioned above, is another peer-to-peer network used by eMule for sharing files over the Internet. It is more secure and potentially long-lived than eD2K, as it does not require the use of support servers (in practice it puts users in communication directly with each other), but is slightly slower in searches and in the first contacts with computers. from which to download files.
That said, to correctly configure the Kad network in eMule you have two ways at your disposal: you can upload a configuration file (nodes.dat) ready to use or you can establish a connection with some users on the eD2K network and activate the Kad network through them.
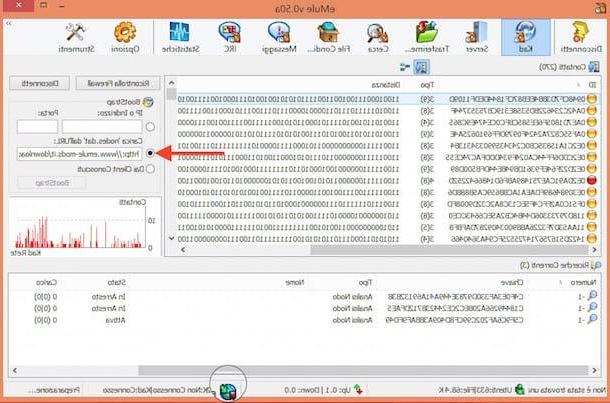
To load a ready-to-use configuration file, select the tab Kad of eMule (top), put the check mark next to the item Load nodes.dat from the URL (in the right sidebar), paste one of the addresses that you find below in the text field below and click on the button BootStrap
- http://www.emule-mods.com/download/nodes.dat (dal forum Emule Mods)
- http://www.nodes-dat.com/dl.php?load=nodes&trace=39513030.1944
If, on the other hand, you prefer to act via the eD2K network, connected to a server, start the download of a file and wait for it to reach a good position in the download queue. At this point, go to the tab Kad, put the check mark next to the item From known clients and click on the button Bootstrap.
Now all you have to do is wait a few minutes and check if the eMule indicator relating to the Kad network (the arrow located in the lower right corner of the program window) turns green. If not, check the router settings as mentioned in the initial chapter of the tutorial and / or take a look at my specific guide on how to connect to the eMule Kad network.
Configure eMule to the fullest
At this point, you should be able to connect to the eD2K servers and eMule's Kad network. But the time has come configure eMule to make the most of your connection speed and not slow down Internet browsing. In this case, the first step I recommend you take is to measure the actual speed of your Internet connection using one of the services that I pointed out to you in my guide on how to measure ADSL speed.
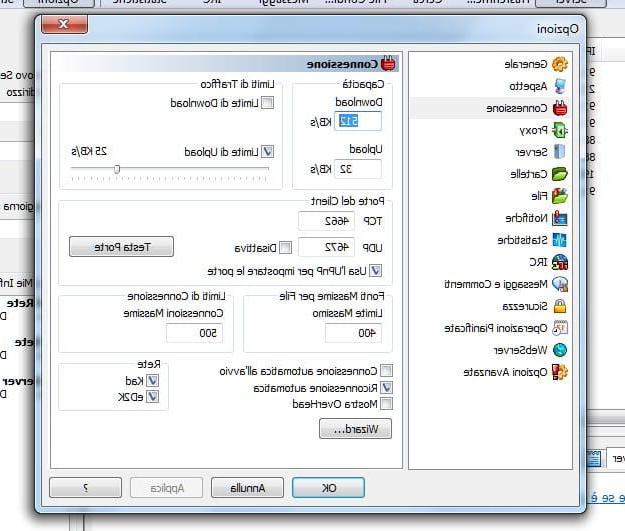
Once the values of upload e download for free of your connection (contracts often lie!), you have to click on the button options of eMule and return to the section Connections. So make sure that there is no check next to the item Download limit and set as maximum download value 512 KB / s (this is a value that is good for all the most common ADSL connections without limiting the program's performance in any way).
As for the upload, specify in the field Upload the real speed of your connection being loaded, put the check mark next to the item Upload limit (essential to avoid flooding Internet browsing while using eMule!) and click on Apply, then you have to move the indicator of the bar that appears next to the upload value and bring it to about 80% of the actual upload speed of your connection (ex 25KB / s compared to a true speed of 32 KB / s).
Despite the precautions seen so far, do you still have some connection problems on eMule? Perhaps the manager who provides you with the Internet connection filters the traffic of P2P programs. To partially bypass this obstacle, click on the button options of eMule, go to the section Safety and metti il segno di spunta accanto alla voce Turn on protocol obfuscation.
Finally, remember to do not share files other than those you download, because if they are too many (or too heavy) they could block your access to certain servers and, when you have become a little more familiar with the program, to adjust the more advanced parameters of eMule, as I indicated in my guide on how to optimize eMule
How to configure eMule