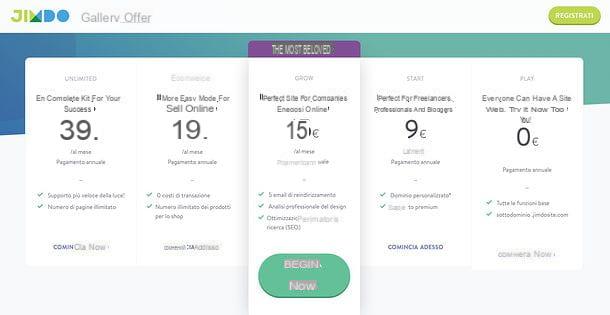
Jimdo pricing
Before getting to the heart of the tutorial and explaining, in detail, how to create a website with jimdo, let me explain the various service plans with their prices.
- Play - is Jimdo's basic plan. It's free and offers all the essential features of the service, with 500MB of memory space and 2GB of bandwidth. It allows you to create sites of up to 5 pages on the subdomain .jimdosite.com in which Jimdo logos and links are inserted.
- Home - is Jimdo's cheapest plan, aimed at freelancers, professionals and bloggers. It costs 9 euros / month (with annual payment) and includes a free second level custom domain for one year (which then costs 20 euros / year) with 5GB of memory space, 10GB of bandwidth, premium support (whose times response time is 1-2 working days), advanced SEO settings (for the optimization of content for search engines), statistics service, HTTPS support, 1 redirect of email addresses and absence of advertising. It allows you to create sites with a maximum number of 10 pages.
- Grow - is Jimdo's most loved plan, mainly dedicated to businesses and online stores. It costs 15 euros / month (with annual payment) and includes a free second-level custom domain for one year (which then costs 20 euros / year) with 15GB of memory space, 20GB of bandwidth, premium support (whose times response time is 1-2 business days), advanced SEO settings (for content optimization for search engines), statistics service, HTTPS support, professional design analysis service, 5 email address redirects and absence of advertising. It allows you to create sites with a maximum number of 50 pages.
- Ecommerce - is Jimdo's plan dedicated to those who need to sell online. It costs 19 euros / month (with annual payment) and includes all the benefits of the Grow plan plus the ecommerce function with unlimited products to be included in your shop, easy-to-use payment methods (credit card, PayPal, bank transfer or SEPA) and 0 sales commissions.
- Unlimited - is Jimdo's most comprehensive plan. It costs 39 euros / month (with annual payment) and includes all the benefits of the Ecommerce plan plus premium support with response times in less than 1 hour, 20 email address redirects, memory space, bandwidth and unlimited number of pages.
It should be noted that one or more domains registered with an external provider can be connected free of charge to your Jimdo site. To find out more and compare all available plans in an even more detailed way, visit the Jimdo website.
How to use Jimdo
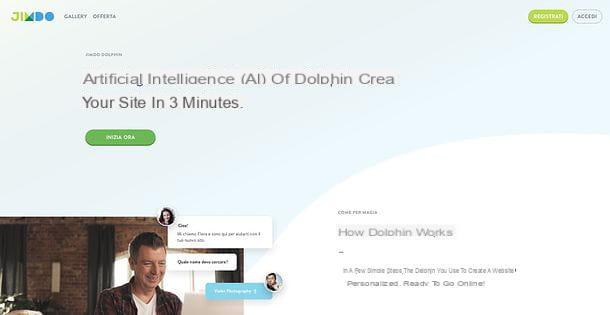
Now we can take action and discover, together, how to build and manage a site with Jimdo Dolphin. The service works with all major web browsers: Google Chrome (starting from version 52), Mozilla Firefox (starting from version 54), Apple Safari (starting from version 10) e Microsoft Edge (starting from version 40). Have fun!
Create the site
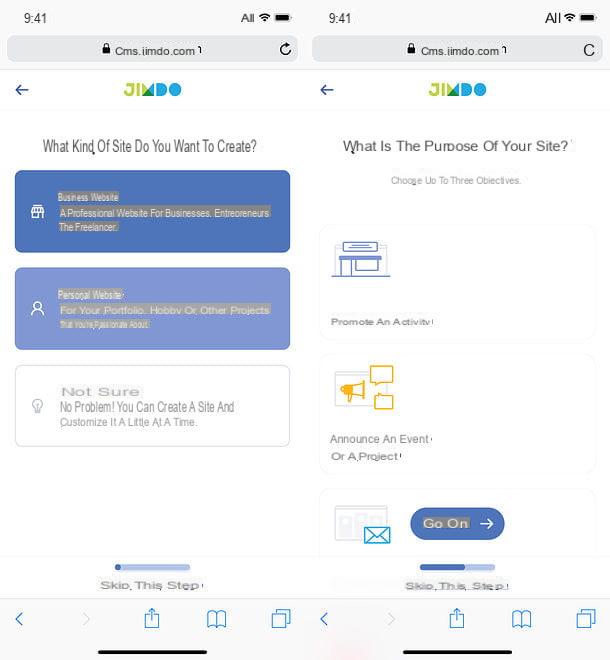
Are you ready to create a Jimdo Dolphin site? Then connect immediately to this page and click on the button Sign up now. Please indicate, therefore, if you wish to create a business site (ideal for entrepreneurs, businesses or freelancers), a personal site (to dedicate to your passions or projects) or, if you are undecided about what to do, click on the button I'm not sure, as you can later choose what type of site to create.
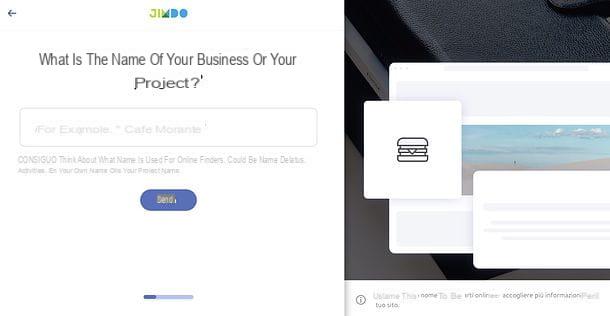
At this point, type the name that you want to assign to your site (which could be, for example, the name of your business, your own name or the name of your project) in the appropriate text field and click on the button Send.
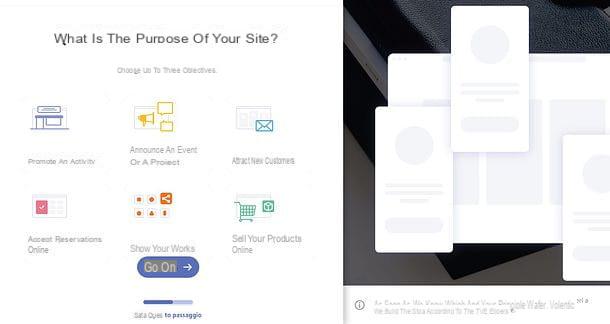
Now you have to indicate what is the goal of your site choosing up to three options from those available: promote an activity if you want to create a site to promote your professional activity; announce an event or project if you want to create a site focused on your projects; Attract new customers if you want to create a promotional site dedicated to the acquisition of new customers; Accept online reservations if you want to create a site in which to accept online reservations; Show your works if you are creating a portfolio site in which to illustrate your work online or Sell your products online, if you intend to set up an ecommerce.
Once you have made your choices, click on the button Continue to go to the next step and continue creating your website.
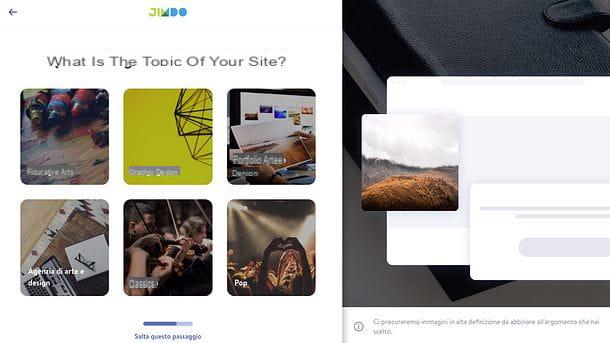
The next step is to choose thetopic to be treated on the site. You can choose, for example, between figurative arts, graphic design, art and design portfolio, photography, classical music, pop music and more. If no topic among those proposed seems relevant to your site, click on Skip this step (below) to continue.
After you have made your choice, Jimdo will intelligently propose you to link your social profiles to the site. For example, if you have chosen to create a site related to the world of graphics or photography, it will ask you to link your profile Instagram to the latter (in order to make your creations known and increase your popularity on the platform), if you have chosen to create a personal site, it will ask you to link your account Facebook and so on. Choose, then, whether or not to accept the links, by clicking on the appropriate buttons, and go on.
Once you have passed the step relating to the topic to be treated on the site, you must choose one graphic style among those proposed by Jimdo: click, then, on the preview of the style that seems most suitable for your site, choose a colour from the palette (or click on the button Amaze me! to leave it to Jimdo to choose a random color combination) and that's it.

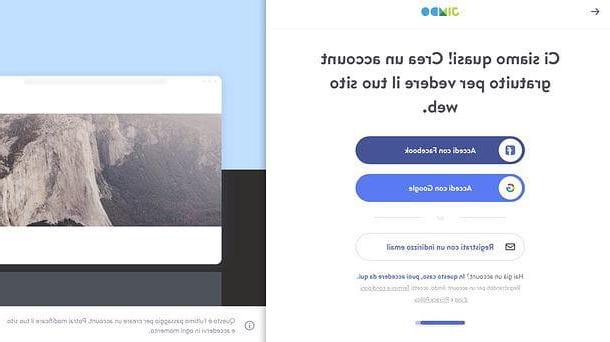
Now you just have to create your account on Jimdo to complete the creation of the site and then manage it easily. You can choose to log in with Facebook, sign in with Google or register with an email addressby clicking on one of the buttons on the screen.
Once you have linked your Facebook account, your Google account or registered with Jimdo via email, you will be offered the domain to be associated with your site: if the one automatically proposed by the service (eg. nomesito.com) suits you, click on the button Register it now! and follow the instructions on the screen to confirm your choice, otherwise click on Choose another one to choose another one or, again, click on Skip this step (below) to go ahead without registering a domain and take advantage of a free third level domain (sitename.jimdosite.com).
In a few seconds, Jimdo's smart website builder will appear through which you can customize all the details of your website. In the meantime, remember to log in to your inbox, open the message you received from Jimdo and click on the button Confirm now contained within it, in order to validate and definitively activate your account.
Customize the site
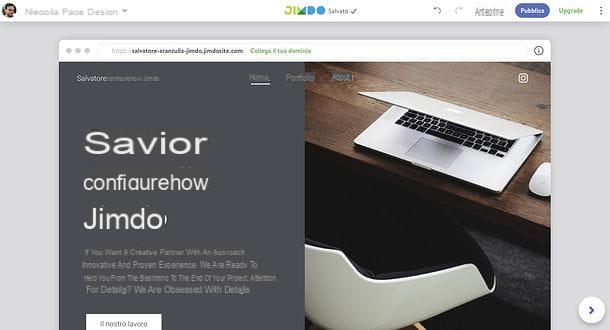
After you have created your site, you can customize its contents by accessing the Jimdo main page and logging into your account (if you have registered for the service via Facebook or Google, you must click on the buttons relating to the latter): in this way your personal dashboard will open.
To access the Jimdo editor and edit your site, click on the button Modification (the icon of pencil) placed in correspondence with the latter. The Jimdo editor comes with an extremely intuitive interface: at the top there is one toolbar which contains the quick link to the dashboard (represented by your profile photo), buttons to customize design, pages e shop (on the left) and buttons for undo o to repeat the last operation, display apreview of the site, publish it and carry out a upgrade of the chosen plan. Finally, there is the ⋮ button which allows you to access the email redirect settings, upgrade to the higher version of the site and to SEO tools (as long as these are included in your plan).
At the center of the editor, however, is the main page of the site, which can be modified in all its aspects by simply positioning the mouse cursor on the various elements that compose it and then using the icon that appear on the screen.
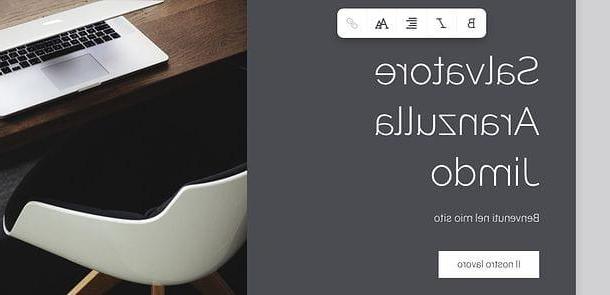
For example, clicking on a block of text, you can freely modify the writings in it and you have the possibility, through the toolbar that appears on the screen, to adjust its formatting (bold and italics), thealignment and dimensions. Also, thanks to the icon of the chain, you can add links in the places of the text you want.
By selecting, instead, a button, you can freely modify the text in it and, using the box that appears at the bottom, you can change the link to associate it with (therefore the page that this will open when users click on it).
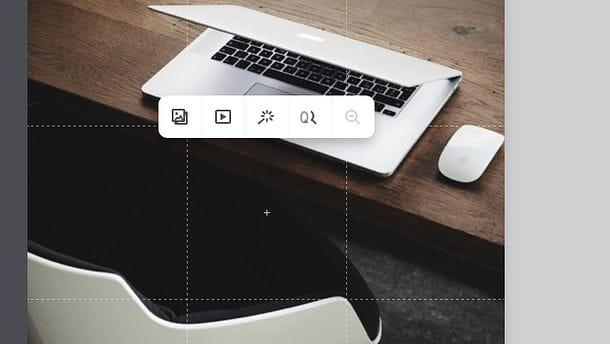
Editing the contents is extremely simple also as far as concerns are concerned Photo and video. By clicking on an image or a movie, in fact, one will appear toolbar with six buttons: the button with the icon photo allows you to replace the existing image with a custom or selected image from the Jimdo gallery; the button with the ▶ ︎ symbol allows you to insert a video from YouTube or Vimeo; the one with the icon Magic wand allows you to apply filters to the selected content; the one with the glasses allows the insertion of the ext tag, while the two magnifying glasses allow, respectively, to increase or decrease the zoom level of the selected content.
In the case of fields that include several photos or videos (e.g. blocks with columns), by positioning the mouse cursor on an image or a video, you will be able to access a toolbar with buttons for eliminate the selected content, duplicate it, move it left / right or add another content.
Jimdo's editor is structured in blocks: this means that each part of the page belongs to a separate block, which can be moved, modified or deleted independently from the rest.
To modify a block, position the mouse cursor anywhere on it and use the icons that appear on both sides to make the desired changes: on the left there is the icon of the Labels which, if clicked, allows you to change the layout and colors of the block. Below it, however, there is the symbol ⋮ which, once selected, displays the buttons for remove the block, duplicate it o move it up or down.
On the right, then, there is the icon of a eye, by which you can add or remove a title, A 'image / video, the text simple, a main button or secondary button.
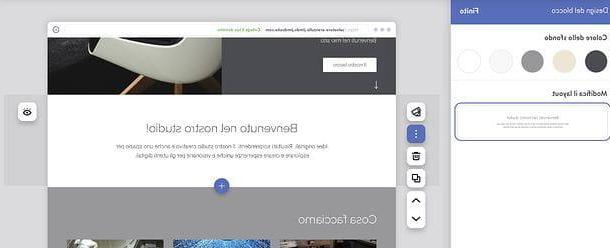
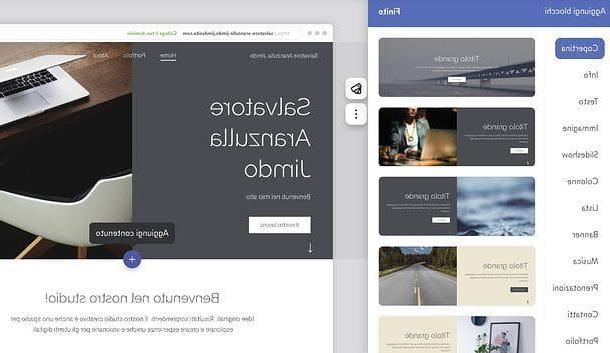
To add a new block, position the mouse on the top or bottom edge of an existing block on the page and press the button capacitor positive (+) lead that appears on the screen. This will open a menu, on the left, through which to choose the type of block - and therefore the type of content - to be inserted in the page.
There are so many contents to choose from: Cover to insert a cover image; Info to insert a text and image box with information about yourself and / or your project inside; Text to add a custom text field to the site; Image to insert a photo or an image gallery; Slideshow to insert a presentation with photos and texts; Columns to add a block divided into two or more columns; Test to add a list; Banner to add a banner; Music to insert a video or a music player; Reservations to add a box relating to reservations; Contacts to enter a form to be contacted by users, or Portfolio to enrich your site with a personal portfolio.
Once you have selected the content of your interest, browse the styles available for it (they always appear in the left side menu), click on the one you like best and this will be automatically inserted in the point of the page you had previously selected. Easy, right?
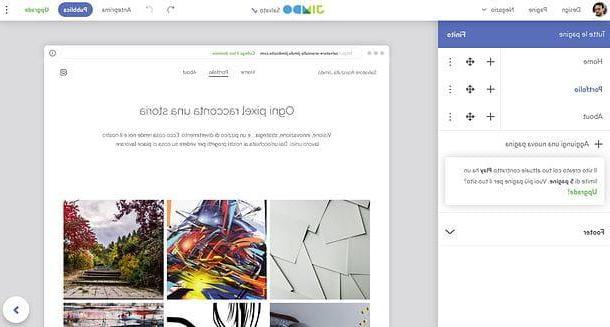
To switch from one page of the site to another (and thus change the other pages that make up your site), use the menu Pages located at the top left: after recalling the latter, locate the page you want to edit, press the ⋮ button corresponding to the latter and select the option Go to from the menu that opens. Alternatively, you can achieve the same result by using the links to the pages on the home page of the site (whose position, however, can change depending on the template you have chosen to use).
Via the "Pages" menu, you can also edit the titles of the pages that make up your site (by simply clicking on them), reorder the latter (using the icon with the two crossed arrows) is duplicate o delete them (by selecting the appropriate items in the menu that appears after clicking on the ⋮ button).
To create a new page, instead, click on the item Aggiungi a new page and type the title you want to assign to it in the text field that is proposed to you. Do you want to create a sub-page for a page already present on the site? No problem: in this case, you have to click on the button + corresponding to the title of the parent page and type the title to be assigned to the sub-page in the text field proposed below.
Again through the "Pages" menu, expanding the field Footer located at the bottom, you can also customize the "technical" pages that make up your site: legal information, privacy statement, Information about cookies, cookie settings, cookie banner e page not found / 404.
If, after creating your site, you change your mind about the design you chose during the creation phase, go to the menu Design Jimdo (top left) and select a new theme from those proposed to you in the left side menu.
When the result satisfies you, to save the changes, click on the item Finished which is located at the top. The new design you choose will be automatically applied to all pages on your site.
Create a shop
Are you going to include one store on your site? Then you absolutely have to populate it with the products you want to sell. Then go to the menu Shop Jimdo (top left) and select the item New product from the latter.
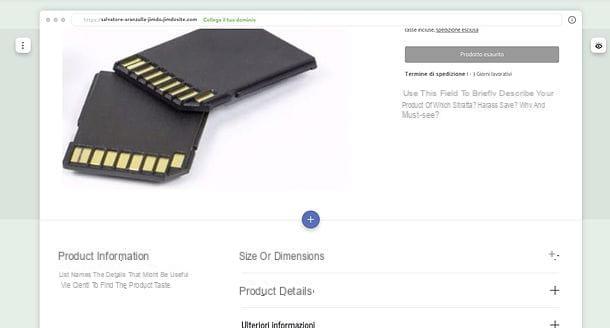
In the box that appears on the screen, click on the button Import to upload a photo of the item you want to sell (or click on the item Create the product without images to fill in the product sheet without inserting any photos), then modify all the fields of the product page that is automatically generated by Jimdo by inserting a Description of the article, his size or dimensions, the product details etc.
Then repeat the procedure for all the items you want to sell and, once the operation is complete, return to the menu Shop Jimdo to access the settings of your store: from here you can complete all the activities necessary for the sale of your products. In addition to having to subscribe to one of Jimdo's plans that allow you to open an ecommerce, you will have to complete your business profile by entering all the necessary data (telephone number, address etc.) e confirm the settings specifying the language of the store, the currency to be used and associating a valid payment method (PayPal) to the latter.
Optimize the site
In its paid plans, Jimdo offers automatic optimization of some parameters of the site, in order to improve the positioning of the latter on Google. For example, it optimizes the meta titles of each page, inserts customized meta descriptions on the theme of the project, makes the site responsive (therefore optimized for viewing from mobile devices), speeds up loading, automatically updates the map, allows you to customize the 404 page (as explained above) and much more. However, there are some tools that can be actively used by the user and that allow you to further optimize your site.
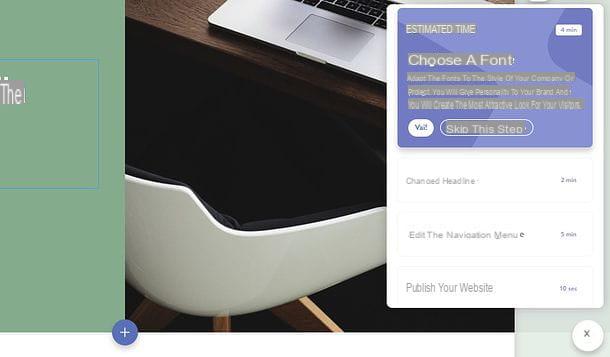
If you need a hand in positioning your site on search engines, for example, you can rely onJimdo's assistant, which allows you to have useful advice on optimizing the site and, therefore, on how to successfully achieve the objectives of your business and make each page more "attractive" in the eyes of Google.
To invoke the Jimdo Assistant, click on the button (>) located in the lower right corner of the screen and press the button Advice, in the box that appears. You will then be given advice on how to best optimize your site.
For example, you may be advised to create your brand choosing the colors and fonts of the brand in which you want your visitors to be reflected, change the headline to have a more captivating title, change the navigation menu and more: what you need to do is select the tabs with the various suggestions from the Jimdo assistant menu and follow the directions contained in them. The result is guaranteed!
Another very useful tool, which I recommend you use to optimize your Jimdo Dolphin site, is the app Jimdo Boost, available free for Android and iOS. This application provides an immediate and personalized analysis of your site, with graphs and information on Google Analytics statistics, data on visits to the site, on the origin of visitors and much more.
Using it, you can plan strategic changes, correct and improve your marketing activities. As easily understood, to use them you must have subscribed to one of Jimdo's paid plans, such as for example Home o Grow.
Publish the site
Once you have completed your Jimdo Dolphin site, all you have to do is publish it online. How? Very simple: access the Jimdo editor, click on the button Preview located at the top right and verify that the site is actually as you want your visitors to see it (you can view it both in desktop that in format mobile devices, using the appropriate links located at the top right).
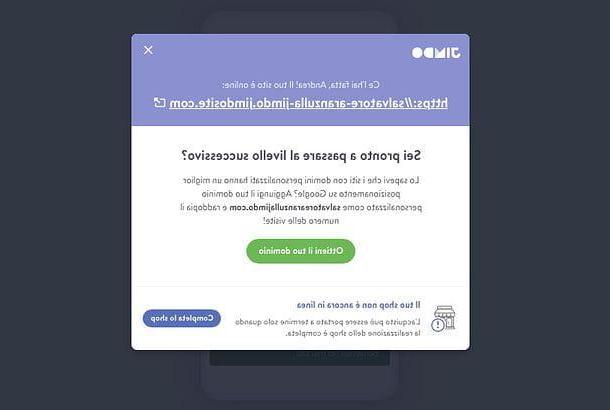
If there are no details to file, click on the button Public located at the top right and your site will immediately become accessible to the public, at the address indicated in the box that will appear on the screen: if you have chosen to use the Jimdo free plan, the address will be something like sitename.jimdosite.com (third level domain). If, on the other hand, you have subscribed to one of Jimdo's paid plans that provide for the presence of a custom second level domain, it will be something like nomesito.com o sitename.com.
Manage the site
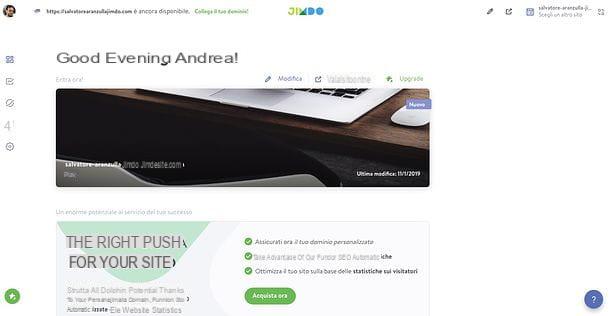
Once you have published your site, you can manage it very easily by connecting to the Jimdo home page and logging into your account. This will open the Jimdo Dolphin dashboard, through which you can modify the site (as explained in the appropriate chapter of this tutorial), monitor its progress and customize various settings.
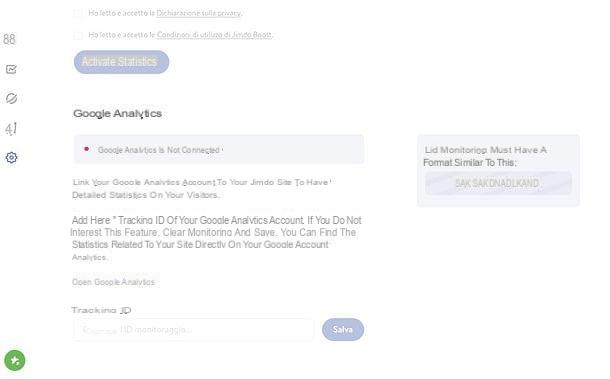
If you have signed up to a Jimdo plan that includes the statistics, you will be able to access the statistics of your site, know how it is doing and optimize it to increase traffic by selecting the icon graphic from the left sidebar. If not, you can activate the statistics by clicking on the button Turn on statistics, by choosing one of the Jimdo plans that include this feature and proceeding with the subscription.
I also point out that by clicking ongear icon located in the left sidebar and clicking on the link Open Google Analytics placed at the bottom of the page, you will get a Tracking ID to be entered in Jimdo to link it to your account Google Analytics.
To manage, instead, i of associated with your site and possibly upgrade from a third level domain (site name.jimdosite.com) to a second level domain (e.g. site name.com), click on the planet present in the left sidebar.
The icon ofairplane, also located in the left sidebar, allows you to manage email address redirects, with the ability to set your redirect email address or alias or connect your G Suite account. This feature also requires subscription to one of Jimdo's paid plans.
Are you planning to create a new site? In this case, click on theaddress of your current site in the Jimdo top menu (top right), then on the button Create a new site and repeat the procedure that I have already explained to you in the chapter of the tutorial dedicated to creating a site with Jimdo. Subsequently, you can decide which site to manage from the Jimdo dashboard by simply clicking on theaddress of your current site in the upper menu and then choosing the site of your interest from the page that is proposed to you.
If, on the other hand, you want to delete a site created with Jimdo, select the latter in the dashboard, click on thegear icon located in the left sidebar and go to the tab Delete the site. Finally, put the check mark next to the item Do you want to delete this site with all its contents? This operation will be irreversible and press pulsating Delete the site. The operation is, as specified, irreversible and therefore the deleted site cannot be recovered: think very carefully before proceeding!
How to use Jimdo from smartphones and tablets
If you want to create a Jimdo Dolphin site and manage it directly from your smartphone or tablet, know that there is no problem: all you have to do is open the browser you usually use to browse the Internet from your mobile device (eg. Chrome if you have a terminal Android o Safari if you have a iPhone / iPad) and connect to the Jimdo Dolphin home page.
At this point, tap the button Sign up now, choose whether to create a business site or personal site and follow the guided procedures for the creation of your site and the creation of your account, as explained in the chapter of the tutorial dedicated to the desktop version of the service (the steps to be taken are the same).
Once the site is created, you can easily manage and customize it by connecting to the Jimdo dashboard and logging into your account. The editor for creating the site has the same functions and the same graphics as its desktop counterpart (of which I told you in great detail in the dedicated chapter of this guide), only the layout of the menus changes, which are accessible by pressing on the icon ☰ at the top left of the screen.
There is also the free application Jimdo Creator for Android and iOS, which allows you to create and manage sites with Jimdo in a very simple way. As of this writing, however, it only supports building standard sites and does not yet include the smart website builder to build (and then manage) Jimdo Dolphin sites.
For more information
If you need more information about Jimdo Dolphin and how it works, connect to the official Jimdo support page, where you can find answers to the most frequently asked questions by users: from the first steps to site design, through to optimization. SEO.
The page presents a comfortable search bar, through which you can quickly find the topics of your interest, plus a series of boxes dedicated to topics such as design, SEO, domain, e-mail etc. Further down, however, there is a list with the featured articles, which contains the most useful support articles available on the Jimdo site. Consult it and you should find the answer to all your doubts.
Article made in collaboration with Jimdo.
How to create a website with Jimdo