Index:
- How to back up your data with Todo Backup (Windows / macOS)
- How to back up your data with Time Machine (macOS)
- How to backup data on Android
- How to backup data on iOS
How to back up your data with Todo Backup (Windows / macOS)

The first piece of advice I want to give you, talking about how to perform a backup, concerns the use of software that can facilitate the procedure and speed it up.
In this regard, I would like to point out Todo Backup, a software distributed for both Windows devices and devices with macOS operating system. This program allows you to create a backup copy of all files on your computer within a physical medium, such as an external hard drive.
The first thing you need to do to create a backup copy of the data contained within your computer is to download and install the program free All Backup.
If you want to get the software for Windows, you can link to this web page to download the version free. If, on the other hand, you want to download the software for macOS, you will need to connect to this address and purchase the version paid. In this guide, I'll show you how to use Todo Backup on devices running Windows.
Once you've opened the link I provided, click the blue button Download, near the version Free / Free. Then enter your email address and click the button Send and then again on the wording Download.
Once downloaded the executable file called tb_free.exe, double-click it and click the button Yes, on the user control screen.
Now, then select your language city and click sul pulsating Ok. In the screen that opens, click NEXT and then Accept. Then complete the installation by clicking three times on NEXT and finally on the button end.
Once the installation is complete, start the program via its icon on the desktop. Then click the button Later, in the window that will appear.
The main screen of Todo Backup is very simple and intuitive. On the top bar you will find the main features that will allow you to perform a backup.
You can start by backing up your entire hard drive or a partition on your computer (Disk / partition backup). Alternatively, you can backup specific files in your computer memory (File backup).
If you need it, you can also decide to back up the operating system installed on your computer: in this case use the function System backup.
Whatever your choice, to continue you will need to set some data on the screen and confirm the start of the backup procedure using the button Proceed. In general, keep in mind that backups can also be scheduled, or you can encrypt them with a password.
To restore a backup, you can click on the entry Select files for recovery, which you find on the main screen of the software. To view the contents of a backup instead, you can click the button Instruments and select the item Mount / dismount. You will then need to select the backup file to view and perform the on-screen procedure.
How to back up your data with Time Machine (macOS)

For Mac computers, one of the best backup solutions is Time Machine: it is a macOS tool that allows you to back up everything on your computer: data, installed programs and even settings.
Each backup can be restored in its entirety or you can decide to recover individual files that you have lost. Keep in mind that, to use Time Machine, you will need to have large storage space and that this will need to be connected to your macOS computer.
Consequently, once you have connected the external storage space to the computer, if it is suitable for hosting backups, a message will appear for its configuration. This means that the drive will contain all backups created with Time Machine. To continue, click on the entry Use as a backup disk.
If, on the other hand, Time Machine does not show any message, start this tool through its icon that you will find in the Launchpad. You can also use the search bar above to find TimeMachine.
At this point, from the window that will appear, click on the button Select backup disk to select a storage drive. If the drive is not recognized, it means that you will have to reset it. You can carry out this last procedure through theDisk utility macOS by setting the format Mac OS extended (journaled).
After you set up Time Machine, it will create backups periodically, if the external drive is connected to your computer. You can restore the backup of the entire macOS system via theMacOS utility or restore individual files via Time Machine.
For the latter option you will have to enter Time Machine by clicking on its icon from the macOS menu bar and clicking on the item Enter Time Machine. You will then be able to scroll through all the backups in chronological order, restoring any lost files.
However, I suggest you read this guide of mine to learn more about the functioning of Time Machine.
How to backup data on Android
Mobile devices running the Android operating system can automatically back up the device's data and settings.
This procedure may already be active, if you enabled it during the initial setup phase. In any case, you can verify the activation by following the procedures that I will indicate in the next lines.
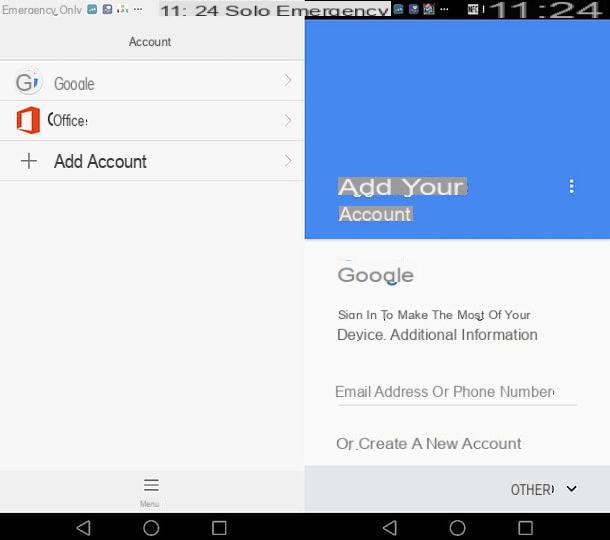
First, you need to check that there is a Google account associated with your Android device. To do this, tap on the icon Settings on Android (symbol of a gear) and tap on the item Account.
If this is your first time adding a Google account, tap Add account and perform the procedure you see on the screen. If, on the other hand, you have already added one during the initial configuration, tap on the item Google and then tap on your account.
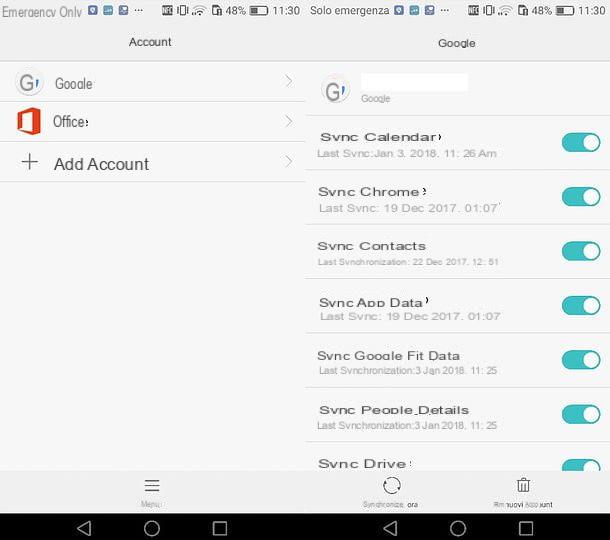
Check that all the items you see on the screen have been activated. This will automatically backup all settings on the screen, and you can restore them in case of a reset of your device.
Let's now move on to backing up multimedia data: photos and videos are usually the files that take up the most space on mobile devices. What you can do to make sure you don't lose them is to make a copy of all your media files and transfer them to your computer.
As an alternative, I recommend using Google Photos, a service offered by Google, available through its app of the same name. Through this app you can in fact automatically backup all the photos and videos you make on your device.
You can then download the free Google Photos app on both Android and iOS. Keep in mind that by uploading these files to the Google Photos cloud, you will not incur any costs for the use of Google services and, moreover, you will not have any space limitations.
To learn more about the subject, consult this guide of mine in which I talk to you in more detail about Google Photos.
How to backup data on iOS

Even on devices with iOS you can use the automatic backup system, offered through Apple's iCloud service; to use it you will need to have an Apple ID.
The space available in Apple's cloud is only 5 GB but you can decide at any time to upgrade your plan and add more storage space.
I remind you that, by default, your device's data synchronization should be enabled. In any case, you can check what is currently syncing from your device to iCloud by reaching the Settings.
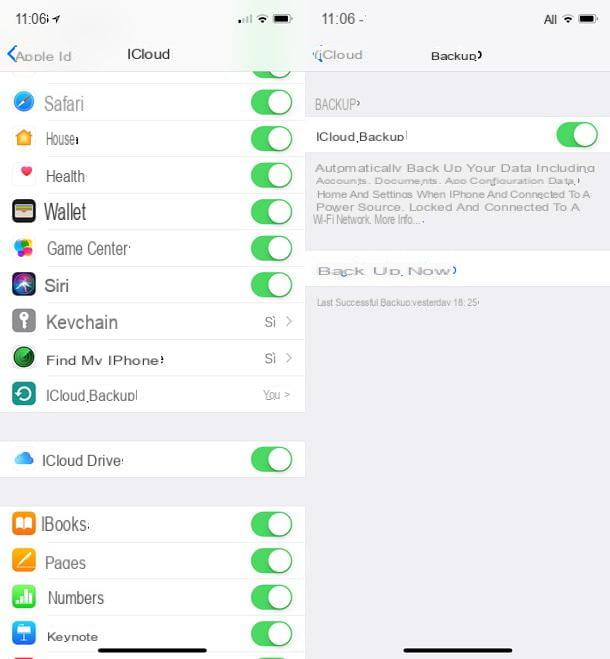
Then click on the icon Settings of your iOS (icon with a gear symbol) and tap on the item iCloud. Wait for all the information to load and scroll through the list to see all the information being synced to iCloud. Synchronization of multimedia elements, such as photos and videos, should also be enabled in the settings.
But since the data you sync takes up your iCloud space, you may run into problems backing up photos and videos on your device. Space, as I explained to you, is limited. Then choose whether to subscribe to the expansion of your cloud, or install third-party applications for backing up photos and videos.
For this purpose, the application that I recommend you download on iOS is Google Photos, the Google app that offers unlimited and free backup of all multimedia contents.
How to back up your data