First configuration of the mobile phone

Have you just bought a new smartphone and are you going to set it up for the first time? All right, then let me guide you through this simple (albeit apparently arduous) undertaking. To begin with, take the phone out of its packaging and insert the SIM into it: in most cases, it will be sufficient to extract the special trolley, using the metal paper clip Supplied.
However, if you do not know how to install the SIM card in the phone, you can refer to the user manual of the same or carry out a short search on Google, using the key insert SIM [phone brand and model]. In particular, if you have an iPhone or a Huawei-branded phone, my guides on how to insert the SIM in the iPhone and how to insert the SIM in Huawei devices may be useful.
Once the SIM installation is complete, you can proceed with the next step, which consists of configuring, for the first time, the operating system on the phone.
Android
After inserting the SIM in the appropriate slot and turning on the smartphone, you can proceed with the initial configuration of Android.
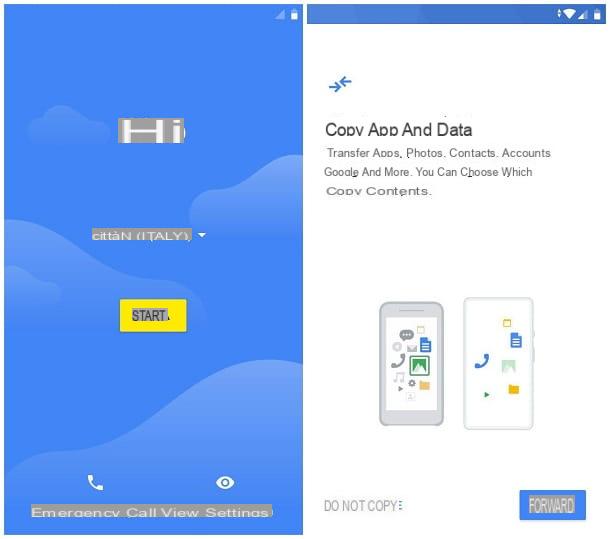
First, select the language to be used in the operating system from the appropriate drop-down menu; then tap the button Start, to start the phone setup wizard.
As a first step, you will be asked to choose one WIFI network to which to connect to download the apps or copy the data: select the network of your interest from the proposed list and, when requested, enter the access key. If you want to continue with the configuration of the phone without using a Wi-Fi network but using the data connection available on your SIM, touch the item Use mobile network for setup. To continue, however, without connecting to the Internet (this option, however, could affect the steps available later), tap the button Ignore, located at the bottom left.
Once connected to the Internet, wait for any system updates to be downloaded and installed and then choose whether to copy apps and data from an existing backup (button NEXT) or whether to skip this step and reconfigure the phone from scratch (button Do not copy).
If you have chosen to proceed with importing a backup, specify whether to recover data from another Android phone, from the cloud or from an iPhone and follow the instructions provided on the screen to proceed with the data transfer (you will be asked to log in to the cloud, to select the backup file, or to enter the credentials of the Apple ID configured on the "source" iPhone).
If, on the other hand, you have opted for the "from scratch" configuration, please log in with yours Google account by entering your credentials in the appropriate forms. If you don't have a Gmail profile, you can create it right away by tapping the button Crea or by relying on the instructions I have given you in this guide.
Once you have logged in, choose, by acting on the appropriate levers, whether or not to carry out the automatic backup to Google Drive, whether to activate the geolocation, whether to allow the scan for Wi-Fi networks and nearby devices even when Bluetooth and Wi-Fi are not active and finally whether to send to Google diagnostic and usage data.
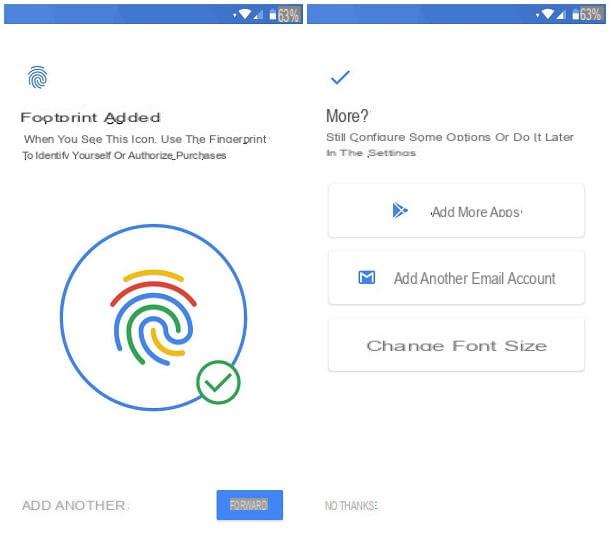
At this point, tap the button Accept (located at the bottom of the screen), to confirm the applied settings and move on to the next step, which consists in configuring theFingerprint or the face recognition.
At this stage, tap the button NEXT, choose whether to configure, together with the fingerprint / face, a lock sequence, an PIN or a Password and, after making your selection, indicate whether or not to activate theSafe Boot (i.e. the need to enter the graphic pattern, PIN or password before the operating system even starts, to unlock it) and follow the on-screen instructions to configure the security protections you have previously chosen.
After this step too, choose whether to activate or not Voice Match (i.e. the ability to call the Google assistant only with your voice) and, if necessary, proceed with the final touches, selecting whether to install new apps (add more apps), set up an additional email account (add another email account) or modify the font size screen.
When you're done, tap the button Not now / Finished for now, to finish the Android setup. Congratulations: As of now, you can start using your new phone right away!
iPhone
You turned on theiPhone for the first time and you just don't know how to move in this new universe? Fear not, setting up Apple-branded devices for the first time is a breeze.
First, when you see the iPhone welcome message appear (the word "Hello" in all languages), press the Home (if present), or touch the screen, to access the selection screen language.
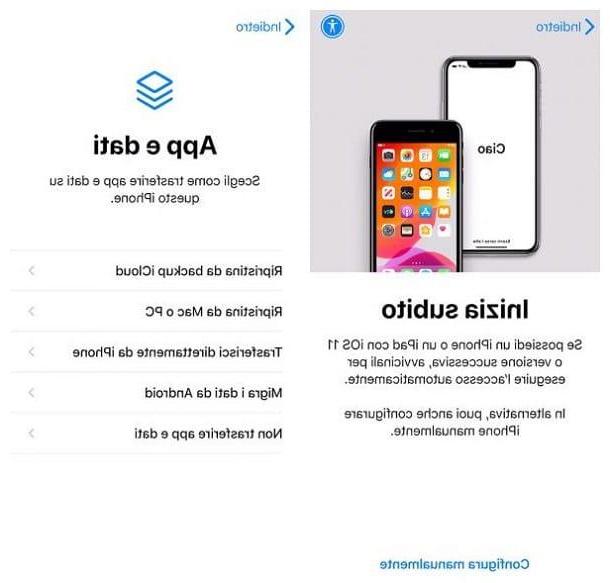
Once you have made your choice choose yours Country or your area of residence and wait for the setting to be applied in the system. Now, if you are coming from an iPhone equipped with iOS 11 or later and you want to automatically transfer data and settings from the old to the new phone, take the first one and, after turning it on and activating Bluetooth, bring it close to the new iPhone and follow the instructions provided on the screen to complete the data transfer procedure .
To configure the phone from scratch, however, tap on the item Configure manually and, when requested, connect to yours WIFI networkby selecting it from the list. If you don't have a Wi-Fi network, tap the entry Use cellular connection, to activate the iPhone via the data network.
Once the connection to the Network is established, tap the button NEXT located at the top right, wait for the "iPhone by" is activated and touch the button Continue, to accept Apple's terms of data sharing and privacy.
The next step is to configure the Face ID or touch ID, ie unlocking by facial recognition or fingerprint (based on the "iPhone by" model used): then touch the item Continue and follow the instructions that are proposed to you to conclude the face or fingerprint recognition phase.
Once that's done, enter a code of 6 code to use to protect your phone, re-enter it when prompted, then choose the recovery option that best suits your case: via backup to iCloud, backup saved on PC or Mac, from a other iPhone, from Android or do not transfer apps and data and set up your phone from scratch. If you have chosen to restore from an existing backup or an Android phone, follow the instructions that are shown to you to recover the necessary data.
We're almost there: log in now with yours Apple ID (if you don't have it, you can create one "on the fly" by filling out the appropriate form or following the instructions I gave you in this guide), tap the button Accept, to accept the iCloud terms of use, and wait for the new account to be set up on your phone.
Next, choose whether or not to enable the location services, configure Crab, Apple Pay and iCloud keychain (which allows you to keep and synchronize Safari passwords with other devices paired with the same Apple ID), indicates whether or not to share the usage statistics of the device with Apple and the app developers and that's it - after a few moments, you should finally be ready to use your new iPhone!
If you have chosen to restore an existing backup, you will have to wait a few more minutes for the necessary data to be copied to the iPhone, which should automatically restart when the transfer is complete.
How to set up your mobile phone for the Internet

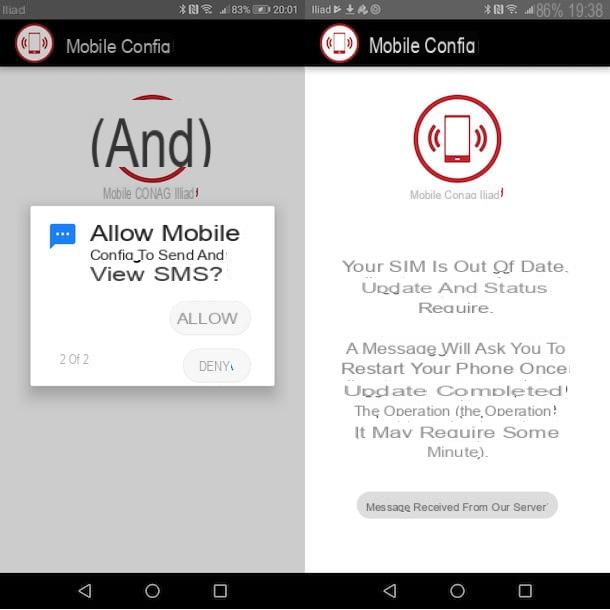
If you have a fairly modern mobile phone, it is very likely that, when you insert the SIM card, it will be able to automatically acquire the connection settings for the carrier in use. In other cases, however, the operator sends a Self-configuration SMS: once the message is opened, the correct settings of the Internet connection parameters are completed automatically.
If, for some reason, you need to configure your mobile phone for the Internet manually, you must first write down the data relating to the APN (ie the "system" that allows connection to the network) in use by your operator: below I indicate those relating to the most well-known mobile telephone operators.
TIM
- Name: TIM
- APN: unica.tim.com
- MMSC: http://mms.tim.com/servlets/mms
- MCC: 222
- MNC: 01
- APN Type: default, supl
- MMS Proxy: PM213.230.130.89:80
- Maximum MMS size: 614400
VODAFONE
- Name: Vodafone Mobile
- APN: mobile.vodafone.com or iphone.vodafone.com (only for iPhone / iPad) or web.omnitel.com
- MCC: 222
- MNC: 10
- APN Type: default, supl, dun
WIND
- Name: wind
- APN / Personal Hotspot: Internet.wind
- MCC: 222
- MNC: 88
- APN Type: default, supl
- MMS APN: mms.wind
- MMSC: http://mms.wind.com
- MMS proxy: 212.245.244.100: 8080
- Maximum MMS size: 307200
THREE
- Name: Three
- APN / Personal Hotspot: tre.com
- MMSC: http://10.216.59.240:10021/mmsc
- MCC: 222
- MNC: 99
- APN Type: default, supl, mms
- MMS Proxy: 62.13.171.3
- MMS port: 8799
FASTWEB
- Name: Fastweb
- APN / Personal Hotspot: apn.fastweb.com
- MCC: 222
- MNC: 08
- APN Type: default, supl
ILIAD
- Name: iliad
- APN / Personal Hotspot: iliad
- MMSC: http://mms.iliad.com
- MCC: 222
- MNC: 50
- APN Type: default, mms
- MVNO Type: GID
- MVNO value: F003
- Maximum MMS size: 200000
COOPEVOCE
- Your name - Coop
- APN - web.coopvoce.com
- MMCC - 222
- MNC - 01
- Type APN - default, supl
- APN protocol - IPv4
- APN roaming protocol - IPv4
POST-MOBILE
- Your name - PosteMobile
- APN - wap.postemobile.com
- MMCC - 222
- MNC - 33
- Type APN - default
- APN protocol - IPv4
- APN roaming protocol - IPv4
Once you have identified the parameters to use for your operator, you need to enter them in the phone, following one of the procedures that I am going to explain to you in the following sections.
Android
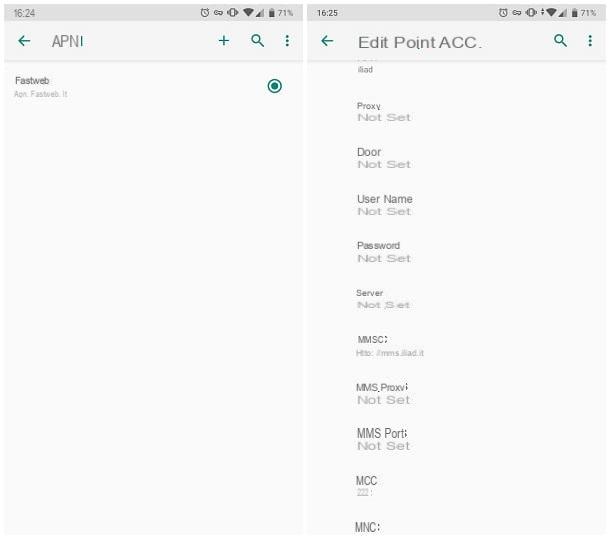
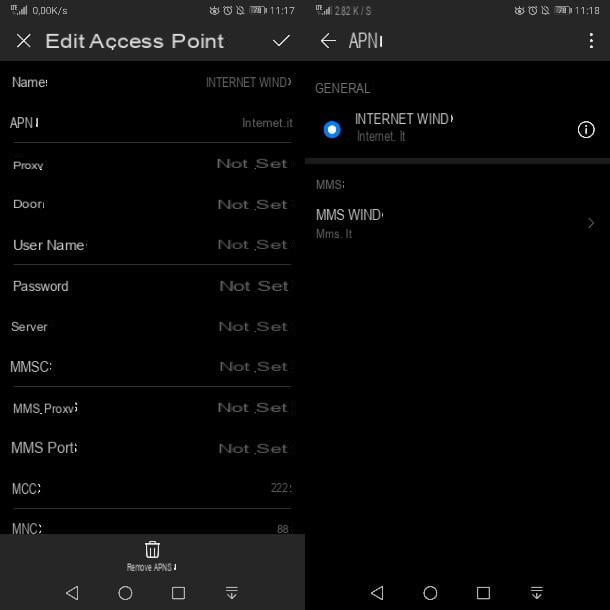
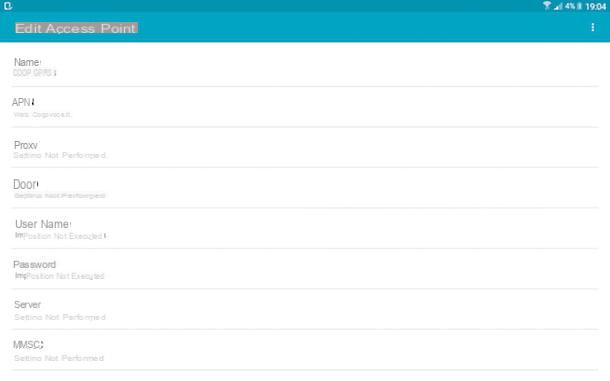
To specify a new access point on Android, pick up your phone and tap on the icon Settings, placed in the drawer of the device. Now, touch the voices Rete and Internet e Mobile network, select the SIM card you want to use for the Internet (if you have a dual-SIM phone) and then tap on the items Advanced e Access point names.
At this point, you can enter a new access point by tapping the button capacitor positive (+) lead, located at the top right, and filling in the next form with the parameters noted previously. When you're done, tap the button (⋮), select the voice Save and finally, put the check mark next to the newly created APN, to use it immediately.
iPhone
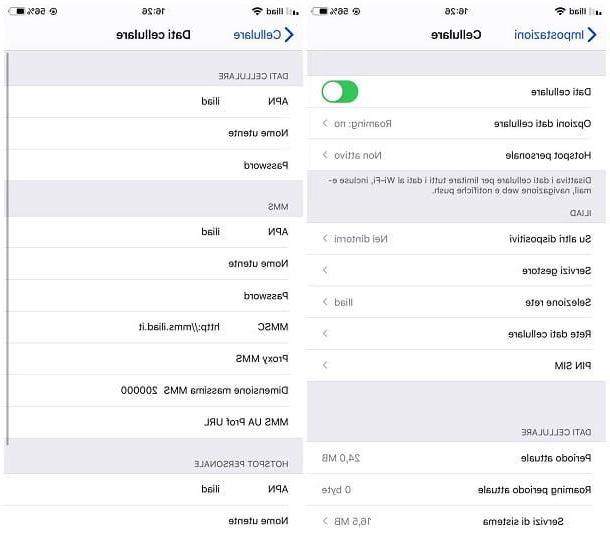
The steps required to set up a new access point on iPhone are very similar to those seen previously for Android: tap on the icon Settings of iOS, then on the voice Mobile phone and, later, on the option Cellular data network.
Finally, using the form proposed, enter the access data noted previously and return to the previous screen to enable the changes just made.
In case of doubts, problems or need for further clarifications regarding the steps required for configuring the Internet on the phone, I refer you to reading my thematic tutorials: how to configure Internet TIM, how to configure Internet Vodafone, how to configure Internet Wind, how to configure Fastweb Mobile, how to activate Internet Iliad, how to configure PosteMobile and how to configure CoopVoce.
How to set up email on your mobile
As a rule, smartphones automatically configure the email address associated with the system during the configuration phase (gmail your android e iCloud on iPhone). So, to access it, simply open the app dedicated to managing e-mail, such as Gmail for Android or Mail for iPhone.
If you are interested in configuring a new e-mail address, different from the one already used to configure the phone, you must instead follow the steps that I am going to illustrate in the following sections.
Android
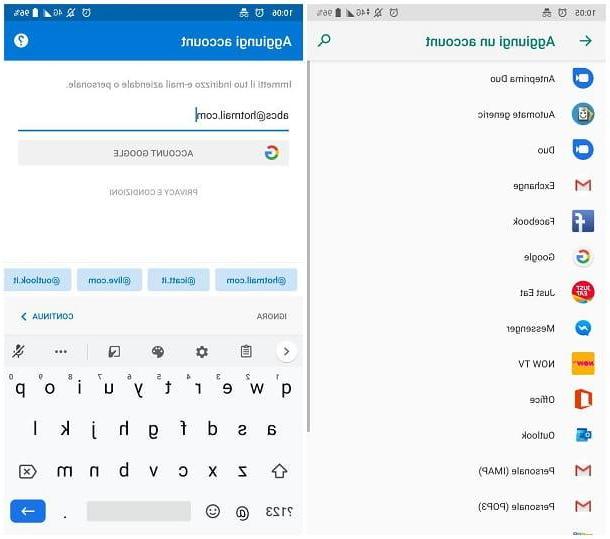
If you are using a smartphone with an operating system Android, fai tap sull'icona delle Settings, then on the voice Account and, later, on the option Add account. Next, choose the e-mail service of your interest, if present in the list, and follow the procedure that is proposed to you to log in and add the account to the device.
If your email service isn't listed in the available options, tap the entry instead Personal (IMAP) and, when richiesto, insertion il username and Password of your inbox: with a bit of luck, Android should automatically configure the parameters for incoming and outgoing mail.
When you're done, specify the sync options for the newly added account (eg. Contacts, Calendar and so on) and that's it: once the configuration procedure is complete, you can access your e-mail using the app gmail (or the default mail manager installed on your device).
For more information about setting up emails on Android, you can take a look at the specific tutorial I have dedicated to the topic.
iPhone
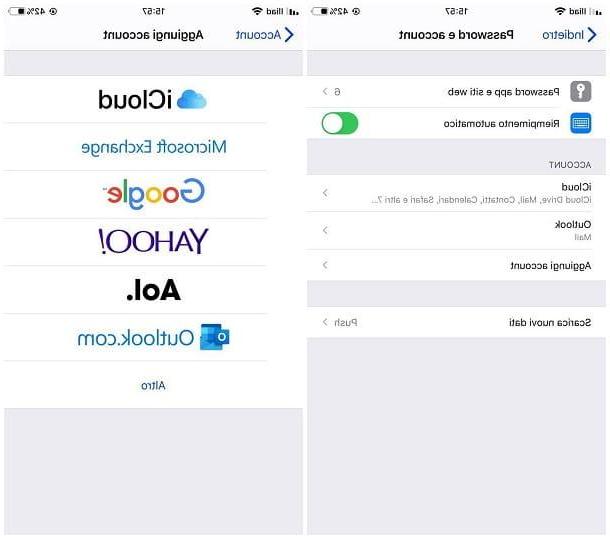
If you're interested in adding a new email address to the iPhone, first touch the icon of Settings of iOS and, in the screen that is proposed to you, first tap on the item Password and account (on iOS 14 and later you have to go up Settings> Mail or Settings> Contacts) and then on that Add account.
Next, select the email service you want to set up and, when prompted, enter theemail address and Password access to the mailbox. If required, also specify a Description account.
If the service of your interest is not present in the list of available accounts, tap on the option Other, type le credenziali d'accesso of your inbox, when requested, and specify i IMAP parameters to use to download and send emails: I have shown you some of the most used IMAPs in my guide on how to activate IMAP.
In any case, these "coordinates" can be retrieved from the website of your e-mail provider, or through a short Google search (using, for example, the key IMAP parameters [mail provider name]).
Once you have entered the required information, tap the button NEXT, indicates the items to be synchronized with the email service in question (eg. mail, contacts, Calendar and so on) and, when done, tap the button Save, in order to add the new account to the Mail app.
To learn more, I suggest you read my guide on how to set up Mail on iPhone, in which I explained everything to you in great detail.
How to set up your mobile phone for your computer
Operating systems Android e iOS they are naturally predisposed for connection to PCs equipped with an operating system Windows and Mac: in general, all that needs to be done is to connect the devices together via USB cable and wait for the computer to automatically recognize the connected smartphone.
However, the procedures for use may be different, depending on the phone in your possession, the operating system in use and the operation you intend to complete. Below I show you some examples.
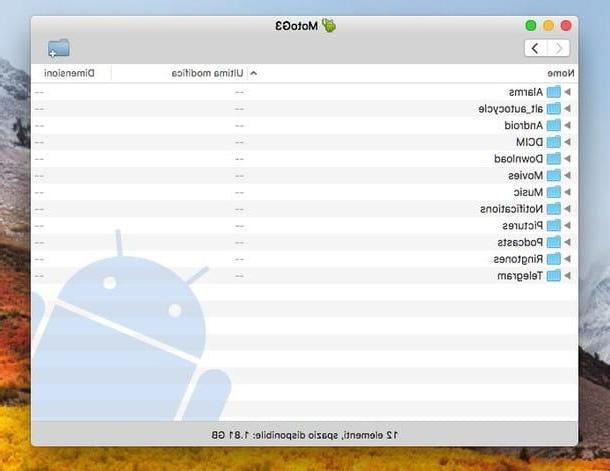
- Access to data in memory - you can access the memory of Android using theFile Explorer Windows, or the program Android File Transfer, for macOS. To access the memory of theiPhone, you need the software iTunes for Windows or use the Finder of the Mac (from macOS 10.15 Catalina onwards).
- Backup and other operations - there are specific software that can be installed on the computer and allow you to perform a large number of operations on the phones Android and on iPhone. The latter, in particular, can also be conveniently managed by the Finder of the Mac (from macOS 10.15 Catalina onwards).
If you want even more detailed instructions regarding the connection between smartphone and PC, I refer you to reading my tutorials on how to connect Android to PC and how to connect iPhone to PC.
How to configure the mobile phone for the car
It interests you configure the mobile phone for the machine, in order to listen to music through the resident speakers "on board", or to manage incoming calls?
Then you will be pleased to know that all modern smartphones provide this possibility, as long as the on-board computer / car stereo is prepared for the connection you intend to use. Below is a list of the most popular connection methods at the moment.
- Smart systems - Many modern cars are equipped with on-board computers compatible with Android Auto or Apple CarPlay. These two software systems allow you to manage, respectively, Android smartphones and iPhones via the car's LCD screen and steering wheel controls. For further information on Android Auto and CarPlay, I invite you to read the tutorials I have dedicated to you.
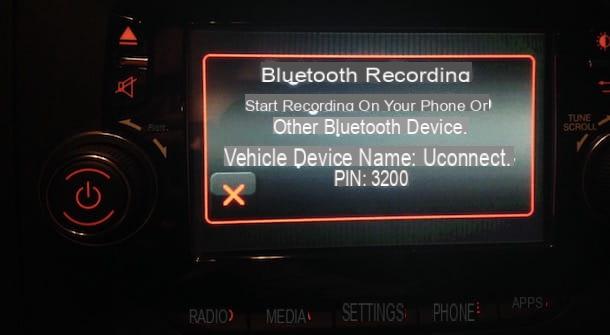
- Bluetooth - if the car's on-board computer or stereo is compatible with Bluetooth, simply use the classic pairing procedure provided by Android and iOS, to pair the devices together. Once connected, it is possible to listen to the music playing on the smartphone from the stereo and, in some cases, to control the smartphone using the physical buttons of the computer and / or the steering wheel controls.
- AUX cable - if you have a phone with a 3.5 mm jack input (the one usually used for headphones) and a stereo equipped with an AUX-IN input, you can connect the two devices together, using a male-male AUX cable. This system, however, allows only the reproduction of music (and phone calls), without the possibility of additional controls.
In this regard, I made a tutorial entirely dedicated to connecting the phone to the machine, in which I explained to you in a rather detailed way how to use the techniques listed above.
How to configure the mobile phone