Configure Vodafone MMS on Android

Do you use an Android smartphone? Then to configure Vodafone MMS you have to go to the menu of Settings (the gear icon located on the screen with the icons of all the apps installed on the phone) and select the item Other from the menu Wireless and ret.
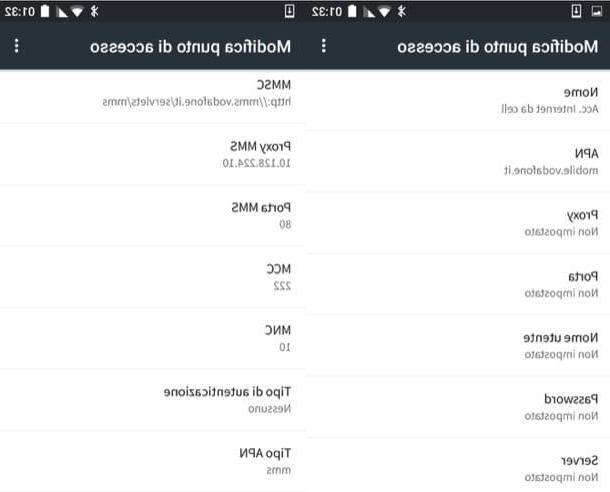
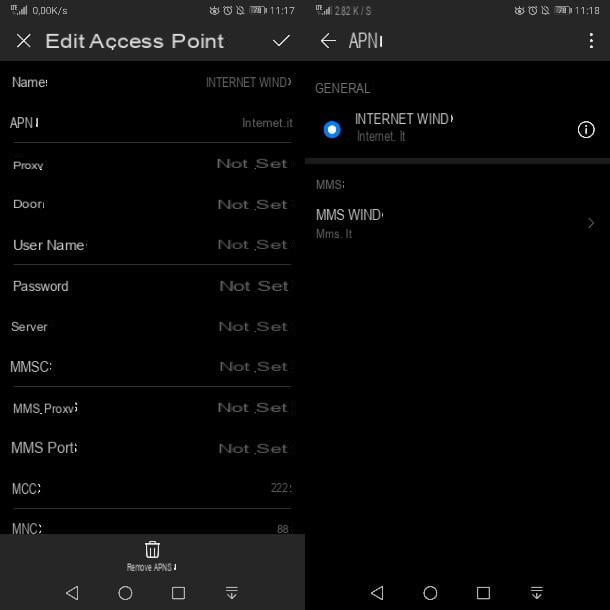
In the screen that opens, first presses on the item Cellular networks, by your complaint Access point names and select the named access point MMS Vodafone. If not, press the button + (more) located at the top right and fill out the form that appears following the diagram below.
- NAME: MMS Vodafone
- APN: mms.vodafone.com
- PROXY: not set
- BRINGS: not set
- PROXY MMS: 10.128.224.10
- USERNAME: not set
- PASSWORD: not set
- SERVER: not set
- MMSC: http://mms.vodafone.com/servlets/mms
- PROXY MMS: 10.128.224.10
- MMS PORT: 80
- MCC: 222
- MNC: 10
- APN TYPE: mms
- APN PROTOCOL: IPv4
- APN ROAMING PROTOCOL: IPv4
- BEARER: not specified
- MVNO TYPE: not set
At this point, pigia sul pulsating menu at the top right (the icon with the three dots) and select the item Save from the box that appears. Wait a few seconds and you should finally be able to send and receive MMS.
If you have one Android tablet equipped with SIM support, you can activate MMS by following the procedure just seen together for mobile phones. If, on the other hand, you are unable to make the Internet connection work via the 3G / LTE network, try changing your settings as follows: go to the screen Settings> Wireless and networks> More, presses on the voice Cellular networks (o Mobile networks), then on Access point names and select the named access point Internet. If not, press the button + (more) located at the top right and fill out the form that appears using the data you find below.
- NAME: Internet
- APN: web.omnitel.com
- PROXY: not set
- BRINGS: not set
- PROXY MMS: not set
- USERNAME: not set
- PASSWORD: not set
- SERVER: not set
- MMSC: not set
- PROXY MMS: not set
- MMS PORT: not set
- MCC: 222
- MNC: 10
- APN TYPE: Internet
- APN PROTOCOL: IPv4
- APN ROAMING PROTOCOL: IPv4
- BEARER: not specified
- MVNO TYPE: not set
Configure Vodafone MMS on iPhone

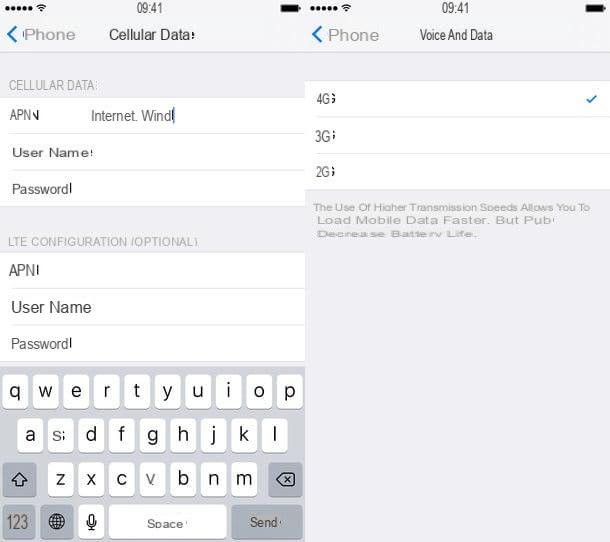
configure MMS Vodafone on an iPhone you have to follow an even simpler procedure. All you have to do is go to the menu of Settings (the gear icon on the iOS home screen), select the items Cellular> Cellular Data Network from the screen that opens and fill in the form that is proposed to you following the diagram below.
- APN: mms.vodafone.com
- MMSC: http://mms.vodafone.com/servlets/mms
- PROXY MMS: PM010.128.224.010:80
When the operation is completed, press on the item <Mobile which is located at the top left to save the settings, wait a few seconds and you should be able to send / receive MMS from your Vodafone line.
If you are using an iPad with Cellular support and you are unable to surf the Internet via the Vodafone data network, go to Settings iOS, select the item Cellular data from the left sidebar and set the value web.omnitel.com in the field APN. Leave all other form fields blank.
If, following the instructions above, you are unable to solve your problems with MMS and Internet browsing, try calling Vodafone operator or contacting Vodafone support via the Internet by referring to my tutorial on the subject.
How to configure Vodafone MMS