Preliminary operation
Before getting to the heart of the topic, discovering how to create a Windows XP live CD and what are the tools you can use to do it, you need to get the installation disc of the operating system or, alternatively, yours ISO image.
Unfortunately, however, considering that Windows XP is an obsolete operating system, it is no longer possible to download its ISO images or purchase its installation CD through official channels.
However, if you already have an OS installation disk, you can turn it into an ISO image using ad hoc programs, such as the ones I suggested in my article on how to create an ISO image.
Also in the case of the installation disc, keep in mind that most of the computers currently marketed, both fixed and portable, do not have a burner. Consequently, if your workstation does not have one, in order to create and use the Windows XP disk, you will necessarily have to get a burner to be connected via USB: if you need some advice about it, you can refer to my purchase guide dedicated to external burners.
Create a Windows XP live CD
After finding the Windows XP disk or ISO image, you can finally take action and find out what needs to be done to create a Windows XP live CD: everything is explained in the following lines.
To perform the operation in question, you must resort to the use of a special software, called Bart PE Builder: it is a free program that works on all Microsoft operating systems that, in a few clicks, allows the creation of a live version of Windows, full of programs and fully functional from CD-ROM, without having to install anything on the PC. Software development has long since been abandoned, but it still continues to run smoothly.
Therefore, first download the program by going to the download page on the MajorGeeks website and clicking on one of the links Download @ MajorGeeks that you find at the top right.
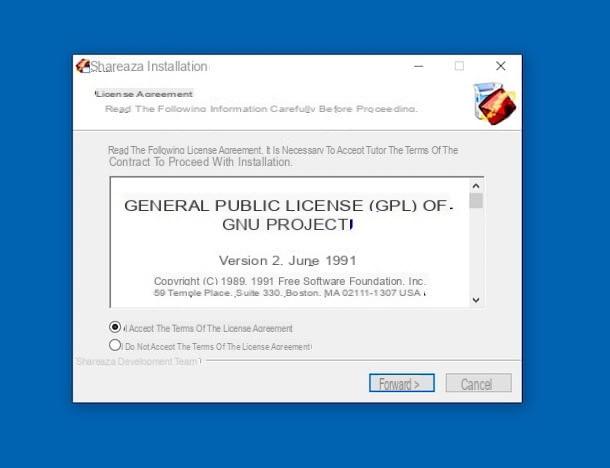
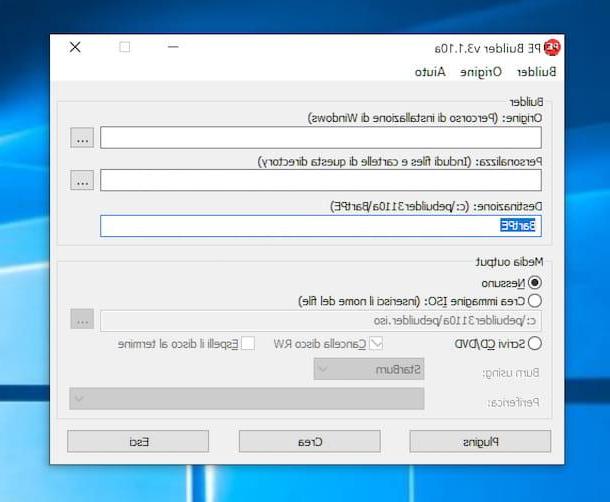
Once the download is complete, open the .exe file just got it, by double clicking on it, click on the button Yes in the window you see appear on the desktop and then presses the button OK to confirm the use of the city language. Then press the button NEXT four consecutive times on that one Install and, finally, on the button end.
In the additional window that you now see appearing on the screen, click on the buttons Accept e No, then insert the Windows XP disk into the CD / DVD drive connected to the computer or keep the ISO image of the OS at hand, click on the button [...] che trovi in corrispondenza della voce Origin and select the disk or the ISO file. Then click on the button OK.
Now, to include one folder of your computer in the live version of Windows XP, click on the button [...] located at the entry Customize, select the folder of your interest and click on the button OK, to complete the operation.
At this point, you need to worry about choosing the programs, called plug-in, functional to what you intend to do and which must be present in your live version of Windows XP. First of all, download the XPE plugin, which allows you to view the taskbar and the Start button, by connecting to this Web page. Then go to this website and download all the plug-ins that you think may be useful, by clicking on the button depicting a white sheet and a yellow wheel that you find in correspondence with the name of each component.
Now you can add the newly downloaded plug-ins to the live version of Windows XP you are about to create: to do this, click on the menu Builder which is located at the top left, then on the item Plugins and then press the button Add. At this point, go to the folder where you saved the plug-ins, select them and click on the button OK. If you deem it appropriate, you can also activate or deactivate the predefined plugins by selecting them from the list and clicking on the button Enable / Disable.
Then, close the plug-in list window by clicking on the button Close located in the lower left part of the screen, and proceed with creating the disc with the live version of Windows XP.
If you previously inserted the burner by connecting the Windows XP installation disc, select the voice Create ISO Image (if you want, you can change the folder where to save the ISO file by clicking on the button [...] located at the entry Create ISO Image) in the program window and click on the button Crea, to create an ISO image of the live version of Windows XP. Then proceed to burn the file obtained on a blank disk, following the instructions on what to do that I gave you in my guide on how to burn an ISO image.
If, on the other hand, you had selected the ISO files in Windows XP, insert a blank disk into the burner connected to your computer, select the option Write CD / DVD in the program window, check that in the drop-down menu adjacent to the item Peripheral your burner is selected (otherwise you can do it yourself) and start the procedure by clicking on the button Crea.
Alternative procedure
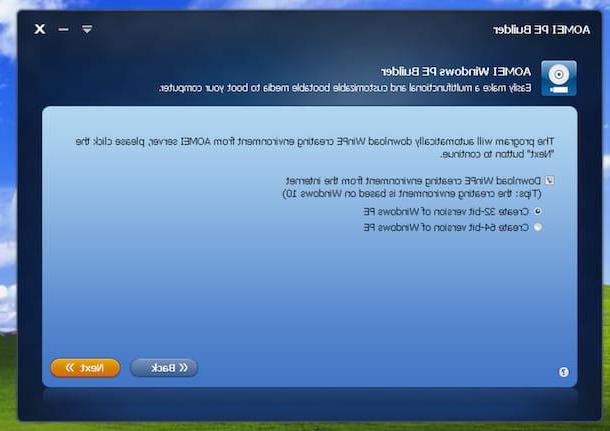
As an alternative to the above program, you can create a Windows XP live CD using Aomei PE Builder: this is another free software that also allows you to create a live version of Windows XP (and all other editions of the Microsoft operating system) quickly and easily.
Unlike the solution I mentioned earlier, it is not necessary to first find the Windows XP installation disk or its ISO image, as the program is able to do everything by itself but, this is essential, the software dev ' be used by Windows XP: if used by a different version of Windows, it will create a live CD of the operating system in use.
That said, to download the program on your PC, go to its official website and click on the button Freeware Download.
Once the download is complete, open the .exe file obtained, by double clicking on it, and, in the window that appears on the screen, press the button Next. Then select the item I accept the agreement and click on the button again Next four consecutive times. Finally, click on the buttons install e Finish.
Afterward, launch Aomei PE Builder via the collegamento added to the desktop or via the Start menu and click on the button Yes, in the window you see appear on the screen.
Now that you see the main screen of the software, click on the button Next, choose whether to create a Windows XP live CD a 32 bit or 64 bit ticking the option you prefer and click the button again Next.
Now you have to choose whether to include only the basic files and drivers in your live version of XP (which you can view by expanding the related menus by clicking on the [+] placed in their correspondence) or whether to add others, according to your needs, by clicking on the buttons add Files e Add Drivers that you find below and selecting the elements of your interest (in this case, please note that it is not possible to include more than 2 GB of applications). Then click on the button once again Next.
In the following screen, check the option Burn To CD / DVD and select your burner from the drop-down menu below. Then insert a blank disk into the CD / DVD drive connected to your computer and click on the button Next in the Aomei PE Builder window, to start the disk writing procedure.
If, on the other hand, you want to get an ISO file to burn with a different program, select the option Export ISO Fileclick on your button KATEGORIEN to indicate the location on your computer in which to save the image file that will be returned to you and press the button Next. Later, you can burn it by following the directions I gave you in my guide on how to burn an ISO image.
Use a Windows XP live CD
After completing the procedure to create a Windows XP live CD, regardless of the program used, in order to use the disk just obtained, leave it in the burner connected to your computer or transfer it to the computer you want to run the live version of Windows on. After that restarts o turn off and on again there PC.
When restarted, the live version of Windows just created should start automatically, whose operation is practically similar to that of the "classic" Windows XP. If, on the other hand, the version of Windows installed on the PC starts normally, proceed with change the boot drive of the computer, putting theCD-ROM drive: to do this, you have to go and act on the BIOS (acronym of “Basic Input-Output System), ie the software that resides in a chip placed on the motherboard of the computer and that contains all the instructions to start the operating system and put the hardware in communication with the software.
For more information on what to do, I refer you to reading my specific guide on how to enter the BIOS.
How to create a Windows XP live CD