Preliminary information

Prima di enter the live of the tutorial and spiegarti how to create free apps, it is my duty to provide you with some preliminary information on the case in question. First, know that to be able to create applications, it is essential to know the programming languages reference, or at least have a smattering of it.
The most popular programming languages on Android are Java e XML, while for the side iOS abbiamo Swift (launched by Apple in 2014) and Objective-C (historical language on which iOS apps have been based from the beginning): for further information, I refer you to reading my specific guides on how to start programming, how to create a program, how to learn Java and how to program in Java. Further detailed tutorials on the subject can also be found by doing some research on Google, on specialized Internet sites on the subject.
Programming languages can be used through special programs designed, precisely, for the development of applications. The software belonging to this category are essentially divided into two types: the SDK and independent commercial solutions.
The SDK (acronym for Software Development Kit), are tools made available by the companies that manage the operating systems (Google, in the case of Android, and Apple, in the case of iOS), thanks to which it is possible to make the most of the platform which they go to contact, allowing you to manage everything in detail, optimizing each function and performing various tests.
Independent software, on the other hand, as the definition itself suggests, is made available by third-party companies and allows you to develop content within an integrated environment. Usually, they are easier to use and allow you to work on a single project that can be exported in different formats, as a package compatible with multiple platforms, depending on the license you have.
How to create a free app for Android and iOS
Having made the necessary clarifications above, let's get to the core of the tutorial and let's find out, concretely, how to create free apps for android and ios. Below you will find the ones that, in my opinion, represent the best software you can use to reach your goal: put them to the test now!
Android Studio (Windows / macOS / Linux)
Android Studio is the Google tool that you can use to develop apps for Android. It's free and works both on Windows that of MacOS, But also on Linux e ChromeOS.
To be able to use it, visit the program's website and click on the button Download Android Studio, which is located in the center of the page. In the form that is shown to you later, check the box next to the item I have read and agree with the above terms and conditions and click on blue button, located at the bottom, in order to start the download.
A scaricamento ultimato, is stai using Windows, april il .exe file you have downloaded and, in the window you see on the desktop, click on the buttons Yes, Next (three times in a row), install, Next e Finish, to finish the installation.
Stai using MacOS, april il package .dmg ottenuto, trascina l 'android studio icon in the folder Applications on your Mac, right-click on it and select the item apri from the menu that appears, so as to start the program going to circumvent the limitations imposed by Apple on applications from non-certified developers (an operation that must be performed only at the first start).
In the window that, regardless of the operating system used, is now shown on the desktop, click on the buttons OK e Next (three times in a row); then click on the button Finish and wait for the download of the components needed to run Android Studio to start and complete.
Then start creating a new project by selecting the option Start a new Android Studio project on the main screen of Android Studio, and choose the module you want to start from. Assign, therefore, a name to the app you are going to develop and select the version of the SDK to use. Next, click on the button Next and indicate which of the available preset bases you want to use, then configure the values (or leave the default ones) and click on the button Finish.
After completing all the above steps, you will find yourself in the presence of the program editor: on the left you will find the structure of the different elements of the project, while on the right the area in which to enter the code parts. At the top, on the other hand, there are buttons for inserting objects, pasting parts of code, etc., and the menu bar.
When you see fit, you can save your app project by clicking on the item Fillet located at the top left and choosing the appropriate item from the menu that opens. For further information and to learn how to use this software, consult the Android Studio user guide provided by Google.
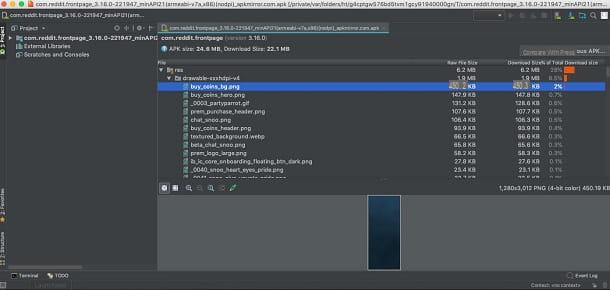
Xcode (macOS)
If you want to create free iOS apps, Xcode is the first resource you need to consider, as it is the tool officially made available by Apple for developing applications for its mobile platform. It's only compatible with macOS and it's free. It also integrates an iOS emulator, through which it is possible to test the functioning of apps and Internet sites, viewing them as they would be shown on the iPhone and iPad.
To download it, visit the relevant section of the online Mac App Store, click on the button View in the Mac App Store e, nella finestra che si apre, fai click sul pulsador Ottieni / Installa. If prompted, then authorize the download using Password Apple ID or touch ID (if the Mac you are using supports the above technology).
After downloading and launching Xcode, click on the button Agree present in the welcome window of the program, enter the Password of the Mac administration in the appropriate field and wait for the installation of the components necessary to run the software to be completed.
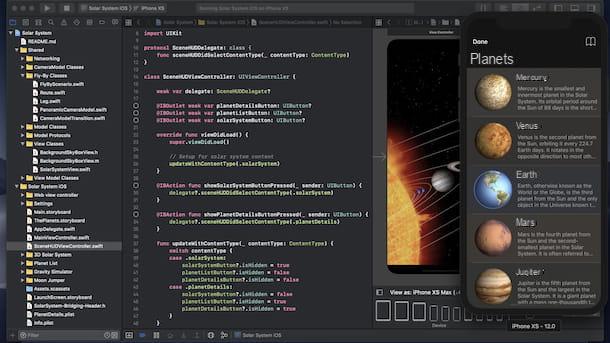
In the next window, select the option Create a new Xcode project, choose the template you want to use from those available and indicate the name you want to assign to the project. Then start devoting yourself to the development of your app using the appropriate editor, which is divided into several sections: on the left there is the project structure, in the center the section for entering the code parts, on the right the viewer, while at the top and bottom you will find buttons and menus with useful functions and commands.
When you want, you can save everything by calling up the menu Fillet (top left) and clicking on the appropriate item. For further information on how Xcode, I refer you to the specific web page on the Apple website.
Corona SDK (Windows / macOS)

Have you ever heard of Corona SDK? No? No problem, I'll explain what it is. It is a free program for Windows e MacOS which allows you to develop applications for Android and iOS in an extremely simple way. It includes everything needed to build, test and publish apps for the platforms in question. It should be noted, however, that on Mac it can only be used for the development of apps for iOS and that, again in this case, it needs Xcode in order to work.
To download it to your computer, visit the program website and click on the button Download, located at the top right. When the download is complete, if you are using Windows, april il .msi package ottenuto e, nella finestra che vedi will share your desktop, click on the button Next. Then check the box next to the item I accept the terms in the License Agreement and click on the button again Next twice in a row, then on that install and, finally, on the buttons Yes e Finish.
Stai using MacOS, april il package .dmg obtained and, in the window you see appear on the screen, click on the button Agree. At this point, drag the Corona folder in the folder Applications on your Mac and start the program by clicking on theCrown Simulator icon which was added to the Launchpad.
Now that, regardless of the operating system used, you see the Corona SDK on the desktop, register (it is essential), by clicking on the button Sign Up and providing the requested data in the browser window you see appear. Then, log in with your credentials via the appropriate software screen.
Adesso, premium pulsating New Project, enter the name you want to assign to your app in the dedicated field and specify the folder where you want it to be saved. Next, select one of the available templates, adjust the screen and orientation settings and press the button OK.
Now you can start getting serious about developing your app by using the console window to enter the lines of code. You can then view everything in the smartphone-shaped editor on the desktop. In addition, the various changes made are saved automatically. For further information on how Corona SDK, I refer you to the guidelines available on the program website.
How to create free apps online
Did you know it is possible to create a free online app, without having to download new programs on your computer and being able to count on the use of a visual editor? No? Well, now you are aware of it and, if you are interested in it, you can learn more by trying the solutions listed below.
MIT App Inventor
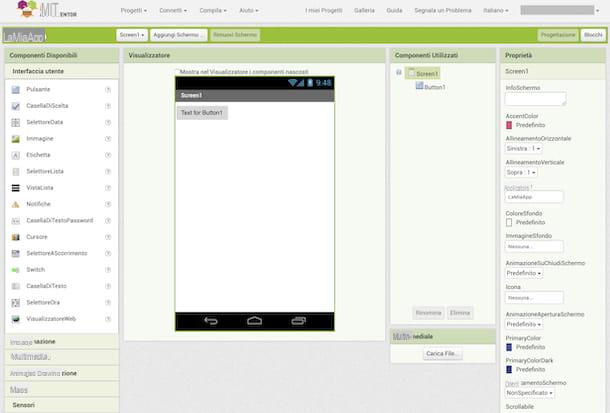
MIT App Inventor is a visual editor accessible via browser that allows you to develop applications for Android in an extremely simple way, without having to write a single line of code. It's free but, to use it, you need to log in with your own Google profile.
To use this service, go to the relevant web page, log in with your Google account and click on the button Start new project, located at the top. Then, in the box that is shown to you, type the name that you want to assign to the app you are going to develop, click on the button OK and translate the service interface to your language, using the drop-down menu at the top right.
Then, use the various sections in the editor to start developing your app: on the left you will find the list of elements and objects that you can add to the application interface, in the center the preview and on the right the list of elements that compose it, the menu with the properties of the selected objects and the button to upload multimedia files.
To add the elements of your interest to the app interface, simply select them from the list on the left, drag them to the editor section through which you can preview the app and drop them in the place you prefer. If you want, you can also change its properties, using the appropriate items and options visible on the right.
I also point out that, if you deem it appropriate, you can add new screens to the application by clicking on the button I add Screen at the top, while to remove them just select them and click on the button Remove Screen adjacent.
Once you have finished developing the app, to save it, click on the menu Projects located at the top left and click on the item Save project attached to it. If, on the other hand, you want to download the app on your computer, you have to select the option Export the selected project (.aia) to my computer that you always find in the menu Projects. For further details and insights on how MIT App Inventor, I refer you to reading the official guide of the service.
AppsBuilder
Similar to the platform I told you about in the previous chapter, AppsBuilder is an online service thanks to which it is possible to develop applications directly from the browser. You can use it to create apps for both Android that for iOS, starting from any website or online content. It should be noted that it can only be used upon subscription to a special subscription (with prices starting from 9 € / month), but it is also possible to try it for free, in a limited way.
To use AppsBuilder, visit its website, click on the button Try for free placed in the center and then on the button Continue. Therefore, create your account to be able to use the service by filling in the fields that are proposed to you.
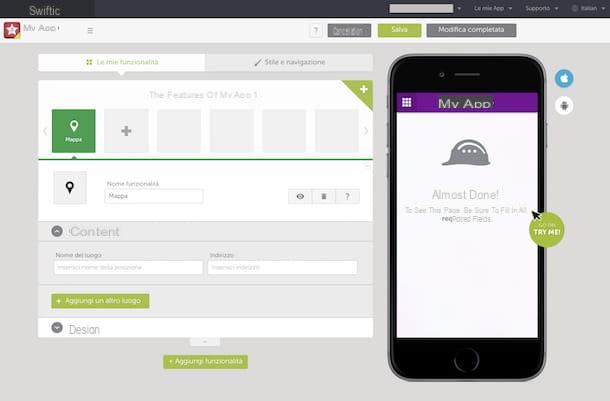
Once logged in, follow the wizard that is proposed to you to start creating your app, indicating it category of belonging e name. Subsequently, you will find yourself in the presence of the service editor: first of all, take care of translating the interface by selecting thecityno from the drop-down menu for choosing the language (top right).
Then select the tab My features, click here Add functionality and add the functions of your interest to the app by clicking on the relevant icons and making any customizations through the menus that are shown to you. In the section Style and navigation of the editor, on the other hand, you will find useful functions to change the app design, colors, etc.
Whenever you make changes to your application, remember to save everything by clicking on the button Save, located at the top. If, on the other hand, you want to exit the editor and save the changes at the end, click on the button Edit completed. To consult the user guides regarding AppsBuilder, you can refer to the appropriate section on the website of this service.
How to create free apps and make money
You have finally managed to create free apps and now you would like to understand how to publish them on the digital store of the mobile platform of your interest and earn thanks to the work done? I'll explain it to you right away. Contrary to what you may think, the hardest part is the one you have already faced.
Android

In regards to Android, to proceed with publishing your app on the Play Store, the first move you need to make is to create a developer account and associate it with yours Google account.
The operation, from the cost of dollars 25, it's very simple: all you have to do is go to the Google Play Console page and send your application to Google, uploading the related APK file, managing its metadata (i.e. version and system requirements) and thinking about the commercial part (title, description, etc.).
As for the possibility of earning money thanks to the apps you publish on the Play Store, you can do it in various ways: you can choose to make your apps available paid, or for free but with advertisements inside, thanks to which monetize.
You can also evaluate the possibility of proposing in-app purchases, through which to offer additional content to users, after downloading, upon payment of a specific sum of money. For more information about the use and operation of Play Console, I refer you to reading the official guide.
iOS / iPadOS
If you have developed an application for iOS / iPadOS, instead, to be able to publish it on App Store, Apple's digital application store for mobile platforms, you need to get a developer account.
The operation, unfortunately, is not free (it costs $ 99 per year) and must be carried out through the appropriate web page on the website Apple Developer Program, by clicking on the button Start Your Enrollment, which is located at the bottom.
The app publishing process you developed requires the use of Xcode and App Store Connect. The first is the software you need to develop the app and will also allow you to submit it to App Store Connect. The latter is Apple's web platform that will allow you to enter all the information on the app which will then go online on the App Store.
As for the monetization discourse, the same rules apply as for Android: you can choose to make money with your app by making it available paid, to allow free download with advertisements or, again, proposing in-app purchases to unlock additional content. For further details, I refer you to the consultation of the website dedicated to the Apple Developer Program.
How to create free apps