Preliminary operation
Before getting to the heart of the tutorial and discovering, in detail, how to make panoramic photos with Photoshop, make sure you have all the necessary requirements to complete the operation.
- Photoshop. As already mentioned at the opening of the post, to create panoramic images with Photoshop you need a fairly recent version of the famous Adobe photo editing software (at least CS4, although the CC version is recommended, more specifically the October 2017 release or later if you are interested in creating 3D panoramas). You can download a 7-day trial version of Photoshop by following the directions in my tutorial on how to install Photoshop. At the end of the trial, to continue using the program, you will need to subscribe to the service Adobe Creative Cloud, with prices starting at 12,19 euros / month to have Photoshop and Lightroom CC plus 20GB or 1TB of cloud storage. More info here.
- Photos suitable for creating a panoramic image. To get a good panoramic image, you need to start from a series of photos with specific characteristics. Adobe (the maker of Photoshop) suggests using photos taken using the same focal length, keeping the camera always at the same height (preferably through the use of tripods with swivel support) and forward the same exposure (Photoshop is able to correct different exposures, but too great differences between one image and another can negatively affect the software's ability to create the panoramic image). Also, you shouldn't use lenses that distort the image (although images shot via fish-eye lenses are supported) and you have to be careful to leave a good margin of overlap between images (The images need to overlap by about 40%, so if you leave a lower, or much greater, margin of overlap between shots, you risk compromising the correct creation of the panoramic image. avoid using the flash for some photos and not for others (you have to use it in all the images of the panorama or in none) and you have to keep the observation point fixed during the shots (so you must try not to move too much while taking a series of photos).
Create panoramic photos with Photoshop
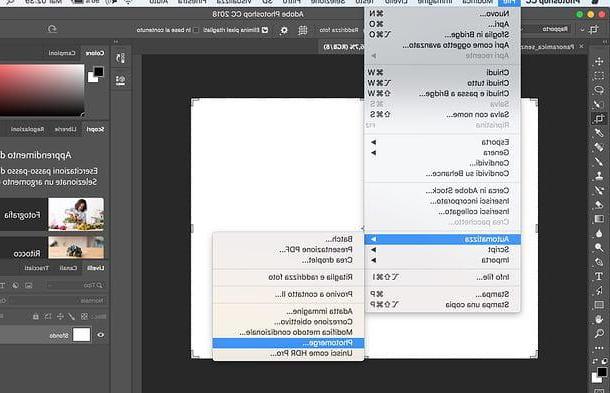
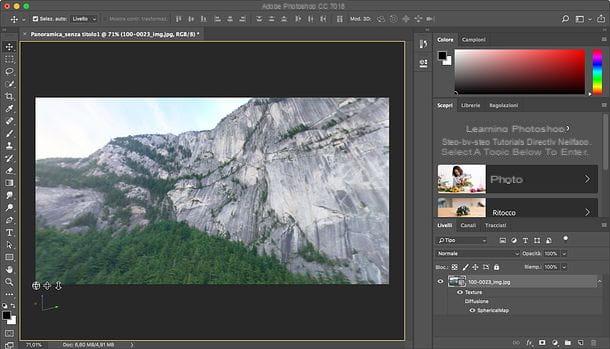
Once Photoshop is installed and the goodness of your photos is established, you can take action. Start, therefore, Photoshop and click on the entry Photomerge placed in the menu File> Automate which is located at the top. In the window that opens, click the button Browse .., select all the photos you want to use to create the panoramic photo and click on the button apri.
If your intention is to create a 360-degree panoramic image, select all the images that make up the panorama, except those that cover the top (zenith) or bottom (nadir) of the scene. You can add these images later.
At this point, you need to put the check mark next to one of the options located in the left sidebar in order to choose the technique to use for merging the photos.
- Automatic - by choosing this setting, you will leave Photoshop to analyze the photos and choose the merging technique deemed most suitable for them.
- Prospective - through this technique, the central image is used as a reference point and the others are adapted (stretched, skewed and repositioned) so that the overlapping points coincide in the best possible way. It tends to create "butterfly" distorted panoramas.
- Cylindrical - it is a particularly suitable solution for the creation of very wide panoramas. It uses the central image as a reference point for joining the other images, which are then arranged as in an unfolded cylinder. Reduces the "butterfly" distortion typical of the "Perspective" technique.
- Ball - simulates the creation of 360-degree panoramas, the shape of which resembles the inside of a sphere. It is also the ideal choice for processing images captured with video cameras capable of creating 360-degree panoramic images.
- Collage - combines the images as in a collage, rotating and scaling them as needed, so as to make them fit together in the best possible way.
- Reposition - joins the images as precisely as possible, without stretching or skewing them.
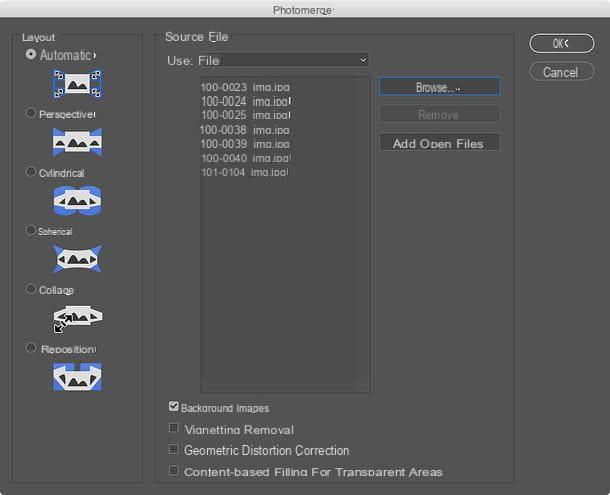
After choosing the type of union that best suits your needs, move to the bottom of the window and choose which options, among those available, to activate or deactivate.
For example, leaving the check mark on the item Blend the images, you can let Photoshop find the optimal edges between images and create seams based on those edges, with color matching; if you activate the correction of geometric distortion, you can automatically compensate for wide angle, barrel and pincushion distortions resulting from merging images; activating the function for the removal of vignetting you can correct any dark edges present in the photos, while activating the content-based fill for transparent areas you can have the transparent areas of the panoramic image automatically fill with content similar to that of the surrounding areas.
Once you have made your choices, click on the button OK and wait a few seconds for Photoshop to process the panoramic image, and then show it to you.
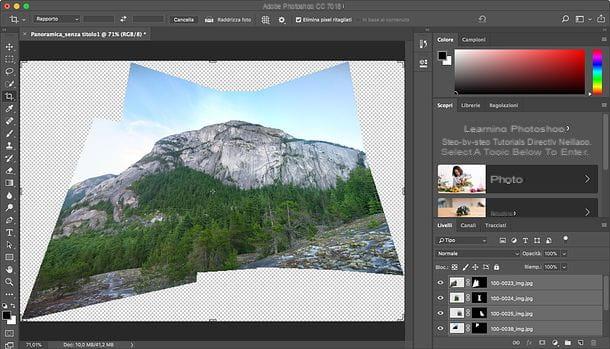
At the end of the procedure, you will surely notice the presence of some portions of photos protruding from the sides of the generated image. To remove them, you need to select it cutter tool from the toolbar of Photoshop, highlight the portion of the panorama without “smudging” and double-click on it.
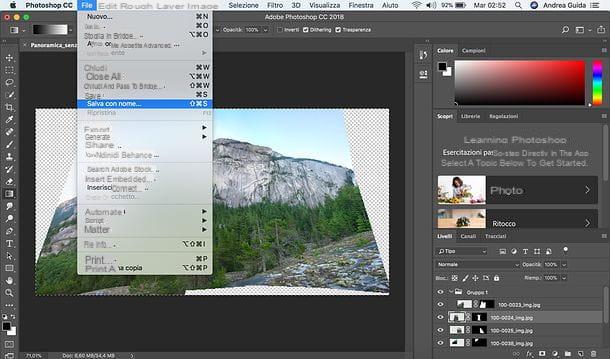
If you are satisfied with the result, all you have to do is save the panoramic photo created by selecting the item Save with name from the menu Fillet di Photoshop. If not, press the key combination instead Ctrl + Z (if you are using Windows) or cmd + z (if you use macOS) to go back and try to repeat the creation of your panorama using another of the options made available to you by Photoshop.
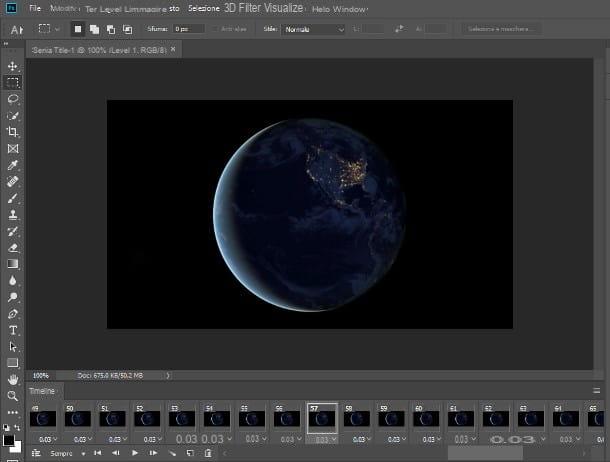
If you want to create a 360 degree panorama, after selecting the images to merge and merging them in mode sphericalgo to the menu 3D> Spherical Panorama> New Layer Panorama from selected layers (above) and you will get a 360 degree navigable spherical panorama. If you wish, then manually add the upper and lower images into the sphere.
Next, use the tool Move to rotate the camera view (feature only available in Photoshop CC versions starting with the October 2017 release) and, if you are satisfied with the result, export your panorama by going to the menu 3D> Spherical Panorama> Export Panorama Photoshop (top).
If some details are not clear to you and / or you want more information on how to create panoramic photos with Photoshop, consult the official support page of the Adobe website dedicated to the topic.
Create panoramic photos with Photoshop on smartphones and tablets
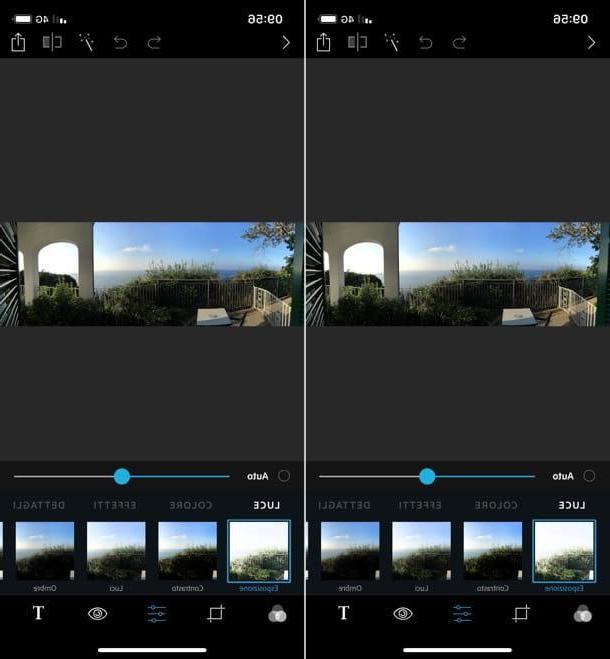
As I explained to you in my Photoshop app tutorial, Photoshop is also available as an application for smartphones and tablets. However, I'm sorry to inform you about this, in the mobile environment it does not yet offer the function to create panoramic images. The only thing that can be done is to import a panoramic photo taken previously with the app Camera of your device and retouch it using the tools included in the application.
To take a panoramic photo with the Camera app of your smartphone or tablet, all you have to do is start it, activate the Panorama mode (on Androidusually just swipe from left to right and select the icon panorama from the menu that opens, while on iPhone / iPad just select the item View from the menu below) and take a picture moving slowly in a circular fashion.
How to make panoramic photos with Photoshop