How to record PC screen without programs
To begin with, let's find out how to record PC screen without programs or, rather, using the tools present "standard" in Windows and macOS. You probably weren't aware of it, but you should know that both Microsoft's and Apple's operating systems include ad hoc tools that can be used without any hassle on anyone's part. To find out more, read on.
How to Record Windows 10 PC Screen
Stai using Windows 10 and you want record the PC screen without installing additional programs, I strongly advise you to turn to the use of the Xbox Game Bar: a utility included in the latest edition of the Microsoft operating system, through which you can record video clips of game sessions and which can also be used to capture any other activity that is performed on the computer screen.
The only thing to note is that the tool can only be used on PCs equipped with one of the following video cards: NVIDIA GeForce 600, NVIDIA 800M or later, AMD Radeon HD 7700 series, HD 7700M, HD 8500, HD 8500M, R7, R9 or later. If you don't know what graphics card is in use on your computer, you can find out by following the instructions in my guide on the subject.
That said, in order to use the Xbox Game Bar, first make sure that it is active (and if not, fix it). To do this, click on Start button (I cheer with the windows flag) site on taskbar and select the icon of Settings (Quella a forma di ruota d'ingranaggio) present in the menu that opens. In the window that appears on the desktop, select the item Toys, click on the wording Xbox Game Bar in the left sidebar and make sure the switch on the top right is set to On (otherwise you provide).
After completing the above steps, bring up the Xbox Game Bar using the key combination Win + G on the keyboard. Alternatively, click the Start button on taskbar, type "Xbox" in the search field attached to the menu that opens and select the result related to Xbox Game Bar.
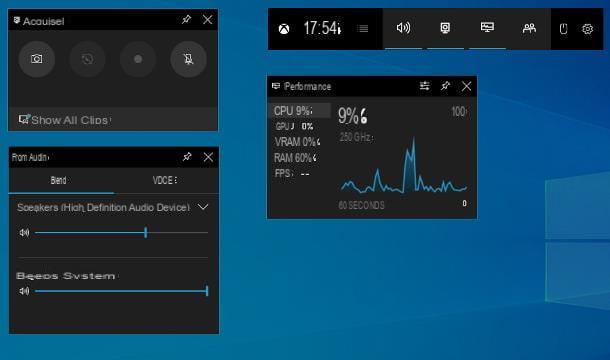
At this point, you should see the utility components on your PC desktop. To start record the screen of the Windows 10 PC, then click on the button Rec that you find in the card Acquire (if the card is not visible, you can fix it by clicking on the button with the camera found on the main application bar). After starting the video capture, you can hide the Xbox Game Bar widgets (except for the recording control widget) by using the key combination Win + G on the keyboard.
If along with what happens on the screen you want to capture the audio coming from the microphone, before starting the recording, click on the button with the icon of the microphone (which you always find in the card Acquire); to select the audio capture device and adjust the volume, use the tools on the box instead Audio (if it is not visible, to remedy, click on the button with thespeaker found on the utility main bar).
When you want, you can then stop recording the screen by pressing the button with the square that you find in the card Acquisition status. The resulting video will be automatically saved in the folder VideoCaptures of Windows.
If you prefer, you can use the Xbox Game Bar's screen recording function even without starting the latter, using some special keyboard shortcuts: Win + Alt + R to start and stop screen recording, Win + Alt + G to record the screen for 15 seconds e Win + Alt + M to enable or disable the use of the microphone during screen recording.
How to Record Mac Screen
Even if you are using MacOS you can record your computer screen without having to use third party programs. How? Simple: using Screenshot, the utility included "standard" in macOS 10.14 Mojave and later that allows you to capture the screen also including the audio coming from the microphone.
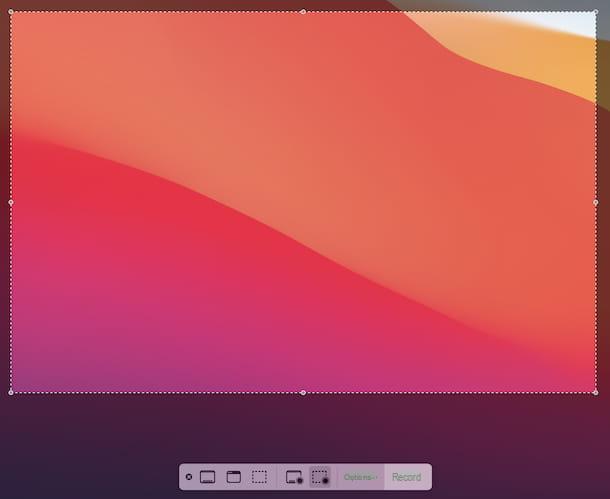
So, for record the Mac screen, first start the screenshot by selecting the relevant one icon (Quella with the camera on the square with the corners highlighted) that you find in Launchpad. Alternatively, you can launch the utility using the key combination cmd + shift + 5 on the keyboard.
When you then see the Screenshot toolbar appear, decide whether you want to start recording the entire screen or a portion of it. In the first case, click on the button depicting the rectangle with the circle, while in the second press the button with the dashed rectangle and the circle and use the cursor that appears to define the exact area to film.
Then, you can start the desk registration by clicking on the button Register, while to stop it, just call up the Snapshot toolbar and click on the button Stop you find on it, after which the resulting video will be automatically saved on your desktop.
If you want to add audio from the microphone to the recording as well, click on the menu before you start filming the screen options found in the toolbar of the program, locate the section Microphone in the menu that opens and select the microphone name to use.
Programs to record the PC screen
The default solutions of Windows and macOS did not satisfy you completely and, therefore, you would like me to suggest you some programs to record the PC screen? I'll settle you instantly! In fact, below you will find all those that, in my humble opinion, represent the best third-party software useful for the purpose. Identify what you think can do the most for you and put it to the test.
How to record pc pc screen with OBS
If you want to film your computer screen with third-party tools, I suggest you first turn to Open Broadcaster Software, otherwise known simply as OBS. It is a totally free and open source program that can be used on Windows, macOS and Linux. Thanks to it it is not only possible to record what happens on the computer screen, but also to broadcast everything in live streaming (eg on Twitch) and create combined recordings between desktop and webcam.
To download the program to your PC, visit its website and click the button with the nome of the operating system in use on your computer.
When the download is complete, if you are using Windows, april il .exe file obtained and, in the window that opens on the desktop, click on the buttons Yes, Next (for two consecutive times) e install, then complete the setup by pressing the button Finish.
Stai using MacOS, april il package .dmg ottenuto, trascina l 'OBS icon in the folder Applications computer, right-click on it and select the item apri from the context menu, then press the button apri in response to the warning that appears on the screen, so as to start the program, however, going around the restrictions desired by Apple against unauthorized developers (an operation that must be carried out only at the first start).
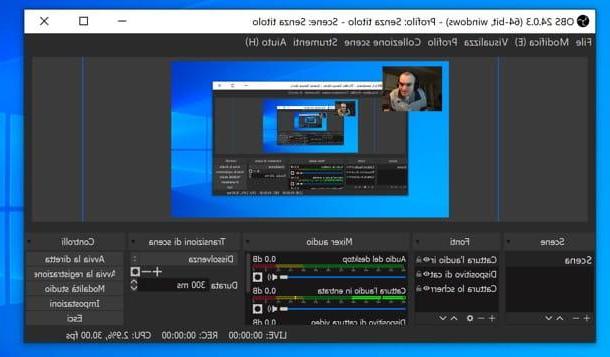
Now that you see the main window of the software, for record PC screen with OBS without streaming it, select the option Optimize for recordings only, I don't do direct that you find in the wizard configuration screen, then press the button NEXT (twice in a row) and on that Apply the settings.
At this point, click on your button Settings located at the bottom right, select the item Exit from the sidebar and make sure that in the drop-down menu in correspondence with the item Exit mode the item is selected Simple (otherwise you provide).
Then take care to indicate the folder in which to save the recordings by clicking on the button Shop by Department that you find next to the field Registration path, make sure that in the drop-down menu Recording quality the item is set The same as the live one (otherwise always do it yourself) and choose the video format of the recording from the drop-down menu Registration form (eg. MP4 or MKV). To save your changes, then click on the buttons Apply e OK.
Proceed now going to tell the program which are the sources it should use for capturing videos. To do this, click the button capacitor positive (+) lead placed under the box References, select the voice Capture the screen from the menu that appears and click on the button OK (twice in a row). Now, move and / or resize the panel with the desktop in the OBS window, so that the "shot" includes the area of the screen of your interest.
If it is your intention to record the PC screen by making a video in which the desktop and webcam video stream are simultaneously shot, click the button again capacitor positive (+) lead located in the box References and select the item Video cattura device from the menu that appears. Next, hit the button OK, to create this new source and then, in the panel dedicated to the settings that will open, press again on OK, to leave all the default settings (making sure that the right webcam is selected in the appropriate drop-down menu). You can now change the preview of the screen you are going to capture by manually moving the webcam frame to the point of the video you prefer.
If you wish record PC screen with audio, press the button once again capacitor positive (+) lead located in the box References and choose to add the incoming audio (i.e. the one coming from the microphone) and / or the outgoing audio (the one coming from the PC) to the recording, selecting, respectively, the options Cattura l'audio in entrata e Cattura l'audio in uscita. However, keep in mind that on Mac to record system audio you need to resort to external solutions, as I explained to you in detail in my guide on the subject. Next, adjust the volume levels for the microphone and speaker via the box Audio mixer.
Now that you have correctly configured the use of OBS, there is nothing left to do but click on the button Start recording. When registration is complete, call up the main OBS screen again and click on the button Finish the registration. For more information, feel free to check out my complete guide on OBS.
How to record PC screen with VLC
Another tool you can rely on to record your computer screen is VLC. In case you have never heard of it, it is a famous media player for Windows, macOS and Linux (as well as for mobile devices and other devices) capable of "digesting" practically any format of audio and video files without having to resort to use of external codecs. However, I chose to tell you about it in this tutorial of mine as it also integrates a whole series of extra functions, including the ability to film the desktop.
To download VLC to your computer, go to its website and click on the button Download VLC. To its completeness, it was used Windows, april il .exe file obtained and, in the window that is shown to you on the desktop, click on the buttons Yes, OK, NEXT (three consecutive times) e Install. Then, finish the setup by pressing the button end.
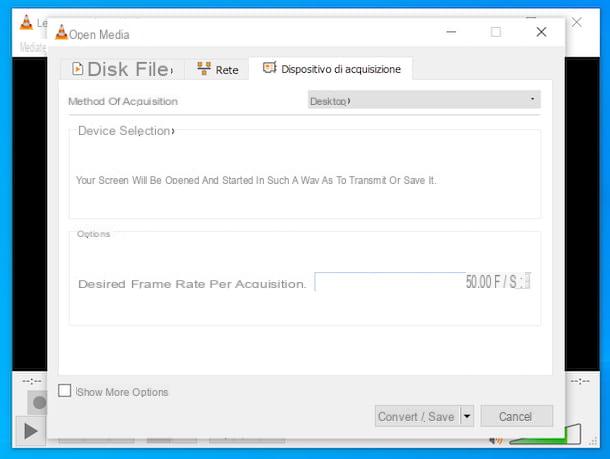
Then wait for the VLC window to be visible on the screen, then click on the menu Media which is located at the top left and on the entry Convert / Save attached to it, then go to the card Acquisition device present in the new screen that has opened and select the item desktop from the drop-down menu next to the item Method of acquisition. Then proceed to adjust the update frequency using the field Desired frame rate for capture.
After completing the above steps, click the button Convert / Save located at the bottom, make sure that in the field Source that you find in the next window, the option is set screen: (otherwise you can do it yourself), check that the voice Converted is selected (otherwise always do it yourself) and select the option Video - H.264 + MP3 (MP4) give menu to tendin Profile.
Infine, click your button Shop by Department located next to the item Destination file and indicate the location in which to save the video that will be returned to you, then type the name you want to assign it in the appropriate text field and press the button Save.
After doing all the above steps, for actually record PC screen with VLC, award-winning starts. When you deem it appropriate, you can stop the acquisition by clicking on the button Stop that you find in the bottom bar of VLC.
Stai is invented using MacOS, april il package .dmg you downloaded from the VLC site and drag theprogram icon in the folder Applications computer, then right-click on it and select the item apri from the context menu. Next, click on the button apri in the window that appears on the screen, in order to start the software, however, going around the limitations imposed by Apple on applications from non-certified developers (an operation that must be carried out only at the first run).
Now that you see the program window, select the menu Fillet located at the top left and choose the item Open capture device from the latter. In the new window that appears, make sure the tab is selected Acquire (otherwise you do), select the option Screen from the top menu, set the value you prefer in the field Frames per second and tick the option Flow output.
Then click on the button Settings and adjust the parameters related to saving the file through the new screen that is proposed to you. So, select the item Fillet, first prize Shop by Department and indicates the location to save the output file, then select the item MPEG 4 give menu to tendin Encapsulation method, put the check mark next to the items Video e Audio and make sure you are using the right codecs (i.e. h264 e mp3) and to correctly set the acquisition parameters (2048 kb / s for video bitrate e 128 kb / s for 2-channel audio bitrate). Then remember to press the button OK per salvare I modified it.
Finally, start the screen recording by clicking on the button apri. When you deem it necessary, you can end the recording by clicking, even in the case of the Mac, on the button Stop which is located at the bottom. For more information, read my VLC tutorial.
Other programs to record the PC screen
Wheel other programs to record the PC screen? Then take a look at the following list: you will find additional software, both free and paid, used for this purpose and able to offer more than appreciable results.
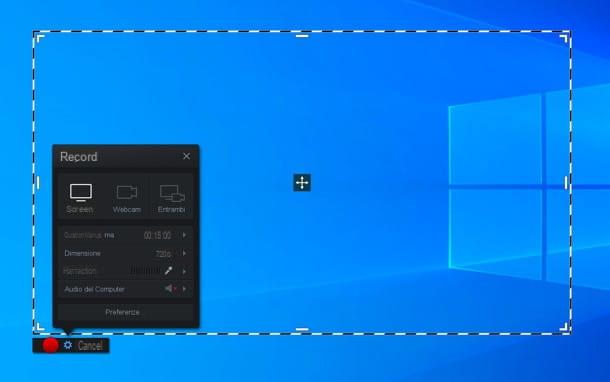
- Screencast-o-Matic (Windows / macOS) - more than a real program, it is an online service that allows you to perform the operation described in this guide by installing a small application on your computer, available for both Windows (including the less updated versions , so it can also be considered an excellent solution for record the screen of the Windows 7 PC) that for Mac. Basically it is free, but it allows you to create movies up to 15 minutes long, it does not allow you to capture computer audio and stamps a watermark on all recorded videos. To get around these and other limitations, you need to subscribe to a paid subscription (which has costs starting from $ 1,65 / month).
- Camtasia Studio (Windows / macOS) - cross-platform software specifically designed to record the PC screen and to enrich the videos obtained with real-time narrations, effects, music and other elements. It is paid (costs € 244,53), but can be tried for free and without limitations for 30 days. I told you about it in detail in my specific guide.
- CamStudio (Windows) - it is a free and open source software for Windows operating systems, which is extremely fast and light and which has a very easy to use user interface. It supports two different recording formats: AVI videos and Flash SWF videos. Its flagship is the possibility that users are offered to add directions, arrows and writings to movies even if they do not have an editor for post-production.
- Screenflow (macOS) - is an exclusive program for macOS dedicated entirely to screen recording. It also includes functions to edit and edit captured movies quickly and easily. It is paid (it costs $ 129), but it can also be downloaded in a free version that does not have limits on use but imprints a watermark on the acquisitions.