How to create folder on iPad desk
To begin with, let's find out how to create a folder on iPad on desk, or rather on the home screen, in such a way as to be able to group applications within it and organize them in the best possible way, to have a more orderly home screen.
To carry out the operation in question, all you have to do is take the iPad, unlock it, press the icon of the first application on the home screen that you want to insert into the folder you are about to generate and drag it over the icon of the second app of your interest. Once this is done, a folder will immediately be created on the desktop and the two selected apps will be added to it.
Keep in mind that the name of the folder is set automatically, depending on the category of app included in it. If you want to change it, use the appropriate field when creating the folder or, subsequently, hold down for a few moments on the appropriate field at the top and type the name you prefer. To save the changes, wait a few moments until the icons stop “jumping”.
If you want, you can also add additional apps to the folder, by dragging the icons of the applications of your interest to it and dropping them when the folder opens, in the appropriate box. In case of second thoughts, you can remove the applications added to the created folder by opening it, holding down the icon of the application of your interest and dragging it out of its box.
Note that created folders can also be moved. To do this, just press on them and, continuing to hold down, drag them to the place on the home screen you prefer (or in the Dock).
To delete a folder, however, you have to remove all the apps inside it by proceeding as I explained a few lines above. After doing this, the folder will be deleted automatically.
How to create file folder on iPad

You are interested in understanding how to create a folder on iPad to organize yours fillet inside? If so, just use the app Fillet. If you were not aware of it, this is the default application for managing files on Apple mobile devices, which the company of the "bitten apple" has made available starting from iOS 11.
To use it, take your iPad, unlock it, access the home screen and tap on the app icon in question (the one with the white background and the blue folder). If you can't find it, it is evidently because you uninstalled it. To fix it, download it again by connecting to the relevant section of the App Store, press the button Ottieni / Installa and authorize the download via Face ID, touch ID o Password.
Once the main File screen is displayed, go to the section Shop by Department, by tapping on the relevant item located at the bottom right, and indicate the location in which to create the folder on your iPad, using the menu on the left. If the menu is not visible, select the item first Location located at the top left. Keep in mind that, by default, File allows you to access only iCloud Drive but if the apps of other services are installed on the device that support integration with the Apple file manager (eg. dropbox), you will also see them appear in the list of available positions.
Once you have reached the position of your interest, press and continue to hold in an empty spot on the screen, select the item New folder from the menu that appears and type the name you want to assign to the folder you are about to create (in the appropriate field). Then, tap on the item end (top right) and that's it.
To add one or more files inside the created folder, go to the position where the elements of your interest are located: you can do this by proceeding as I have indicated a few lines above or, alternatively, you can search by keywords , taking advantage of the appropriate field at the top.
At this point, I premi sulla voce Select located at the top right, select the files you want to move, press on the item Move which is at the bottom and navigate to the location where you previously created the folder. To confirm what your intentions are, then click on the item Move located at the top right.
If instead of moving one or more files you prefer to copy them, proceed as follows: press and hold for a few moments on the element of your interest and select the item Copy from the menu that appears. Then, open the previously created folder, press and hold for a few moments in an empty part of it and select the option Paste from the menu that just appeared.
If, on the other hand, you want to intervene on the folder by changing its name, deleting it etc. press and continue to hold down the folder icon for a few moments, then select the operation you want to perform from the menu that appears. You can choose between: Copy, Duplicate, Rhinomine, Move, Delete, Save as Favorite, Tag e Info.
How to create photo folder on iPad
You would like to organize yours photo in folders, or better to say in albums, on your iPad but you don't know how to do it? Then follow the instructions on what to do in this passage.
First, grab your tablet, unlock it, go to the home screen and hit the Photos app icon (the one with the white background and the multicolored flower), which is the default image and video management application on iOS.
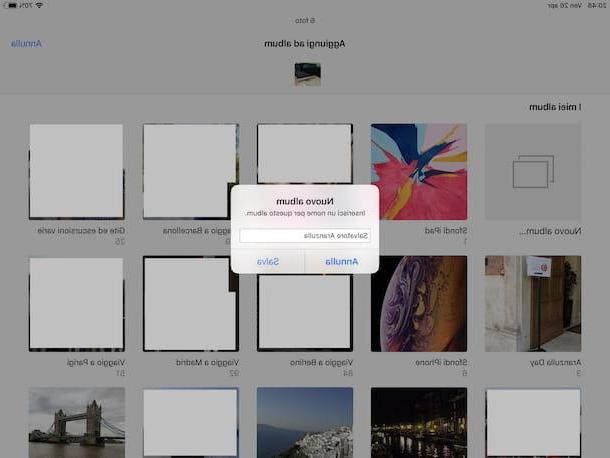
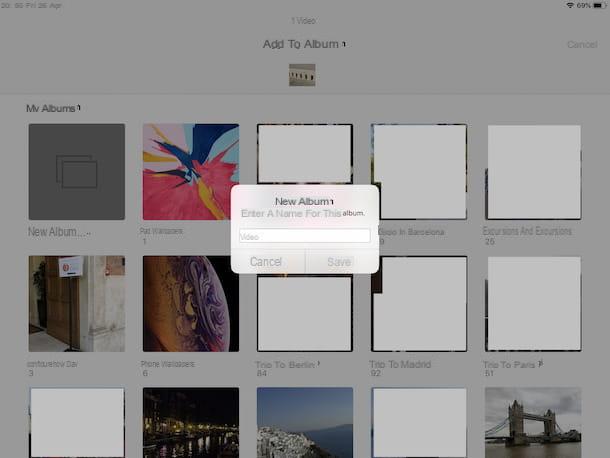
Once the main screen of the app is displayed, go to the section Gallery, by selecting the appropriate item at the bottom left, tap on the wording Select (top right), select the images you want to add to the album you are about to create and press on the item Add placed at the top left.
Now, tap on the item New album, type in the title you want to assign to the album and press the button Save. Once this is done, you will be able to view the newly created album in the section Album application.
To add other images to the created album, instead, go to the section Gallery of the app, tap on the item Select located at the top, select the photos of your interest, press on the item Add at the top left and tap on the preview of the previously created album.
If you want to change the name you have assigned to a particular album, proceed as follows: go to the section Album application, press on the item See more located at the top right and then on that Modification which is located at the top, always on the right. Then, press on the name of the album you want to edit, type in the new title and tap on the item end, located at the top, to save the changes.
In case of second thoughts, you can delete the albums you created by going to the section Album of the app, by tapping on the item See more placed at the top right, then on the wording Modification (always present at the top right), by pressing on red circular button that you find next to the album and selecting the button Delete. Please note that photos attached to the album will not be removed but will continue to be visible in the photo library.
How to create video folder on iPad
And as for the video? How do you create a folder containing the videos of your interest? Even then, just take advantage of the app Gallery, as seen together in the previous step. The operations you need to perform are practically the same as those I indicated for the photographs but, as you can guess, you will only have to act on the videos.
How to create mail folder on iPad
Let's see now how to create a folder on iPad in the app Mail, then a folder to organize the emails received or sent with the email accounts configured on iOS.
To do this, all you have to do is take your iPad, unlock it, access the home screen and tap on the app icon in question (the one with the light blue background and the white envelope). If you can't find the application, it is evidently because you uninstalled it. To fix it, download it again from the relevant section of the App Store, by tapping the button Ottieni / Installa and authorizing the download via Face ID, touch ID o Password.
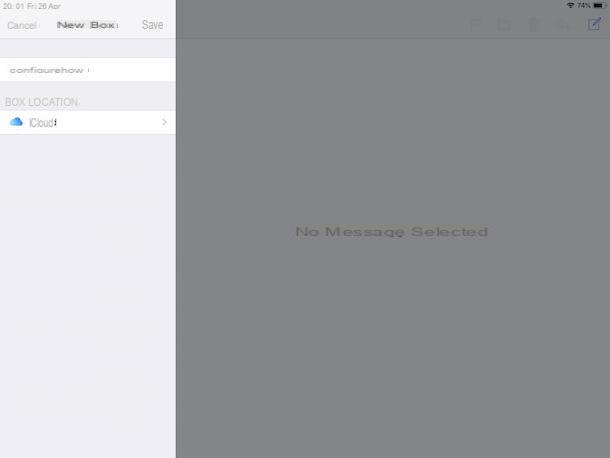
Then, select the item Modification located in the menu on the left of the main Mail screen. If you can't see the menu, press on the item first Boxes which is always on the left, at the top. Then, tap on the wording Modification placed at the top and press on the item New box placed at the bottom.
At this point, type the name you want to assign to the folder you are about to create in the field Your name, select the reference mailbox via the menu Box position (Eg. iCloud) and tap on the item first Save and then on that end (both placed at the top).
To move your emails to the newly created folder, go to the position where the messages of your interest are (e.g. in sent mail), press on the item Modification placed in the upper left part, select the emails in relation to which you want to act, press on the item Move which is located at the bottom and indicates the folder created previously from the menu that opens.
If, on the other hand, you want to move a single message at a time, swipe from right to left on the latter, press the button [...] that is shown to you, choose the option Move message from the menu that opens and select the reference folder.
Should you have second thoughts, you can always delete the folder created by proceeding as follows: click on the item Modification located in the upper left part of the main Mail screen, tap on the name of the folder you created, press on the item Delete box and confirm what your intentions are, by tapping on the button Delete in response to the message that appears on the screen. Note that by doing so, any messages in the folder will be removed from the account.
How to create favorite folder on iPad
Interested in understanding how to create a folder on iPad to organize your favorite di Safari? Nothing simpler. I'll explain immediately how to do it.
To begin with, take your iPad, unlock it, go to the home screen and press the Apple browser icon (the one with the compass). Once the navigator screen is displayed, press the icon depicting the book located at the top left and select the tab with the icon book give the menu check if you press.
At this point, fai tap sulla voce Add to Wishlist attached to the displayed menu and then on that Modification. Select, therefore, the wording New folder located at the bottom, type the name you want to assign to the folder in the field Title, tap on the item Add to Wishlist that you find under the heading Location, tap on arrow to go back and tap the button end, in order to apply the changes.
Once you have created your folder, to save your favorite sites within it, you must proceed as follows: go to the site of your interest, press on button for the sharing (the one with the square and the arrow) located at the top right and tap on the item Add to favourites, in the menu that appears. Then tap on the item Save to confirm what your intentions are.
Well: repeat the steps I just indicated for each site you want to include in the favorites folder. Then, click on the icon depicting the book located at the top left of the Safari screen, select the tab with the icon book in the menu that opens, tap on the item Add to Wishlist and on the folder name and you will be able to view all the sites saved in it. To connect to those of your interest, click on their name.
In case of second thoughts, you can remove the sites added to your favorites at any time by going to the relative menu as I explained earlier, by tapping on the item Modification placed at the bottom, by pressing on red circular button placed next to the name of the site of your interest and tapping the button Delete. Successively, your voice is awarded end at the bottom.
To delete the folder, on the other hand, go to the favorites menu, press on the item Modification placed at the bottom, on the red circular button next to its name and on the button Delete you see appear. Finally, tap on the item end which is located at the bottom.
How to create folder on iPad