Preliminary information

Before we get into the tutorial, there is some preliminary information that it is my duty to provide you. Let's start from a firm point: most e-mail clients are able to acquire in automatic the configuration parameters needed to make Libero Mail work.
If that doesn't happen, it's still possible configure mail Free in a manner manual, by entering the necessary data to use the protocols IMAP e POP3, which allow you to send and receive mail without opening the browser.
Between the two, I recommend that you use the IMAP protocol, which is more modern and is configured for use on multiple devices. In fact, it keeps track of the changes made on any computer, smartphone or tablet and automatically synchronizes them on all devices, keeping a copy of the messages always on the Libero Mail remote server. The POP3 protocol, unlike IMAP, is older and has been designed for use on a single device. It does not synchronize emails across multiple devices and deletes messages from the Libero Mail remote server once they are downloaded to your computer or portable device.
To use one of the two protocols, you must enter the relevant ones in the settings of your e-mail client configuration parameters. You can find them below, as well as on the official website of the service.
IMAP protocol
- Incoming mail server (IMAP): imapmail.libero.com, Port: 993, Requires SSL: yes
- Outgoing mail server (SMTP): smtp.libero.com, Port: 465, Requires SSL: yes, Requires authentication: yes
- Full name or display name: [uo nome]
- Account Name or Username: Libero mailing address (e.g. [email protected])
- Email address: Libero mailing address (e.g. [email protected])
- Password: Libero Mail password chosen during registration
POP3 protocol
- Incoming mail server (POP): popmail.libero.com, Port: 995, Requires SSL: yes
- Outgoing mail server (SMTP): smtp.libero.com, Port: 465, Requires SSL: yes, Requires authentication: yes
- Full name or display name: [uo nome]
- Account Name or Username: Libero mailing address (e.g. [email protected])
- Email address: Libero mailing address (e.g. [email protected])
- Password: Libero Mail password chosen during registration
Also keep in mind that on your Libero account you have activated two-step verification, instead of your account password, in the client you must use the app-specific password generated via this page. This applies to all email clients for computers, smartphones and tablets.
If you don't want to use an email client, you can still log in to Libero Mail simply using the browser. To do this, all you have to do is start the browser, go to the Libero Mail home page, press its button Log in, type your email address in the field insert your email, press the button NEXT, enter the account password in the field Enter your password and press the button again NEXT.
How to configure Libero mail on computer
At this point I would say that we are there, we can finally take action and go and find out how to configure Libero mail on computer. Below, therefore, you will find explained how to do it using all the most popular e-mail clients for Windows, macOS and Linux.
How to configure Libero mail in Outlook
If you want configure Free mail in Outlook, the Microsoft e-mail client, an integral part of the Microsoft 365 suite, the first thing you need to do is start the program on your computer, selecting the relevant collegamento that you find in Windows Start menu or theicon present in MacOS Launchpad.
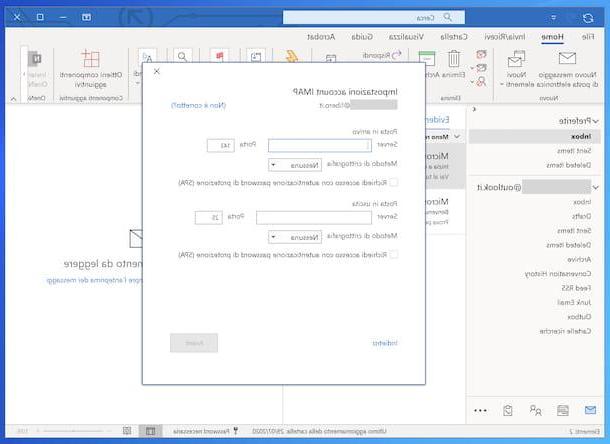
Once the Outlook window appears on the screen, click on the tab Fillet located at the top left and on the button Add account, present inside the panel that opens. Then type your e-mail address in the appropriate field, click on the button Connect and, when prompted, enter the password of the e-mail box and click the button again Connect, so as to automatically acquire the IMAP account settings and complete the mailbox configuration.
In case the automatic parameter detection fails, you can add the server parameters manually. To do this, start creating a new account as I indicated earlier and, after entering your Libero email address, click on the item Advanced options and check the box next to the option Allow advanced account setup.
At this point, choose the option IMAP o POP depending on the protocol you intend to use, fill in the fields on the screen with the parameters relating to the incoming and outgoing mail servers and click on the button NEXT. Then complete the procedure for configuring Libero mail, typing the password of your e-mail account and pressing the button Connect.
How to set up Libero mail on Thunderbird
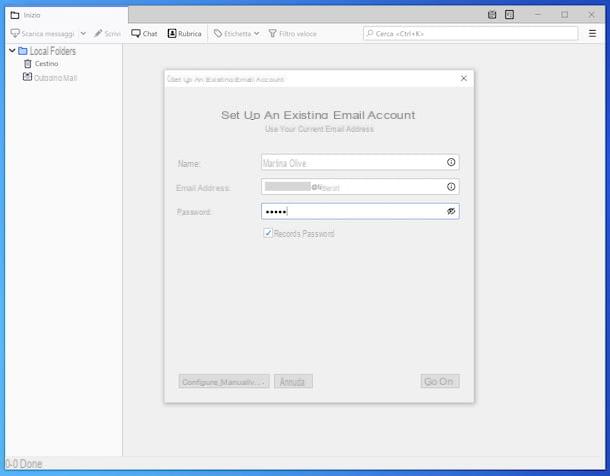
Now, let's see how to set up Free mail on Thunderbird, the e-mail client developed by Mozilla. First, open the program, going to select the relevant one collegamento present in Windows Start menu or theicon in MacOS Launchpad.
Now that you see the Thunderbird window on your PC screen, click the button with the three lines horizontally located at the top right, choose the item New from the menu that opens and select the option Existing email account from the further menu that is proposed to you, in order to configure the program with your Libero e-mail address.
In the new window that appears, then type your name, your Libero email address and the relative password in the appropriate fields, then click on the buttons Continue e Done, in order to complete the automatic configuration.
If the software is not able to automatically retrieve the parameters to configure the e-mail account, digitize it manually, filling in the fields that are proposed to you in the new form displayed with the information relating to outgoing and incoming mail. Then save the new settings entered by clicking on the button Done.
How to set up Libero mail on Mac
You have an Apple-branded computer, you use the default macOS email client and, therefore, you'd like to understand how to setup Libero mail on Mac? I'll explain how to do it. First, open the program by selecting the relevant one icon that you find in Launchpad.
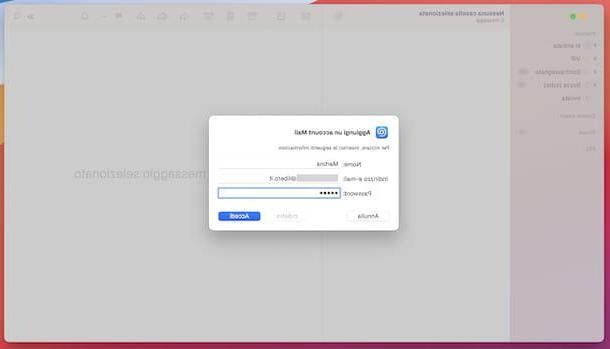
Once the main Mail window appears, click on the menu Mail which is located at the top left, then on the item Add account and, in the box that opens, select the option Other Mail account, then press the button Continue.
At this point, enter your name, the email address to be configured and the password to access the mailbox in the text fields displayed on the screen, click on the button Log in and wait for Mail to try to automatically configure the mailbox.
If the automatic configuration is not successful, enter the IMAP or POP parameters necessary to use your Libero mail account by clicking on the button Continue, by choosing the type of account from the appropriate drop-down menu and typing in the form that appears the data relating to the incoming and outgoing mail. Finally, click on the button Log in, specify the items to synchronize with the Mac and click on the button Save.
How to configure Libero mail on smartphone
Let's now move on to the mobile side and let's find out how to configure Libero mail on smartphone (other than on tablets, there is no difference). Below, therefore, you will find illustrated how to proceed both on Android that of iOS / iPadOS.
How to configure Libero mail with app
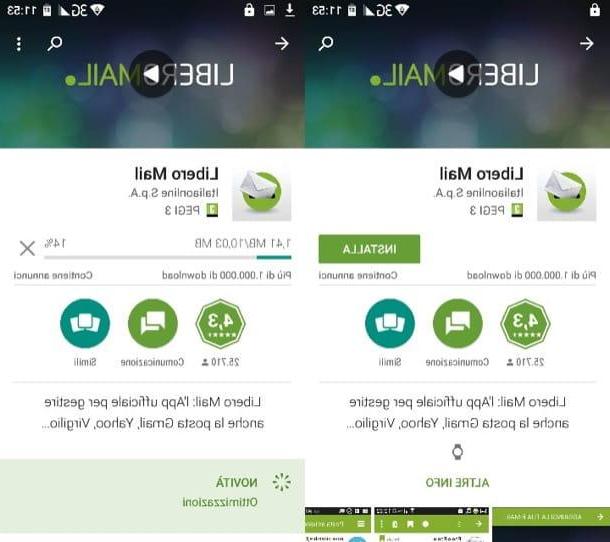
Libero Mail can be used on mobile devices primarily through its official application, available for both Android and iOS / iPadOS. It is free and, of course, it is able to configure itself automatically after entering the data relating to the Libero mail account.
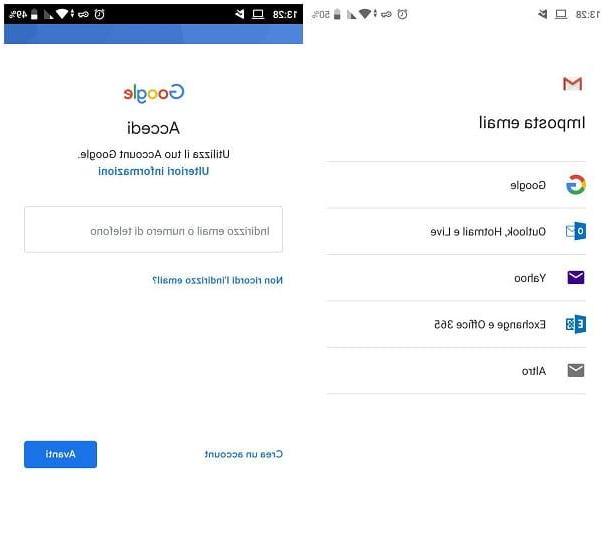
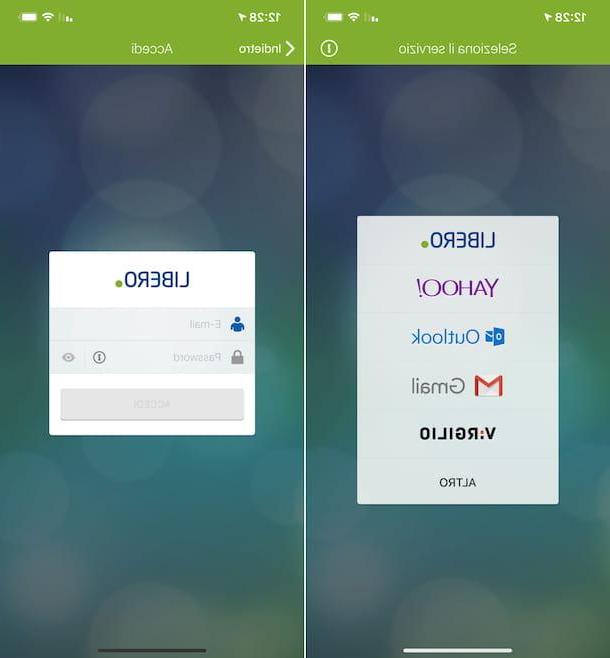
So, if you want configure Libero mail with app, first download and install it on your device. To do this, if you are using Android, visit the relative section of the Play Store and award your bottone Install. If you are using a device on which the Play Store is not available, you can download the app through an alternative store. If you are using iOS / iPadOSinstead, visit the appropriate section of the App Store, press the button Get, by your complaint Install and authorize the download via Face ID, touch ID o password dell'ID Apple.
Then, start the Libero Mail app by selecting the relevant one icon which has been added to the home screen. Now that you see the app home screen, select the option Free from the menu that appears, then type your e-mail address in the field Email, the password associated with it in the field Password and press on the buttons Log in e Done.
How to configure Libero mail on Android
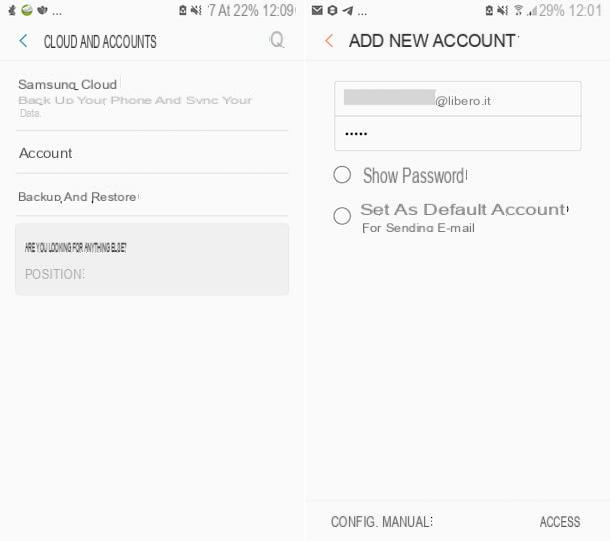
Let us now how to setup Libero mail on Android. To do this, just add the new email account directly from the system settings. After doing this, the Free account will be available and ready for use in thedefault app used to manage emails.
Therefore, to carry out the operation described above, select the icon of Settings (Quella a forma di ruota d'ingranaggio) that you find on the home screen and / or in the Android drawer, then touch the wording Accounts / Accounts & Synchronization and press pulsating Add account, present at the bottom of the new screen.
Now, select the item E-mail from the next menu, indicate your email address and the associated password in the appropriate fields and tap the button Log in, so try to set up Free mail automatically.
If the automatic configuration is not successful, proceed by manually entering the necessary data by touching the wording Manual configuration at the bottom, deciding whether to use the IMAP or POP3 protocol through the menu that appears and then filling in the fields on the screen with the parameters relating to incoming and outgoing mail. Finally, tap on the item Log in.
Please note that some of the indications I have given you in this step regarding the items to select in the Android settings may differ slightly from what you see on the screen, depending on the version of the operating system you are using, as well as the brand and of the device model.
How to set up Libero mail on iPhone and iPad
You are interested in understanding how to set up Libero mail on iPhone and iPadUsing Mail, the default app for managing email? I'll explain how to do it. Again, just add the account to system settings and find it available in Mail as well.
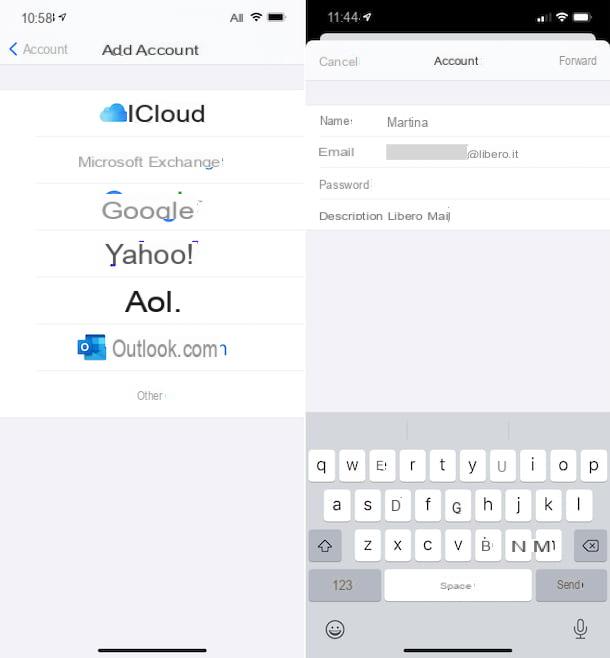
To do this, access the iOS / iPadOS home screen and / or the Liberia app, then touch the icon of Settings (Quella a forma di ruota d'ingranaggio) e, nella schermata che ti come cometa, fai tap sulla voce Mail, so on that Account and, subsequently, on the wording Add account.
In Seguito, fai tap sulla voce Other, scegli l'opzione Add Mail Account and fill out the form that is proposed to you with the requested data: your name (the one displayed for outgoing messages), your email address, the password to use to access it and, if you wish, a description of the mailbox.
Then touch the item NEXT at the top right and wait a few moments for Mail to attempt to automatically retrieve the server data for incoming and outgoing mail.
If the automatic configuration procedure is not successful, you will be asked to manually fill in the form with the parameters necessary to use Libero Mail. If so, select the tab IMAP or that POP depending on the protocol you want to use and enter the parameters relating to incoming and outgoing mail in the appropriate fields.
Finally, touch the wording NEXT located at the top right, indicate which elements you intend to synchronize with the newly added mail service and press the button Save.
How to configure Libero mail