Preliminary information

Before proceeding with the connection of the Netgear Wi-Fi extender, I would like to provide you with some very useful information for the success of this tutorial.
You need to know that there are such Wi-Fi extenders wireless only, capable of hooking up to an existing Wi-Fi signal and replicating it in their coverage area, and access points wired, i.e. real extenders that need to be connected directly to the main router by means of Ethernet cable to then generate a Wi-Fi network that acts as an extension of the main one.
The difference between the two types of extenders can be identified in the signal stability and in simplicity of installation. In the first case, a Wi-Fi network extension based on wireless bridges is very convenient to make but less stable than a wired network, as it is more prone to interference. In the second case, an extension based on an Ethernet cable makes the propagation of the network more stable and continuous but more difficult to implement initially and "inconvenient", due to the presence of physical cables in the house.
In the first case, you just need to have a free electrical outlet, not too far from the router, in which to install the wireless access point. In the second case, however, you will need to connect an Ethernet cable to a LAN port on the router and to the appropriate port on the extender. In both cases, you have to make sure that the extender is placed in the area of the house that is not currently served by the Wi-Fi network.
In the case of the Wi-Fi only extender, you must also make sure that it is placed in an area where the signal from the main router is still strong enough to be picked up and then repeated satisfactorily. Ideally, it should be somewhere between where the main router still covers well with its signal and the area of the house that is now out of coverage. To configure everything, just use the browser you usually use to browse online from your PC, your smartphone or your tablet
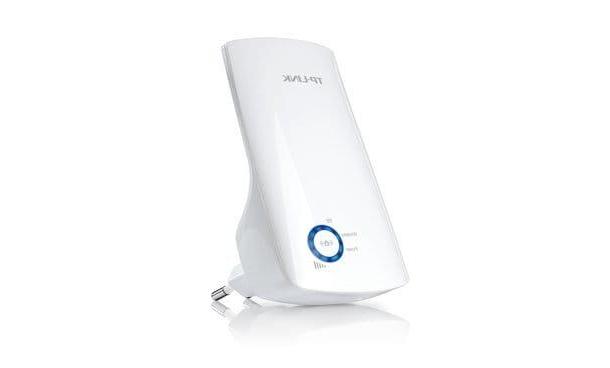
To clarify the ideas on the types of devices we are talking about even better, here are two examples of Netgear wireless type Wi-Fi extender, capable of increasing the Wi-Fi network up to an area of 54/80 square meters (depending on obstacles and furnishings) at a maximum speed of 300Mbps. The supplied LAN network port can be used to connect output devices, such as a game console, notebook or TV.
See offer on Amazon See offer on AmazonInstead below I propose some examples of Netgear access point that can be installed in areas totally absent of a Wi-Fi coverage and thanks to an Ethernet cable coming from the router can in turn propagate a powerful and stable wireless network in the surrounding area.
See offer on Amazon See offer on AmazonBelow, however, I propose some examples of Ethernet cables, which will be indispensable when you want to install a wired access point in a remote area with no Wi-Fi coverage. Based on the distance between the router and the access point, you will need to choose the length of the cable to buy.
See offer on Amazon See offer on AmazonIf you do not know how long the Ethernet cable must be and you think that you will not be able to run the cable through the corrugations in the walls (if any), I suggest you consult a professional electrician who can do this preliminary operation for you in a few hours. of work.
How to connect Netgear extender

After reading all the necessary requirements and preparing for the installation of your new access point, let's not waste any more time and let's take action! In this chapter you will find explained how to connect Netgear extender.
If your Netgear extender is of type wireless, find a room suitable for its installation. This type of access point - as already mentioned above - must be inserted in a free electrical outlet and safe, possibly not used for daily household chores. It must also be located within the coverage area of the current Wi-Fi network.
This step is very important: if you place the extender in an area where the current Wi-Fi signal is weak, you will get a poor result with possible connection failures, instability e slowness navigation. If you place it in one room too much close to the router, the coverage area may not be greater than that already reached by the router's Wi-Fi coverage. So, the best suggestion I can give you is to place it in a room of intermezzo between the router and the area where the signal is weak.
Once you have found a room that is sufficiently covered by the Wi-Fi network, you can connect your new wireless access point and wait two minutes (standard timing) to start. You can then move on to the next chapter for configuration.

If your Netgear Wi-Fi Extender is of type wiredInstead, as anticipated in the previous chapter, you must have prepared an Ethernet cable that from your router arrives in the desired room (or area) for the propagation of Wi-Fi. Then plug the Ethernet cable intoLAN input of your access point and then connect the power supply using the power supply included in the package.
Whether your wired access point is power compatible POE (Power over Ethernet) and you want to avoid the clutter of the power supply with the wire at the installation point, you can opt to install a POE Injector downstream (i.e., close to the router). You can understand if your extender has this feature by reading the technical specifications of the product.
The POE Injector transmits the electricity in the network cables while simultaneously supplying the data for navigation and l 'energy to power the Wi-Fi extender. The procedure is simple, all you have to do is connect the POE Injector to the power supply and into the input LAN DATA / IN insert a network cable that you will connect to a LAN port on the router, while in the output LAN DATA / OUT you will connect the new Ethernet cable that leads to the remote room (or area) of the house where you need to install the access point.
See offer on Amazon See offer on AmazonOnce the installation is complete, please wait two minutes (standard timing) that it starts up and then proceed to the next chapter for configuration.
How to set up Netgear extender

After installing the Netgear access point, the next step is to configure it to connect it to the existing network and make it fully operational, so let's see immediately how to set up Netgear extender in order to propagate the home Wi-Fi network in its surrounding area.
Netgear Wi-Fi extender configuration (wireless or wired), generally the same for almost all devices, may slightly change the GUI for configuration, but you will see that the nomenclature of the menu items for the first configuration it is very similar for everyone.
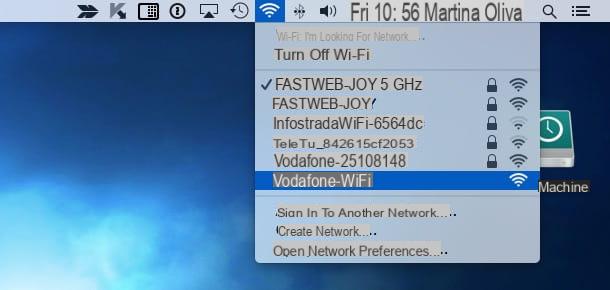
After waiting two minutes for the extender to start, switch to your PC (suggested) or a mobile device (more inconvenient) and log into thelist of Wi-Fi networks detected by your device (if you don't know how to do it, read my dedicated tutorial).
Among the Wi-Fi network connections you will notice the name of a new Wi-Fi network, generated with a name that usually recalls the brand o model of the extender you just installed, followed by the serial number, for example: NETGEAR_EXT, WAX214XXXXXX-CONFIGONLY or WPN80-2.4GHZ. This is nothing more than a Wi-Fi network open e temporary generated by the new extender to be configured.
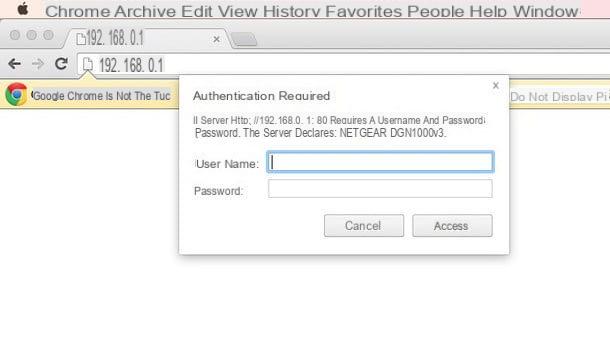
After connecting to the Netgear extender's Wi-Fi network, you need to log into its Web page configuration. To do this, you need to launch your favorite web browser (I suggest you use Google Chrome, for greater compatibility) and type in the device address.
This address can vary from extender to extender and can be found in the form of text or in the form of numbers (IP address) on the back of the device, on a dedicated label, or in the technical documentation contained in the sales package. Typically it is http://mywifiext.net but on the label you may find a different address, for example http://aplogin.net or http://192.168.0.1.

The web address will take you to the configuration page of the called device Netgear Genie. Once uploaded, click on the only available button: New extender setup, then fill in the module proposed with a email address it's a Password secure, in order to create the extender login account (required to log into the setup screen from now on).
You will then be asked to enter your location of origin, then choose Europe through drop down menu located in the center of the screen, then click on the button Continue located at the bottom of the page.
At this point, choose the installation option WiFi extender (wireless) in case you are setting up a wireless-only extender, or Access point, in case you are using a wired solution instead; then click on the button Next.
Good! wait a few moments while the extender scans for existing Wi-Fi networks. At the end it will show you the result of the discovered networks, in the form of a list; therefore, choose the name of your current Wi-Fi network and then enter your password in the text field Password (network key), to allow the access point to replicate the same network. Then click on the button Continue.
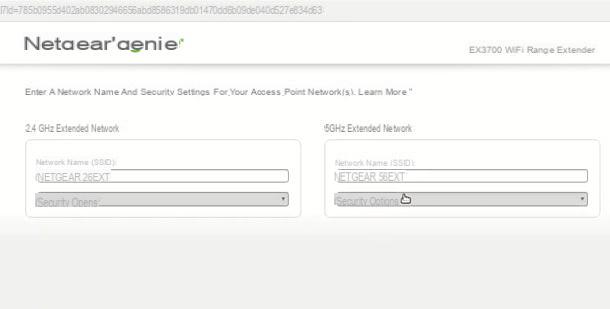
You are almost done: in the next screen you can decide the name of the network propagated by the extender in the text field Network name (SSID): I suggest you keep a name similar to that of the network generated by the router but not the same, as there may be conflicts.
If I had purchased a dual band extender, you will need to enter this information for both the 2.4GHz network and the 5GHz network. A little further below, then check the option Use the same security mode and password as the existing network and finally click the button Continue.
Good! at the end of the wizard your Wi-Fi network will also be extended to the new installation area. If you want to manually change some standard parameters of the access points, you can go to the menu Access point / Wireless> Radio> 802.11a / 802.11b and, on the central page, change the value of the radio transmission, generally called Radio power o TX Power level o Max tx rate. The higher the value is set, the higher the transmit power of the antenna (s) of your extender. Be careful, however, to select city as an area in which to operate and not enter values higher than those required by law.
In the same section of the menu, you also find the option to change the Channel transmission, or Channel. This allows you to change the radio transmission channel used by the wireless network, if the one currently used is saturated, resulting in a slow and unstable connection.
I suggest you leave this setting on Car o Automatic for 5GHz network and change it to 1, 6 o 11 (the radio channels of the band that do not "overlap" with each other) for the 2.4GHz network. More info here.
How to configure Netgear extender