Preliminary information
The topic of creating a Facebook Showcase might seem complicated, but in reality it is just a matter of following a few steps: the important thing is to learn which ones. To make everything clearer, I will start with some information about the elements that you should activate in advance in order to sell on Facebook, through the practice of Social commerce.
So, going in order, the first thing you need is a Facebook profile to which one must be connected Facebook page . administered by you: this is the key tool, provided free of charge by the social network in question, to sell products on the channel. If you still don't have one linked to your business and you want to set it up correctly, read my guide on how to create a Facebook page.
Furthermore, a notable facilitation comes from already being in possession of a e-commerce site started, with your products for sale. You can connect it to Facebook tools and direct buyers directly there - I'll show you how to do this later Shopify, one of the best platforms suitable for the purpose.
After you have shaped your Facebook page with all the information you deem necessary, in order to best describe what you do, you should create an account Facebook Business Manager (you can find the procedure in my guide on how to use Facebook).
The latter is an advanced tool that, among other things, allows the user to also manage separate advertising accounts and access very detailed data on the progress of advertising campaigns. If you want to know more, check out my guide on how to advertise on Facebook.
Using the Business Manager requires a little dedication, it is a tool designed especially for professionals, such as Social Media Managers. However, if you stick to my instructions for the moment, you can use it safely, even if you don't have much experience in the sector. In any case, if you prefer to postpone the activation step, you can also perform it during the opening of the store on Facebook, you will be prompted at the same time.
Warning: the interface to access this function has recently been renamed Facebook Business Suite, so you will find it in your menus within the social network. Its purpose is to summarize all the activities of the channels linked to Facebook to which your page is connected, therefore, for example, also Instagram.
Having said that, it is now possible to introduce the main topic of these lines, namely the instrument Facebook showcase, related to the functions described so far (Facebook page and Business Suite) as well as to your e-commerce site. I warn you, however, that this function, also known as Tab, has been replaced by that call Facebook Shop. So I will refer to the latter in the continuation of the tutorial you are about to read.
By activating the Facebook Shops function, it will be possible create a personalized digital store, also working on any Instagram profile connected to the Facebook page. If you want to know more, go to the Facebook Help Center and check out the official Facebook for Business page.
How to create a Facebook Showcase
Now that you have a clearer overview of the functions made available by Facebook for users who wish to sell through this social channel, let's move on to the practical side of the matter and see how to create a Facebook Showcase. Or rather, how to use the function Facebook Shop, which replaced the Showcase, as mentioned in the previous chapter.
That said, here is the procedure you can perform directly from your PC. On the other hand, there are limitations regarding the configuration from a smartphone or tablet (I'll tell you more about them later).
How to set up Facebook Shops from PC
Using Facebook's tools dedicated to professional sellers isn't that difficult. Before explaining to you how to configure Facebook Shops from PCHowever, I remind you that at the moment in the city it is not possible to allow users to make a purchase directly from the Facebook or Instagram page: they must be directed to a external website or a solution of messaging belonging to the Facebook ecosystem: Facebook Messenger, Direct for Instagram o WhatsApp.
Having said that, know that to configure Facebook Shops from a PC you have two solutions: with or without Facebook Business Manager already active.
If you don't have a Facebook Business Manager account yet, log into yours personal Facebook profile, find the name of the Facebook page . you want to make a shop in the left side menu and selected.
You will find yourself inside the Home of the page: here look for the item Shop in the menu on the left, or scroll down the page until you find the wording Sell your products, then click on one of two options. If by any chance you don't see either of them, the problem may be related to the category to which your page belongs chosen at the time of its creation. To solve, move to the item Edit page information and in the card Categories, add more or remove those present.
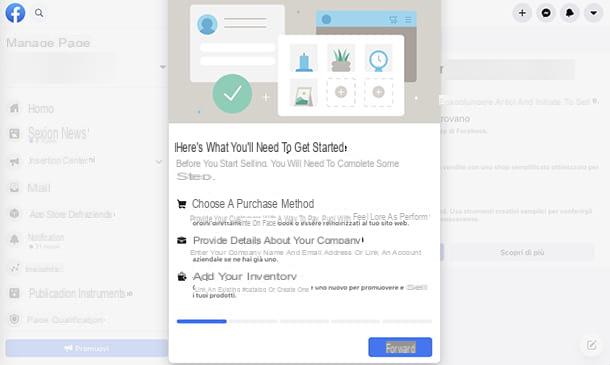
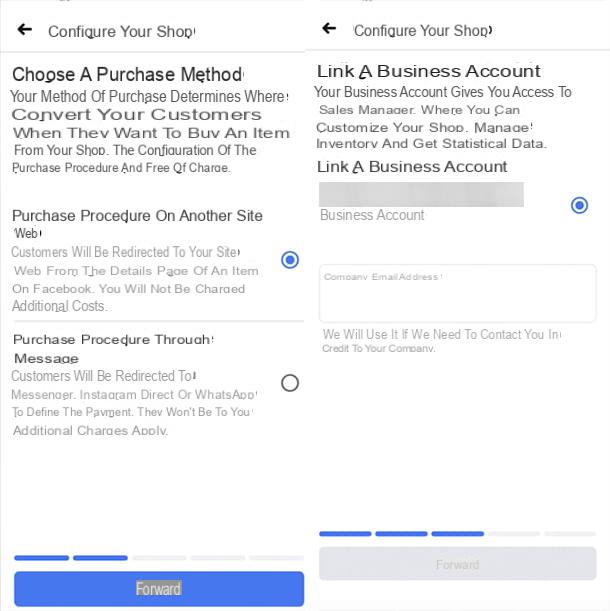
If, on the other hand, everything went smoothly, a tab called Configure your shop: read the information and click on the button NEXT. In the folder Choose a purchase method, decide where to direct people to conclude the purchase procedure. You will automatically see the two options available for the city: target buyers towards your e-commerce or inside Facebook Messenger, Direct from Instagram (if you have a profile linked to the page) or WhatsApp.
Once you have determined the purchase method, you will move on to the section Choose a company: here, in addition to selecting the Facebook page where to activate the shop, it will come automatically created a Business Manager profile, from the card Dettagli dell'account.
It's not over, just a few more steps: you will always have to use the button NEXT, after responding to some requests for store customization, Up to enter the first items in the shop. If you want to know the procedure in detail, read my guide on how Facebook Shops works.
Please note: before your shop is active and approved, it must switch to the scrutiny of the Facebook staff, so it might take up to two weeks. In the meantime, you can still carry out actions within the Product Catalog, arranging it as you see fit, with photos, precise descriptions of what you intend to sell and customizing the graphics.
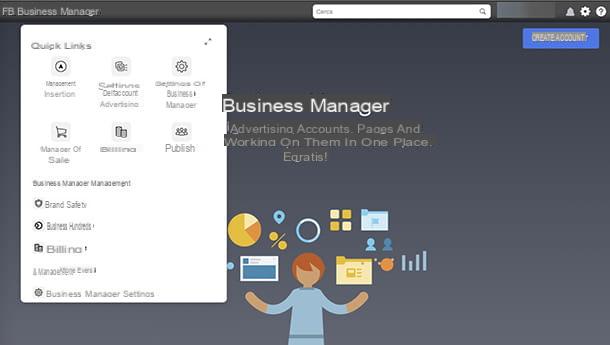
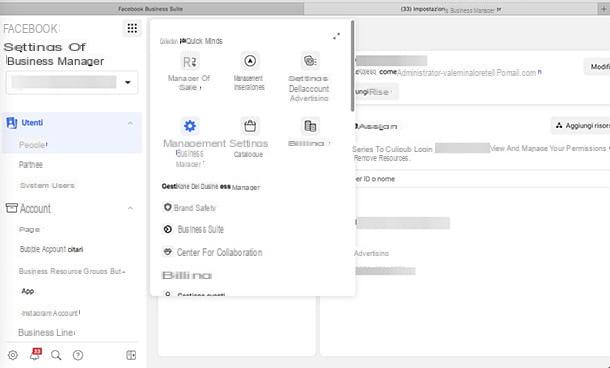
Specifically, now that you have the Business Manager, you can go inside his Home (find access to Business suite from your personal Facebook profile, in the side menu on the left) and click on the item Other tools. Then, in the menu that opens, click on the wording Business Manager settings and, on the next page, go toicon represented by a grid of dots, up. Then click on the symbol and in the tab that will open select the item Management of catalogs. At this point, follow the guided procedure.
At the end of this step, returning to the Home of Business Manager, you can click the button again Other tools, then on the wording Business Manager settings and, always selecting theicon with dots, this time to choose Sales manager. Here you can also decide to add a connected and active Instagram account to the Facebook page, to sell the same products also on that channel.
Also from the Sales Manager it is possible to create one collection of products: this will include your name, a description and a nice presentation image. The purpose of a collection is to direct the hypothetical buyer to a series of similar items, which he may be interested in. From Sales manager, go to the wording Shop, choose the account where you want to create a collection and click on the button Modification, then the icon + (Add new) and on the voice Collection, finally choose the wording Create a new collection. To know the detailed procedure, consult the official guide on the Facebook Help Center and keep in mind that you can import a collection also on your Instagram business profile.
Also, know that if your business page is related to an your language business, At the moment it is not possible to use in-app payments. If the business resides overseas, you may be asked to instead specify more details about VAT, taxes, shipping and payment methods. Finally, if you also have an active account on Instagram, you can decide to connect it to also take advantage of this channel as a sales base, later I'll show you how to do it.
From the moment you have already created a Facebook Business Manager account, you can proceed in this way: log in to yours personal Facebook profile, locate the item Business suite in the side menu on the left and click on it.
On the page that opens, select the wording Other tools and, from the drop-down menu, choose the item Business Manager settings. In the following screen, click on theicon represented by a grid of dots, up. Then, again inside the drop-down menu that will open, click on the item Sales manager.
If, on the other hand, you want to use the "classic" Facebook Business Manager, move the mouse cursor over the symbol of three menu lines, at the top left, and select the icon Sales manager give the menu that you come purpose.
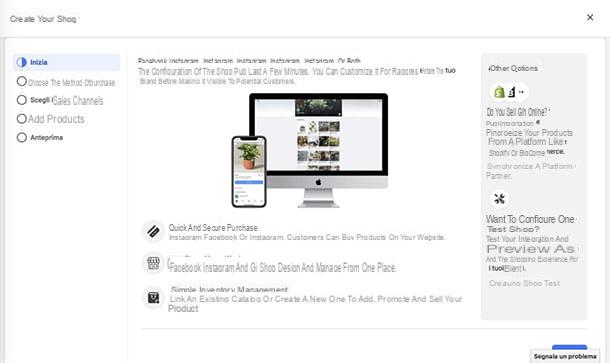
Once you are inside the Sales Manager, you will be faced with a screen where it reads Sell on Facebook, Instagram or both platforms: arrived here click on the button Start.
On the next page, entitled Choose a sales method, check if you want to sell physical goods (Shop) or if you offer services or other (Catalog). In the first case, starting from the card Create your shop, you can refer to the procedure described above, choosing where you want your customers to conclude their purchases, the sales channels and, of course, adding the products.
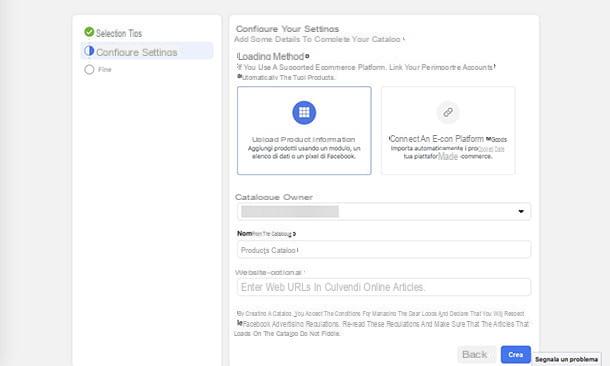
If you have chosen the Catalog, you will be in front of the board Select your catalog type: choose a'thematic area that best represents your services, click on the button NEXT, fill in the fields on the next page with the requested information and push the button Crea.
How to set up Facebook Shops from smartphone
You would like to find out how to configure Facebook Shops from smartphone? I'm sorry to warn you that, at least at the time of writing, it doesn't seem to be possible to access the feature Sales manager from the app Business suite for Android (also available on alternative stores and iOS / iPadOS). Therefore, for the complete configuration of Facebook Shops, you will have to rely on a PC, following the explanation in the previous chapter.
However, you can also start the process from your smartphone or tablet: to do this, launch the Facebook (available for Android on the Google Play Store and alternative stores for devices that do not support Google services and on the App Store for iOS / iPadOS) and, from yours personal profile, tap on the menu.
On the page that opens, select the Facebook page . on which you want to activate the shop, scroll the buttons at the top of the display to the button Other, and touch it. On the next screen, scroll to the entry Edit the page, then tap the section Shop. If you can't find it, choose the item from the same menu Settings, hence the wording Page information and change the options inside the tab Category.
At this point, follow the procedure: it will be like the one you run from a PC, described in the previous chapter, except for the steps relating to the Facebook Business Manager or Business Suite.
Another thing you can do, using your smartphone, is to activate the function Shopping on your possible profile Instagram, the other well-known social channel belonging to Facebook and focused on photos and images. To configure the Shopping function on Instagram, you need to put your e-commerce site into communication with Facebook and, in fact, Instagram itself.
After you upload the products to sell in the Facebook Shops catalog, make sure that the Instagram profile you will refer to is also a company type and connected to the Facebook page about to become a shop.
Then log into that Instagram business profile, tap on the menu and, in the menu that opens, touch the item Settings. Now select the item Company and then tap on the link Configure Shopping su Instagram and then touch the button Start. Follow her procedure indicated on the display, confirm the settings and activate the function.
You will then have to wait for approval for the actual activation of the Shopping function by Instagram: when this happens, you will receive a notification when accessing the channel.
You can sell on Instagram through the mode Tag products: remember to tick the option Buy on another websiteIn section Select purchase method to redirect buyers to your e-commerce site. You can also use Instagram Stories.
How to connect an e-commerce to Facebook
If you are considering the possibility of connect an e-commerce to Facebook, as you already have a site on which you sell products and / or services, know that not only is this possible, but you will be able to enjoy some facilities.
As already mentioned, among the options that can be activated in the Facebook Shops configuration there is precisely the one that allows you to direct buyers to your e-commerce site. But that's not all: you can also connect yours to Facebook e-commerce account to receive data from users, useful for your marketing strategies (in this regard, you can take a look at my guide on how Facebook Ads works). I would say that it is appropriate to investigate the question.
Shopify
Maybe you too have generated your e-commerce with Shopify, one of the most complete e-commerce platforms available on the market, thanks to which you can easily create online stores and manage products, orders, shipments and payment, without necessarily having to use the code (as I also explained to you in my dedicated tutorial). Well, if that's the case, you're in luck - Shopify is one of them Facebook Shop partner platforms. This means that you can connect your e-commerce to Facebook and integrate the sales of the two platforms.
So, if you want to proceed with the connect your Shopify account to Facebook, go inside Business suite, from PC, then, during the configuration of the shop, in the tab Create your shop, go to the tab Other options and click on its link Synchronize a partner platform. On the next page, click on logo on Shopify and, in the next section, select the button Log in to Shopify, to complete the configuration of your account (just follow the instructions on the screen).
Alternatively, you can log in to yours Shopify account, select the icon + (Add), choose the item Sales channels and click the icon again + next to the wording Facebook. At this point, click on the items Update sales channels e setup starts, then select options Connect account e ends the setup.
Remember that when Facebook Shops and Shopify are connected, it will automatically be active on your e-commerce site Facebook Pixel, an analysis tool that allows you to understand what kind of actions users perform on the website, arrived through your advertising campaigns.
Also, by accessing the section Sharing of settings data, always within theShopify account, and activating the card Maximum, about customer tracking, you can count on an additional function. It is about API Conversions, definable as complementary to pixel.
Other solutions
If your e-commerce site, which you already have active, is not part of the Facebook Shops partner platforms you will have to refer to the instructions that your platform, on which you created it, should have issued in this regard. However, I can tell you how to proceed for some well-known platforms they represent other solutions with respect to Shopify, not included as a Facebook partner.
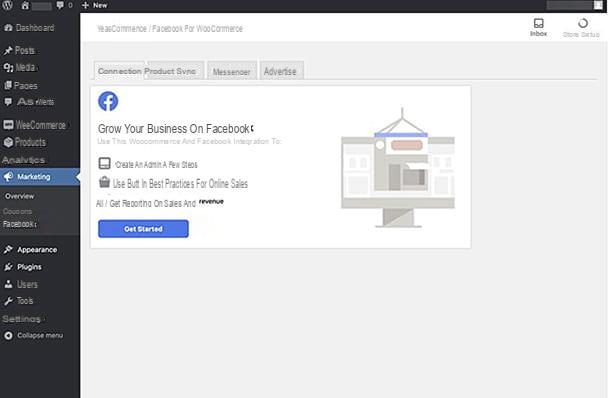
- WooCommerce - is the open source plugin for sales and the official e-commerce creation of WordPress, the platform currently most used for the creation of blogs and other types of websites. Its use, such as that of WooCommerce, it is destined to average expert users. However, just install the plugin Facebook for WooCommerce, activate it and, within the Control Panel, locate the wording Marketing and then select the item Facebook, then follow the on-screen instructions. There are also great deals with ready-to-use WooCommerce installations, such as those from Aruba. Read more here.
- Big Cartel - is a platform for creating online stores, especially dedicated to those who deal with craft or artistic activities. The advice of its developers, compared to Facebook Shops, is to use the synchronization between the Facebook Catalog and the product tag system on Instagram, to direct buyers to the website.
- Ecwid - proves to be a useful solution for small business activities. From the platform control panel simply select the option Sell on Facebook and follow the recommended procedure.
For further information on the functioning of Facebook Shops, I refer you to the official support pages.
How to create a Facebook Showcase