Create a restore point in Windows
Create a restore point in Windows it is a really simple operation: as I explained to you at the beginning of the guide, this tool allows you to restore programs, drivers and computer settings to the conditions they were in at the time of its creation, while keeping the documents created in the meantime unaltered. The operations to be performed are practically the same on all versions of Windows currently supported.
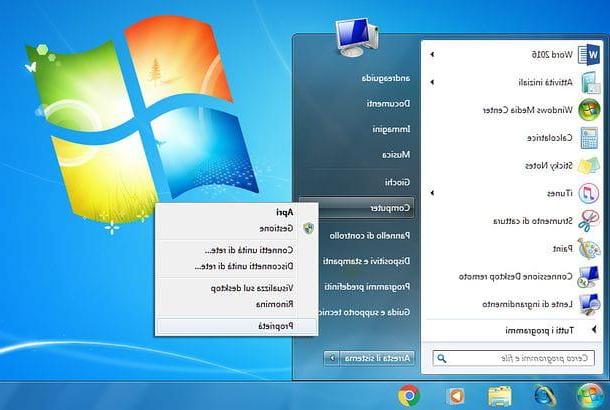
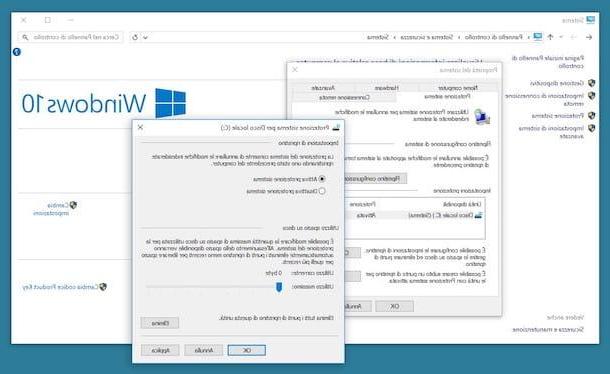
Su Windows 10However, you must take care to activate the restore points feature in advance, as this is disabled by default. To proceed, open the menu Home by clicking on the icon in the shape of pennant located in the lower left corner of the screen, type the phrase Control Panel in the search box and click on the first relevant result (marked with the wording Desktop app).
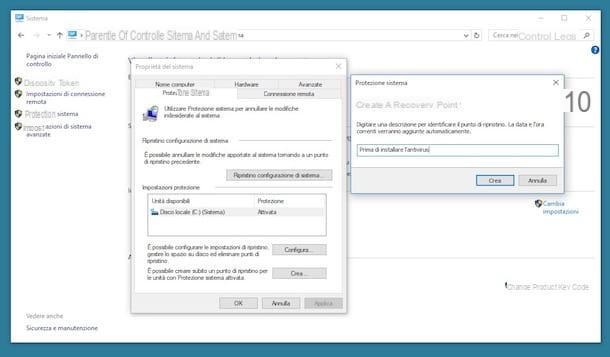
At this point, clicca sulla voce System and security (if this is not displayed, make sure the menu View by: resident in the upper right is set to Category), presses on the section System and then on the voice Advanced system settings. To conclude, click on the tab Protection system, select the disk on which Windows is installed (marked with the entry (System)) from the box Security settings, pigia sul pulsating Configure ..., scegli l'opzione Enable system protection and confirm the changes by pressing the button OK. The same procedure may also be necessary in previous editions of the operating system, keep this in mind.
Now that you have finally activated the restore points feature, you can proceed to create them: first, log in to the Control Panel calling it up from the menu Home Windows, choose the category System and security, then click on the items System e Protection system.
Fatto ciò, click on your button Create ... resident in the new window that opens on the screen, indicates a name with which to recognize the restore point you are about to create (eg. First Installation) and click the button again Crea to start creating the restore point, which may take a while.
Once you have completed the procedure for saving the restore point, you will see a warning appear on the screen: all you have to do, at this point, is to click on the button Close to conclude the procedure. The game is done!
Note- If you need it, you can manage the disk space that Windows dedicates to restore points. How? Very simple. Arrived at the screen Protection system of the Control Panel, presses the button Configure ... and act on the cursor attached to the section Disk space usage to change the amount of space to dedicate to it (I recommend using a value between 5 and 10 GB). Once the available space is exhausted, Windows will take care of automatically deleting the oldest restore points (to make room for the new ones). If you wish, you can manually delete all the restore points created so far by pressing the button Delete.
How to use a restore point

Once you have created a restore point, you can use it at any time to restore your system to the state it was in when it was created. How? I'll explain it to you right away!
To get started, click on the button Home (the flag icon located in the lower left corner of the screen), type the word "restoration" in the search field that appears on the resident screen and press on the item Restoration relating to Control Panel. Arrived at the next screen, presses on the item Start System Restore and press pulsating NEXT to initialize the process.
At this stage, you must indicate the date to return the computer to (by selecting the most relevant restore point), and then press the button Come on, finish e Yes to definitively start the recovery procedure, which could take up to several minutes.
Note: if you are unable to view the restore point of your interest, as it is not very recent, put the check mark next to the item Show additional restore points.
Always remember that, at the end of the process, programs, drivers and settings will be erased installed after the chosen date, while the files created will remain intact: if you want to know which programs and which drivers will be deleted, select the restore point to which you want to return the computer and press the button Look for interested programs located at the bottom right.
Create a restore point on Mac
You did not find the information I provided in this guide useful, as you own a Mac and you are looking for a solution for create a restore point on the operating system MacOS? I think I have something I can do for you.
time Machine is the backup solution integrated into Apple operating systems and allows, at any time, to create a complete backup of the operating system and use it as a "restore point" when reinstalling macOS.
Unlike Windows, however, backups created with Time Machine not only restore the system, settings and programs to a previous state, but also the data. Therefore, should you decide to restore your Mac to a previous state using a backup created with Time Machine, remember to perform the saving all data saved after its creationotherwise they will be lost.
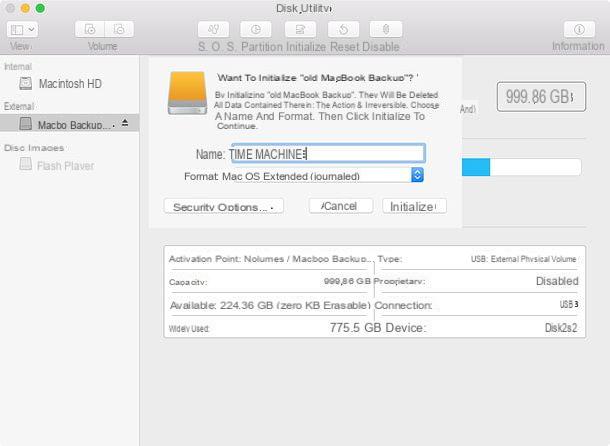
Having made this more than necessary premise, it's time to take action: first, get an external hard drive on which to save the "restore point" (following my advice for purchases, if you wish) and format it with the file system Mac OS Extended Journaled through theDisk utility, residing in the folder Other of the Launchpad. If you don't know how to do it, I invite you to consult my guide on how to format Mac external hard drive.
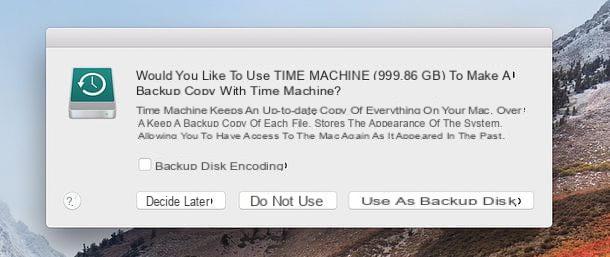
Once the disk has been formatted, a message should appear on the screen time Machine that asks you if you want to use the newly formatted disk to back up your Mac: answer the warning in the affirmative by clicking on the button Use as a backup disk and wait for the process to complete (which could take a few hours, depending on the amount of data on the disk).
Note: the backup will be updated automatically every time you connect the hard disk to the Mac. If the space runs out, the operating system will automatically delete the oldest backups (notifying you with a warning message).
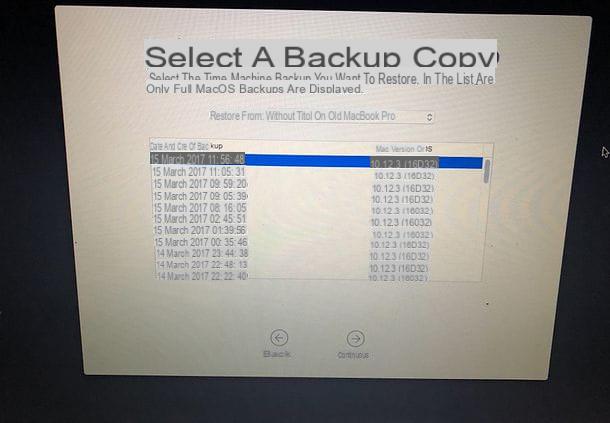
Returning the Mac to a "restore point" created with Time Machine is just as simple: turn off the computer completely, turn it on while holding down the keys cmd + r of the keyboard until the logo of the bitten apple appears on the screen, choose to Use your language as the main language and click on arrow (->) to move forward.
At this point, connect the disk with Time Machine backups to the Mac, select the item Restore from Time Machine backup from the recovery mode selection box, click the button twice consecutively Continue, choose the disco which contains the backups, press the button again Continue and choose the date to return the computer, bearing in mind that the change it also involves personal files (those created after the restore date will be destroyed).
Finally, select the Mac disk on which to restore the backup, click on the button Unlock, type the administrative password of the computer and press the button Restore: At this point, you simply have to wait for the process to complete, knowing that it could take quite some time.
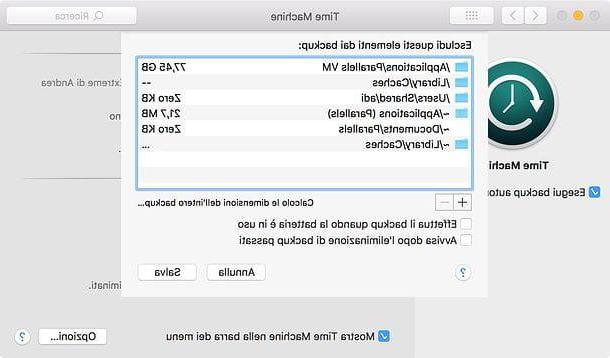
What I have shown you is only the basic procedure for creating and using a "restore point" on Mac: if necessary, you can customize the folders to save, choose whether to backup even if the computer is powered from battery (very useful option for MacBooks), save backups to a network disk and much more. I showed you in detail the use of Time Machine in my tutorial on how to backup with Time Machine.
Alternative solutions

If you have come this far, it means that you have perfectly understood the use of restore points on Windows, however you are looking for an alternative solution that can offer you a recovery mode that is a little more complex and specific than those seen. until now? Then let me show you some solutions that might be convenient for you.
- Operating system recovery (Windows 10) - the latest version of the Microsoft operating system allows you to restore the operating system to its initial state, deleting drivers, settings and programs and leaving your personal files intact. This is an extremely useful solution if your computer's operation is compromised due to a program or device driver that is not easily identifiable. I taught you how to reset Windows 10 in my dedicated tutorial.
- Disk cloning - it is a technique that allows you to copy the entire contents of the system hard disk to an external disk. Subsequently, it is possible to restore the created "clone", even on a new disk, within a couple of clicks, a very useful solution in the event of a disaster (for example a hard disk that suddenly stops working due to hardware damage) . One of the most efficient free solutions for Windows, suitable for this purpose, is Clonezilla, for use in conjunction with software Tuxboot o Rufus: I told you about it in detail in my guide on how to clone a hard drive. On Mac, however, you can use Carbon Copy Cloner, as I explained to you in my tutorial on how to clone Mac hard drive.
- File Backup - if you are not interested in taking into account the operating system, but you are more oriented towards a solution that allows you to store multiple copies of the same file, then I recommend that you turn to a specific solution such as File History Windows, or third-party programs such as Macrium Reflect Free o EaseUS Todo Backup Free. I told you about it in detail in my in-depth analysis dedicated to backup methods on Windows 10, which you can also use safely on all other versions of the Microsoft operating system.