Colored LEDs and color temperature
How many times have you heard of Colored LEDs and color temperature? And most importantly, how much confusion has this topic introduced into your familiarity with LEDs? I guess you don't have very clear ideas on the subject, but don't worry: in this chapter I will explain in a few simple words the difference between the two things and, subsequently, I will guide you to the application of some scenarios able to satisfy your needs. .
I Colored LEDs they are electronic components in which different materials are introduced semiconductors in micro quantities and of different nature, which have the peculiarity of emitting colored light when they are crossed by the electric current. To simplify the concept further, we are talking about the famous LED RGB (Red, Green, Blue) or RGBW (Red, Green, Blue, White), i.e. LEDs capable of emitting lights of any color.
La color temperature, expressed in Kelvin (K), is instead the degree of coloring emitted by a white light LED that can be shifted on a chromatic scale ranging from warm white, tending to the colors of red and therefore relaxing (1.800K), up to cold white, tending to the bluish color of the ice, excellent if the environment requires bright and energetic lighting (12.000K).

A big difference between these two characteristics in LEDs is the fact that colored LEDs are generally used to color environments, stimulate different emotions, so as pure decorative light or if we want secondary light. While white LEDs with warm, neutral or cool light are used as primary light o ambient light.
To give you a case in point: with a white LED bulb you can create a warm and welcoming atmosphere thanks to the color temperature that moves through the color of red (therefore from white-yellow-orange-red), but you cannot reproduce any other color. Otherwise, with an RGB / RGBW bulb you can reproduce all the colors of the chromatic scale of colors and at the same time you can imitate (but not equal) the color temperature emitted by a warm, neutral or cold light LED.
One last technical feature that you can find on both colored LED lights and white LED lights, is theintensity bright or the luminous flux expressed in Lumen (lm). This is nothing less than the luminous value of the lamp and is an element that you will be able to consider based on the use of the room.
If you'd like to delve into the technical side of how colored LEDs work, I suggest you read my tutorial on how LEDs work, which talks about just that.
How to create colors with LEDs in the room
Now that you have a little clearer idea of the difference between the color of an LED lamp and its color temperature, you are ready to take action and color the rooms in your home with the right lighting. So courage, let's not get lost in other words and see immediately how to create colors with the LEDs in the room.
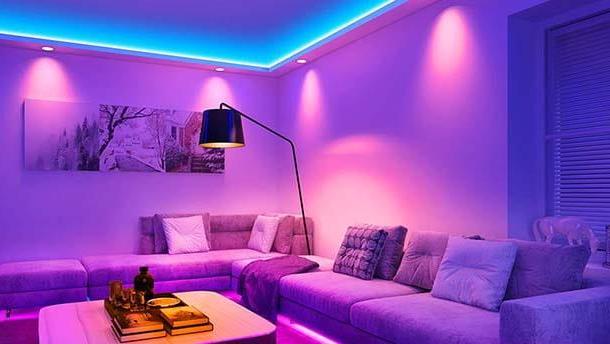
You must know that you can find many types of colored LEDs on the market (in the shape of a traditional bulb, chained in long flexible strips, tubular that resemble neon, etc.). The most particular shapes can come up against you in the most creative installations, such as under the sofa, on top of a piece of furniture, behind the TV or in the center of the room.
If you want to color the room with a perimeter light effect, I suggest you consider the RGB LED strips. Thanks to the versatility of these strips, you have different application possibilities: you can place them on the upper floor of the furniture that surrounds the room in order to hide them well and create a "bathroom" of light along the perimeter. If the LED strips are too long, you can always cut them with scissors where they are visible joints in pond: usually you find them every meter or every 50 cm.
After applying the LED strip on the side of the room you are interested in or, if you have had the opportunity along the entire perimeter, all you have to do is connect the supplied power supply to the socket, then pressing the button Power (universal symbol of ON / OFF) on the remote control, always supplied, you can turn it on. The remote controls of the different LED products are very similar to each other, the button fashion triggers the programmed plays of light, i colored buttons activate a static light of the respective color, the buttons capacitor positive (+) lead e negative (-) lead instead, they allow you to increase and decrease the intensity of the light.
Below I propose some ready kits of LED strips complete with adhesive strip for a convenient and quick application, power pack adequate e IR remote control. These kits are great for making a colorful room in minutes, plus they are easily available online at a really attractive price.
See offer on Amazon See offer on Amazon See offer on Amazon
If the perimeter light is not what you are looking for, the best suggestion I can give you to color the rooms in your home using LED lights, is certainly to introduce you to the world of Philips Hue and its products smart. The numerous Philips LED bulb kits are ideal for decorating rooms at home with different intelligent light sources, fully controllable by smartphone via Wi-Fi or Bluetooth connection.
With a kit of those that I propose below, you will be able to control all the light points simultaneously or independently, decide their color, adjust their luminous intensity and their color temperature.
See offer on Amazon See offer on Amazon See offer on AmazonThese colored LED bulbs can be applied in any support E27 with power lower than i 30W (consumption is really low). In the first two kits there are 3 light bulbs, a possible scenario could be the following: you install an LED bulb instead of the traditional one in the chandelier and the other two you could install them in two floor lamps, perhaps placed in two opposite corners of the room.
This way you have 3 colored light sources that gradually intersect with each other. Now you need to connect the Hue controller to your router with a Ethernet network cable (if you do not have one, I leave you below some articles easily available from the Web at great prices) then connect it to the power supply to start it.
See offer on Amazon See offer on AmazonAfter that, all you have to do is install the app Philips Hue on a mobile device connected to the home Wi-Fi network, for convenience you can find the direct link below to download the app on devices Android (if you do not have google services you can try to search for it on an alternative store) or on devices iOS / iPadOS. After installing the app, just launch it and wait for it to complete the search for controllers in your home network. After a few seconds your Hue controller will be detected, then you will notice the green button Search for… located at the bottom of the screen, it will turn into a button Connect: press it to continue.
In the new screen you will read the request to press the button round located above the Hue controller, so go ahead and within seconds you will have reached the finish line. Once connected, you will see in the app the list with the 3 new LED lights you installed. Here you can quickly turn them on or off by doing tap on the relative control switch on the right (ON / OFF), but the thing that will interest you most right now will be the management of colors and intensity bright, then tap a lamp name and you will be introduced to the control screen Assessment of the single light. From here you can manage all the characteristics of the light source and also give it a custom name. have fun!
One last tip I can give you is to take a look at the many videos of YouTube showing different ambient lighting setups, maybe you could start by checking out the videos on how to mount RGB LED strips it's surely how to cut an LED strip.
How to create colors with the LEDs behind the TV
One of the best ways to create the right atmosphere while watching a movie, a TV series or a football match is definitely to turn off the main light in the room and focus attention on the screen. Maybe with a decorative light reflected on the wall and then hidden behind the TV which helps you not only to prevent eye fatigue, but also to enjoy the beautiful atmosphere created. In this chapter, therefore, I will explain to you how to create colors with the LEDs behind the TV!
There are several ways to create a colored LED light behind the TV, and I will list them all below: from the simplest and therefore cheapest, up to the most complex, cinematic and therefore a little more expensive to set up.
The simplest method is to place one or more RGB / RGBW LED lamps placed behind the TV facing the wall, so as to obtain a radiant but static color effect, or manually adjustable.
See offer on Amazon See offer on Amazon See offer on AmazonIf you want a more enveloping solution, you might consider applying one RGB / RGBW LED strip along the entire rear perimeter of the TV in order to have a wider reflected light. There are gods Kit that allow you to apply the strip on all 4 sides of the TV thanks to the special flexible corner connectors.
If the idea appeals to you, find below some examples of LED strips for TV panels from 40 to 70 inches. When you've got your kit, just remove the adhesive film back and apply the strips along the rear perimeter of the TV, then all you have to do is connect the cable supply to the power outlet and get comfortable on the sofa, you can control the new bathroom of light behind the TV with remote control Supplied.
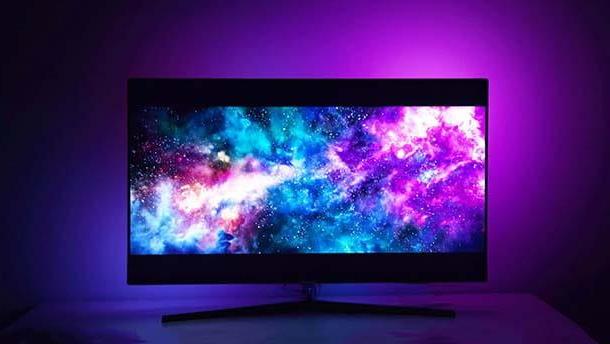
See offer on Amazon See offer on Amazon See offer on AmazonThe quickest, cinematic and even more expensive alternative might be to buy a TV equipped with the technology Ambient Light, then with the factory controller installed on board and the LED bodies for light and color animations. These TVs require no additional setup and allow you to change the LED backlight mode from the convenience of your TV remote.
Below I propose 3 models of televisions Philips Ambilight, designed with a scenographic backlighting system that recalls the colors and brightness of the rear LEDs based on the colors of the images displayed on the screen. The LED-lit area of the Ambilight system creates a screen expanding effect by projecting the colors onto the wall behind the TV, I guarantee it will be a truly immersive experience.
In summary, to have this type of solution you do not need a kit and you do not have to install anything as it is all included and pre-installed in the TV. The Philips Ambilight models that I propose below are conveniently available online and boast the most modern technology on board, such as 4K UHD LED / OLED panels, smart hubs for connectivity and interactivity and native integration with the assistant. vocal Amazon Alexa.
See offer on Amazon See offer on Amazon See offer on AmazonTo further realize how simple it can be to apply colored light behind the TV, I suggest you watch some videos on how to mount LED behind the TV or how to put colored lights for TV su YouTube in order to see on a practical level the experiences of some youtubers who deal with this topic.
How to create colors with LEDs to the beat of music
If, on the other hand, your aim is to create ambient lighting that reacts and comes alive to the rhythm of the music, well, then this is the chapter for you. In fact, I will explain step-by-step how to use the tool designed to achieve this, so let's roll up our sleeves and see how create colors with the LEDs to the beat of the music.
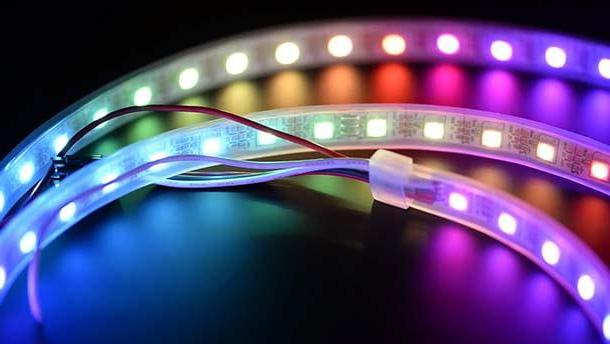
A simple and effective way to get colorful and animated lighting to the beat of the music is to put the LED controller Colorful X2 between your audio source and an RGB (digital) LED strip with addressable chips, that's right you can't use just any LED bulb or LED strip. First you need to find everything, so below I propose the kit easily available online at competitive costs consisting of 1 LED strip, 1 x 5V power supply, 1 x LED controller e 1 3.5 "jack cable additional.
See offer on Amazon See offer on Amazon See offer on Amazon See offer on AmazonOnce you have your kit, you can proceed with the installation. Place the LED strip where you would like the colored light to be diffused, behind the sofa, above the furniture, along the entire wall, the possibilities are endless. To apply it, simply remove the adhesive film located at the bottom and gently press it on the surface along which you want to slide it.
Now take the end of the LED strip and cut the connector a 3 pin, then screw the following wires to the Colorful X2 controller terminal: the cables V+ (red) e V- (white) of the LED strip go into the terminals V+ e V- controller, while the cable D (green) must be tightened in the clamp D controller (indicating the data communication cable). At this point it remains for you to connect the two cables of additional power supply to the power supply, so you have to tighten the cables V+ (red) e V- (white) additional to the terminals V+ e V- power supply.
Finally, you will need to connect an electrical cable with terminal plug a 10A (amps) to the power supply, then tighten the cables brown e blu respectively to the terminals of the power supply L e N, then tighten the cable yellow green to the terminal of the land on the power supply (icon with 3 horizontal lines), follow these steps very carefully before connecting the power supply to the power outlet, if you are not sure about the connection I suggest you get support from a friend or an acquaintance who knows the basics in the sector electric.
That's it, the controller is ready to drive the LED strip to the beat of the music, so it's time to play a piece of music. Included you will find a cable 3.5 "jack that you can connect to any digital device such as a smartphone, a tablet, a computer or a stereo, therefore, connect one end to your favorite player and the other end to the Colorful X2 controller, in the input marked with the voice IN. Then connect the second 3.5 ”jack cable to the controller output, labeled with the voice O while the other end you will need to connect to your amplifier or audio system to which your speakers are connected.
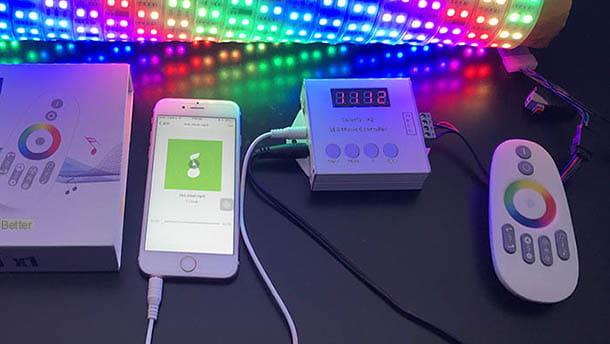
Very well, we're almost there, now with the remote control of the controller, also supplied, touch the key with the musical note icon to change the operating mode to Music, you will see 20XX on the controller display, where 20 indicates the operating mode and XX the selected play of light number. Done! Play your favorite song and enjoy the play of light moving and intensifying to the beat of the music!
With the remote control you can do a lot of things, such as changing the type of animation scheduled, there are 27! Then you can speed up o slow down light transactions, increase or decrease the volume, reverse the direction animations or exit music mode and use the LED strip as a normal colored ambient light source. In this case, if you place your finger on the color circle, you can choose a specific color and adjust its intensity.
If you do not want to use cables to transmit music and you want to have an environment in which any sound or music makes the colored LEDs react and animate, freeing you from connections between devices, then I propose another specific product. The Music IR Controller is a device with integrated microphone that captures sounds and converts them into highly sensitive colored light pulses, making you obtain a performing and satisfying result.
In this case you just need one or two 4-pin RGB LED strips (non-digital and maximum 180W of combined power) and connect each wire to the respective terminal on the controller: The white (or black) cable to the terminal capacitor positive (+) lead, the green wire to the terminal G, the red cable to the terminal R and the blue cable to the terminal B.
As for the previous solution, here too you will need to equip yourself with a power supply 12V DC to power the controller, then nothing else is needed. Once you have installed the power supply and the RGB LED strip to the controller terminals as indicated above, you are ready to go.
See offer on Amazon See offer on Amazon See offer on AmazonYou will notice that the light shows will also start when the controller hears your voice, so play a blast of music to see the effect.
How to create colors with LEDs