RealWord Cursor Editor (Windows)
The first of the useful resources that I want to advise you to try is RealWorld Cursor Editor. It is a free and usable program on all versions of Windows which, in fact, allows you to create mouse pointers starting from scratch or from pre-existing images. It is quite simple and intuitive and the final results returned are definitely noteworthy. Let's see how it works right away.
First, go to the program's website and click on the button Download to download RealWorld Cursor Editor on your PC. Once the download is complete, double-click on it to open the file you just obtained (RWCursorEditor32.msi) and, in the window you see appear on the desktop, click on the button Next.
Accetta quindi the conditions of use of the program, meeting the segno di spunta accanto alla voce I Agree, and click on first Next four consecutive times, then on Si ed infine your Close to finish the RealWorld Cursor Editor installation process.
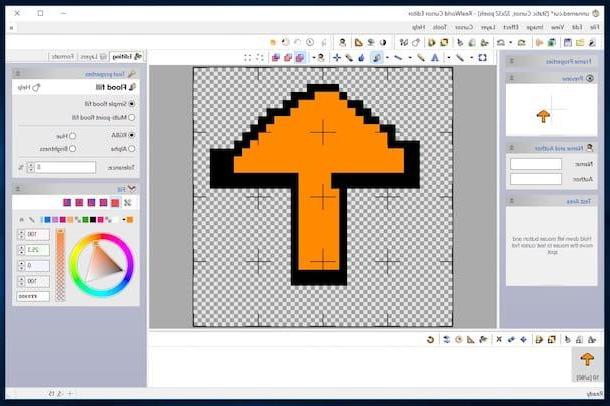
Now, launch the software via its icon that has been added to the desktop (or call the program from the Start menu) and, in the window that opens, click on the button Create which is at the top left to start creating a mouse pointer. Then select the item by double clicking on it New mouse cursor and use the editor that opens to create your cursor. To generate a new cursor starting from a pre-existing image, select the item instead Cursor from image.
You can create your pointer using all the tools you find in the program toolbar, such as the pencil (Pencil), the color filler (Flood fill) and geometric shapes (line, curve etc.) and the color palette on the right. To add a shadow to your cursor, click the button instead Drop Shadow.
When you are satisfied with the result, type the name you want to assign to the mouse cursor just created in the text field next to the item Name: in the left part of the window, your name in the text field next to the entry Author: and select the item Save as ... from the menu Fillet to save the pointer. Great, don't you think?
CursorFX

As an alternative to the above program, I suggest you consider using CursorFX. Similarly to the aforementioned software, it works on all versions of Windows and allows you to create mouse pointers by modifying those already included in the program and / or creating new ones starting from pre-existing images. It also allows you to apply fantastic animated as well as sound effects to the pointers you create. In short, try it now and you will see that you will not regret it. It's free but is also available in a paid variant that includes extra features.
To download the program on your computer, first connect to the CursorsFX website, click on the button Try it Free! which is on the home page, type your e-mail address in the appropriate field that you see and press the button Download placed sideways. Now, access the inbox relating to the email indicated above, api the email that was sent to you by CursorFX and click on the button Download e poi quello Download Now on the page that opens in the browser window. The program download will start immediately.
When the download is complete, open the file obtained (CursorsFX_free_2.xxexe) by double clicking on it and pressing on Yes / Run in the window you see appear on screen. Then click on the beton Agree, remove the check mark relative to the installation of any additional programs that are useless for your purpose and click on Next twice in a row. Done!
Then you will find yourself in front of the main CursorFX window. Then select the package of pointers you like most among those attached to the list below and then click on the button with the pencil correspondent you see appear. If, on the other hand, you prefer to create a new set of pointers from scratch, click on the button New theme.
Regardless of the choice made previously, in the new screen displayed select the tabs at the top (Cursors, Special Effcts, Trails e Sounds) and modify the various pointers by selecting the one in relation to which you intend to act and then using the appropriate tools that you find on the right. To set a given image as a cursor, you need to click on the button Import graphics that you find at the bottom right.
To then apply a given set of cursors, select the reference one in the main program screen and press the key Apply which is below. Obviously, even if you close the CursorsFX window, the changes will continue to be maintained.
Edit Cursor Online
You don't want to download and install new programs on your computer and use the ready-to-use mouse pointers that are on the net on this or that other Internet site. further solutions to offer you? Of course yes. You can turn to Edit Curosrs Online that, as can be easily understood from the name itself, alto is nothing more than an online application through which, in fact, you can create pointers for the mouse by acting directly and comfortably from the window of the Web browser, whatever you prefer. It is easy, intuitive, the results returned are respectable and it is a resource made available by the same software house as the aforementioned RealWorld Cursor Editor. In short, I advise you to try it now.
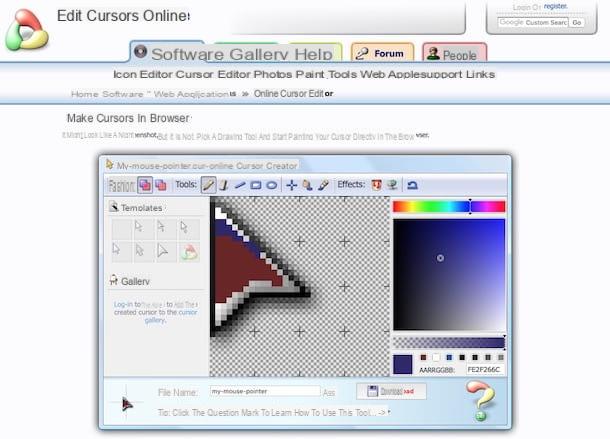
To serve, first connect to the Edit Cursor Online home page and start drawing your pointer in the editor located in the center of the page. Through the toolbar at the top you can select the drawing mode, for example you can choose the shape of the brush, you can apply the shadow effect, color an entire area etc., all by clicking on the corresponding buttons. To cancel the changes you have made, you have to click on the button with the arrow that you always find at the top.
In the right part of the editor you will find the area for the selection of colors. You can also select and customize ready-made templates by clicking on the one you prefer on the left side of the editor, under the heading templates.
Once the changes are completed, name your cursor in the appropriate field next to the wording File name: which is at the bottom then press the button Download adjacent and wait a few moments for the download procedure of the file relating to your pointer to be started and completed. It was so easy, wasn't it?
Other interesting solutions

Did the above resources not convince you in a particular way and are you looking for additional tools through which you can create pointers for the mouse? Then take a look at my tutorial dedicated to cursor programs and you will see that you will not regret it. You will find a bunch of other software useful for the purpose in question as well as the customization of the pointer in general with special effects and various decorations that you can download and use immediately on your computer. Have fun!
You will then find other interesting solutions indicated and explained in my guide on how to create a mouse cursor. Please, give it at least a look.
Apply the cursors you created
Except for CursorsFX which includes a special command through which you can directly apply the cursors created, to install the generated mouse pointers on Windows just access the section included in the system control panel. Let's see in more detail how, you can find everything explained below.
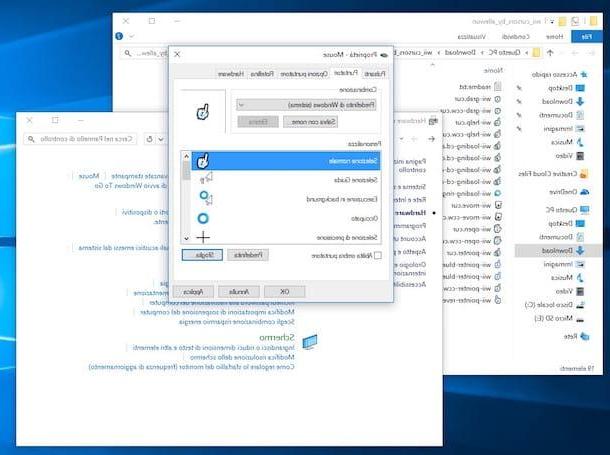
- It was used Windows Vista, 7, 8 / 8.x or Windows 10, to apply the cursors go to menu Home and go to Control Panel. In the window that opens, first click on Hardware and Sounds and then Mouse (under Devices and Printers) to access the mouse settings. Then click on the tab Pointers, select the type of pointer to change from the list (ex. Normal selection, Guide selection, etc.), click on the button Sfoglia ... to select the cursor to use and first press on Apply and then OK per salvare i Cambiomenti.
- It was used Windows XP, you can apply the newly installed pointers by clicking on button Home and by going to Control Panel. In the window that opens, first click on Printers and other hardware and then Mouse to access the mouse settings. Then click on the tab Pointers, select the type of pointer to change from the list (ex. Normal selection, Guide selection, etc.), click on the button Sfoglia ... to select the cursor to use and first presses on Apply and then OK to save the changes made.
And on Mac?
As for the Mac side, unfortunately Apple-branded computers do not integrate special options through which you can change the mouse pointer. To do this, it is therefore necessary to resort to the use of third-party applications.
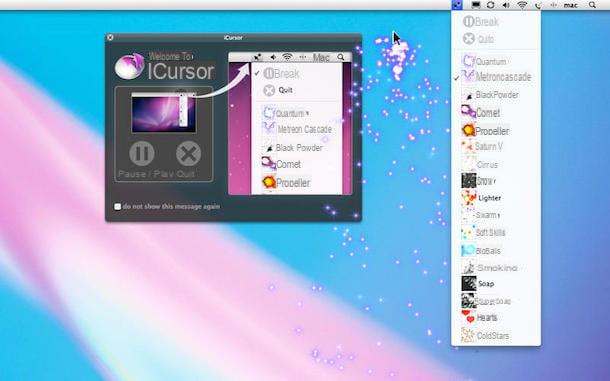
Among the various resources available for this purpose, I suggest you iCursors (free) e PinPoint Mouse Enhancer (for a fee, costs 5,49 euros) that allow you to select, customize and apply new pointers on macOS in the blink of an eye. Both applications can be downloaded from the Mac App Store and they are quite simple and intuitive to use.
How to create mouse pointers