Index:
- Ronyasoft CD DVD Label Maker (Windows)
- UnderCover10 (Windows)
- DiscLabel (macOS)
- Artwork Creator (Online)
Ronyasoft CD DVD Label Maker (Windows)
Ronyasoft CD DVD Label Maker is a payment for computers with Windows operating system that will allow you to create covers and labels for your media in CD, DVD and Blu-Ray format. However, this program can be evaluated before its purchase by downloading one trial version, which however applies a watermark to the works you will make.
If you are interested in trying this program, then I recommend you reach the Ronyasoft.com website and, via the green button Get Started Now, download the evaluation version, contained within the file ronyasoft-cd-dvd-label-maker.zip.
Then double-click on the file to open the compressed folder (you don't need a specific program to open a compressed folder in ZIP format) and then double-click on the file inside it, called RonyaSoft CD DVD Label Maker X.XX Install.exe.
If you use the Windows built-in tool to open a compressed folder, click the button Run. The Windows User Account Control window will then appear, in which you will need to click on the button Yes.
Select the language you want (in this case cityno) and click on the button Ok. Then click NEXT and then Accept, to accept the license agreement. Then click on NEXT and then Install. Infine, fai click su end, to finish the installation. At this point, all you have to do is open the program via its desktop icon.
At the first start you will be presented with a window to purchase a license to use. As I told you before, the program requires a license to use, based on the purpose of your use (personal or commercial). If you decide you just want to test the program and continue with the evaluation version, click the button Later. This way you can access the evaluation version which will allow you to check the features of this software.
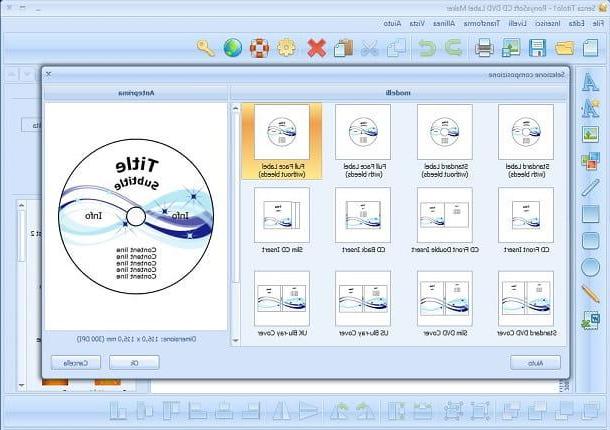
At the first opening, you will have to decide whether to start your own composition or use one of the many pre-existing templates that will help you to configure the label or cover of your CD.
By clicking on Start composing, you will need to select the kind of project you want to create: Box cover o Disc label. In both cases, you will need to enter the exact dimensions of the project, and then be directed at the design stage.
By clicking instead on Start model, you can choose from the many models of labels and covers: you can choose, for example, to print a slim DVD cover or a borderless label to apply to your CD.
Once you have chosen your project, from model to new composition, you will be given tools to import images, add text and shapes to customize your project. When you are satisfied, you can decide to save the project, using the button with the diskette symbol, or print it directly, using the button with the symbol of a printer.
UnderCover10 (Windows)
If you are looking for a solution instead free for your computer running Windows, then I can recommend UnderCover 10. This program will allow you to print your CD cover in a few simple steps. It will give you many layouts (all customizable) to print labels to apply on your CD disc or you can recall templates for printing front and back covers of your CD case.
But what stands out about UnderCover10 is its simple and minimal interface, with the essential tools for printing CD covers.
If you already own your CD cover and just want to print it via UnderCover10, then this program is really for you. If, on the other hand, you need to customize the graphics of your cover, then you will need to download another program used for this purpose.
I therefore recommend that you read this guide of mine, called Graphic programs, which could give you some useful advice on software to design your cover, or use the online Artwork Creator tool, which I will talk about in the next paragraphs.
To download this program, go to its website and click on the red button Download Now. Then download the file undercover10.zip and start the file inside it. Then carry out the installation, carrying out the short and simple procedure on the screen and then start the program through its icon on the desktop.
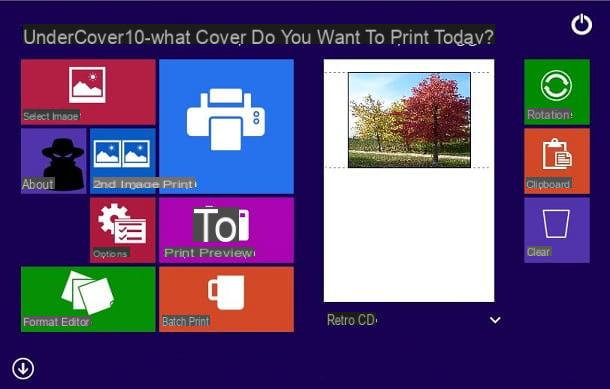
To import your CD cover image, click the on-screen button Select Image and select the image to use from your computer. From the box showing the import preview, click on the wording below to open a list with all the layouts you can use with that image.
You can see a preview by clicking on the button Print Preview. If you need to change the format, click the button Format Editor, otherwise click the button Print, to start printing your project immediately.
DiscLabel (macOS)
In case you have a device with macOS operating system, then you will have to turn your gaze to other software, as the ones I told you about before are not compatible with your system.
Among those that I recommend, my choice falls on DiscLabel. This professional program for macOS is available at payment, priced at $ 35,95; however, you can download one evaluation version completely free which will show the features of this software. You can download this trial version via the official DiscLabel website by clicking the button Download Free Trial.
After downloading and installing this software, in the window that will appear, click on the button Demo, so you can start using DiscLabel.
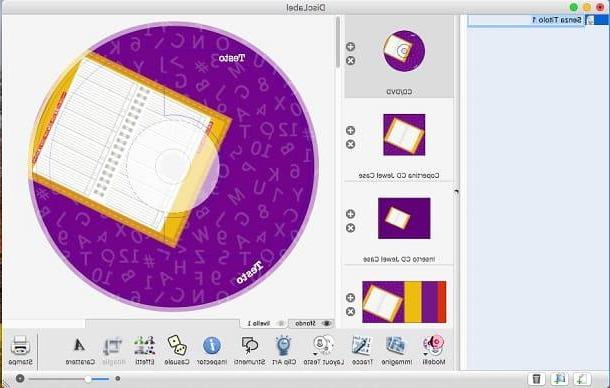
From the first opening, you will notice that this professional program is enriched by many fully customizable templates. Then choose one of those proposed and click on the button Choose.
You can now decide which elements you need, such as the label or cover of your CD, and then customize each element, using the buttons below in the menu: Templates, Image, Tracks, Text Layout, Clip Art, Tools, Inspector, Random, Effects, Crop and Font. These are all the additional tools that DiscLabel makes available to you to customize your project, such as adding images or texts.
Artwork Creator (Online)
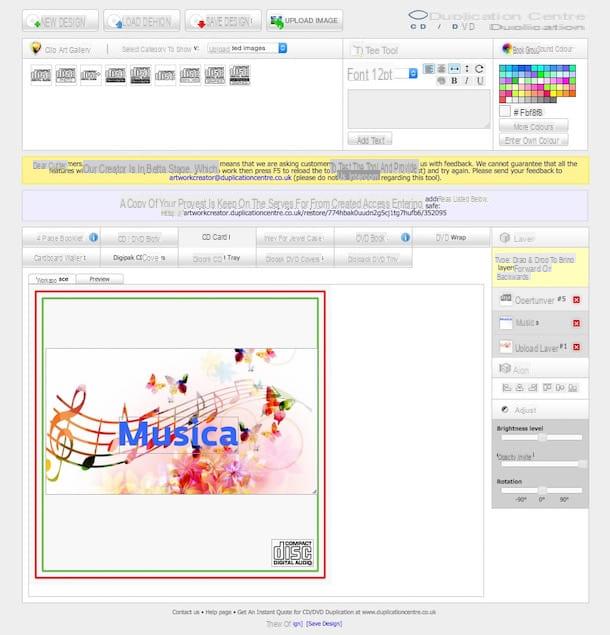
The programs I've told you about so far all require software to be installed on your computer. However, there are some alternatives that will allow you to create a project directly online, using a tool that can be used via the browser. In this way you will be able to customize the graphics of your CD covers in an even faster way, and then proceed with their printing later.
The online tool I'm talking to you about is Artwork Creator, tool free for the creation and customization of CD and DVD covers and labels. It can be used both by computers with a Windows operating system and by those with a macOS system. The prerequisite to be used is to have Adobe Flash Player installed, without which some features will not be available.
To use this tool, access this link via your browser and select one of the design templates available to create your CD covers. For example, click Digipak CD covers to start creating a cover for your CDs.
Now you can use all the customization tools to design your label. You can then apply text, logos and images as a background. To upload an image, click the button above upload Image and import all the images you want to use for your CD cover.
From the inset Clip Art Gallery, you will be able to see the imported images and any logos to apply to your project. You can also use the Text tool to add layers with texts to enrich your project. Also through the box Background Color you can set a background color to the entire CD cover.
When you have completed your project, you will need to click on the button Save Design, so as to download your entire project in a single ZIP file. Inside there will be files that you can then print and apply to your CDs.
How to make CD covers