What are Lightroom presets

Before going into the heart of the article and see how to make gods presets in Lightroom, it seems only right to explain to you in more detail what the latter are. As I have already mentioned a few lines above (and as the term itself suggests), presets are nothing more than files that can be saved locally (and possibly shared with other users), containing parameters to be applied in the same way to the images on which you choose to operate.
The presets, as you can well imagine, are extremely versatile and useful for applying changes "on the fly" to your shots, a bit like using the filters on Instagram and in photo editing apps.
It is possible to create presets in Lightroom both from a computer and from smartphones and tablets and to do so is very simple: just import a photo into Lightroom to use as a template (preferably a shot that has the characteristics of the shots to which you can apply the preset later), you edit the various parameters of the shot according to your preferences and you save the model, so that it can be reused later. Read on to find out all the details.
How to create PC Lightroom presets
If you agree, let's get right into the guide and see how to create Lightroom presets on PC using both Lightroom Classic (ie the "traditional" version of the program) that Lightroom CC (the “revised” version of Lightroom, included in the Creative Cloud subscription).
Lightroom Classic
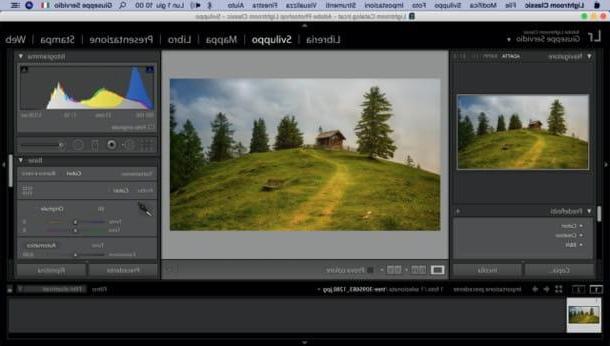
If you prefer to use Lightroom Classic, start the program, import the shot to use as a "base" for the creation of the preset (just drag it into the program window and click on the button Import) and click on the tab Development located at the top right.
Now, expand the menu Toning curve placed on the right sidebar and modify the points in the graph that appears on the screen, in such a way as to act on the lights and shadows of the photo. Maybe you can make a "classic" S curve, which can be suitable for multiple types of shooting.
By expanding the menu Base always present in the right sidebar, you can change the adjustment bars related to exposure, contrast, shine, ombre, Bianchi, neri, etc. Adjust these parameters according to your preferences, taking into account that the changes in question will also be made to the shots on which you decide to apply the preset.
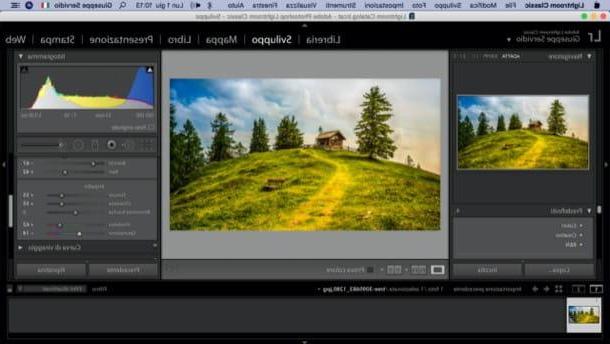
Now, I advise you to work on the shades. Expand the menu TSL / Colors also placed on the right and adjusts the various tone available (red, Orange, yellow, green, aquamarine, purple blue, Etc.).
Once you have adjusted all the various parameters to apply to your photos using the preset, save it. To do this, click on the icon capacitor positive (+) lead located on the left, in correspondence with the item Default, and click on the item Create default on the menu if you press.
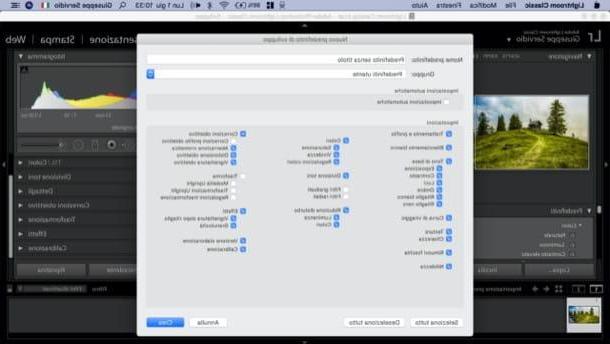
In the window New development preset, then assign a name to the preset, typing it in the text field Default name; make sure that the boxes of the various adjustments you have changed and want to include in the preset are checked, then click the button Crea And that's it.
At this point, the preset you created can also be used to modify other shots “on the fly”. To recall it, after importing a photo into Lightroom Classic and calling up the tab Development, expand the menu Default located on the left, click on the item User presets and click on preset name created previously.
Lightroom CC
If you are going to proceed from Lightroom CC instead of the “Classic” version of the program, know that you also have the possibility to synchronize presets through your Creative Cloud account and also apply them to the photos you retouch on the go.
To proceed, import the photo to be edited in Lightroom CC: go to the menu File> Add Photos, select the shot of your interest from the window that opened, click on the thumbnail of the image that appears in the Lightroom CC window and click on the button Add N Photos.
Once the photo to be used as a "base" of the changes to be used for the preset has been imported, select it from the menu located at the bottom (so as to view it in the workspace) and use the tools on the left to act on it .
If you want to change the parameters of the photo, for example, call up the panel Modification (by clicking on the icon depicting the three adjustment bars on the right) and, in the window that opens, move the sliders on the respective adjustment bars, in order to modify theexposure, contrast, shine, ombre, the balance of White and black temperature vividness saturation, etc.
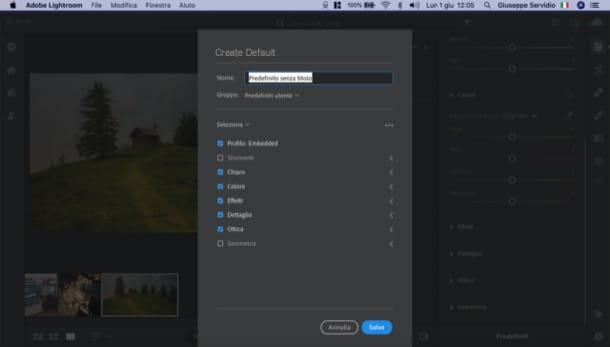
When you are satisfied with the changes made, save the preset: to do so, go to the panel Modificationby clicking once again on the icon three adjustment bars (top right), select the item Default (below), click on the button (...) located in the new panel that appeared on the screen and click on the item Create default in the opened menu.
Assign, therefore, a name to the preset, choose which parameters to include in it by checking / unchecking the appropriate boxes and click on the button Save, to complete the operation. Simple, right?
How to create mobile Lightroom presets
As I mentioned a few lines above, it is possible create presets on Lightroom mobile and the procedure to follow is very simple: just import the photo into the app to use as the “base” of the preset, modify its parameters and save the preset, which will also be available in Lightroom CC.
To proceed, therefore, start Lightroom on your Android or iOS device, log in to your Creative Cloud account (if you have not already done so), tap on the books (top left) and presses on the symbol of postcard (bottom right), to act on a photo already present in the Gallery, or press the icon of camera, to take a new photo.
After choosing or creating the photo to use as the "base" of the preset, presses on it preview to open and edit it. Then select the item Color, to act on temperature, hue, saturation, etc .; the voice Effects, to adjust the clarity of the shot, remove haze, etc .; that Details, to increase image sharpness and details; that optics, to remove chromatic aberration, enable / disable the lens correction tool, and so on.
When you have finished the changes to be made to the photo and, therefore, to the preset you are making, scroll the menu located at the bottom of the screen, select the item Default, award-winning (⋮) located on the right, select the item Create default in the opened menu and choose the name to assign to the new preset, writing it in the text field Default name.
Subsequently, select / deselect the parameters to be included in the preset, using the appropriate boxes in the menu that appeared on the screen and, when you are ready to do so, press the button (✓) located at the top right.
To use the default template you created, after importing the photo to which you want to apply it to the Lightroom app, scroll down the menu at the bottom, select the item Defaultpiggy symbol (⌵) located next to the item Colors, click on the wording User presets do tap sul preset name created previously, so as to apply it to the image.
How to create Lightroom presets