How to create an event on Facebook from smartphones and tablets
If you are going to act from smartphone or tablet, know that create an event on Facebook it's not complicated at all. All you have to do, in fact, is to log into your account in the official app of the social network and use the function dedicated to the creation of new events.
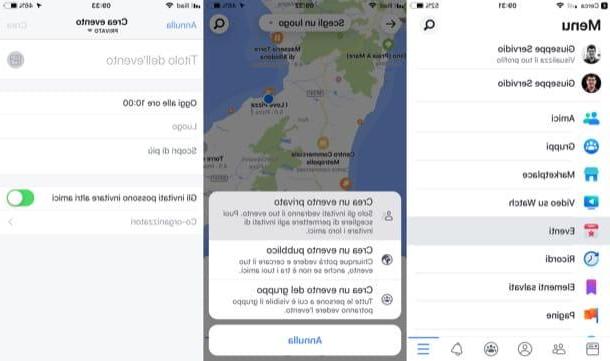
To proceed, then start the Facebook app on your Android or iOS device and log in to your account (if you have not already done so). Then press the button (≡) located at the top right (on Android) or bottom right (on iOS) and, in the screen that opens, select the item Events.
Now, tap the blue button capacitor positive (+) lead located at the bottom right (on Android) or on the button (+) Create located at the bottom left (on iOS) and then decide what type of event to create: su Android, tap the (▾) button located at the top left and select the option Public event o Private event; on iOSinstead, select one of the options in the menu that appeared on the screen, between Create a private event, Create a public event e Create a group event.
When choosing whether to create a public or private event, keep in mind that by creating a public one, anyone will be able to view it (even those who are not subscribed to Facebook); by creating a private one, however, only invited people will be able to view it. Also know that once the event is created, it will no longer be possible to change its privacy.
After deciding whether to create a public or private event, tap the button Aggiungi photo (on Android) or on the symbol of the camera (on iOS) and select the cover photo of the event. In the text field Event name / Event titleinstead, indicate what name you want to assign to the event.
Then complete the description of the event by specifying the place exact and theNow where it will be held, provide any ticket links, Some details regarding the event itself and, as soon as you are ready to do so, tap the button Public o Crea to share it.
If you have opted for the creation of a public event, know that you can choose as an organizer a page of which you are the administrator, in order to sponsor the paid event.
Did you see how simple it was to create an event on Facebook? Details regarding the participants in the event, the number of people invited, etc. are summarized in the section Organized events (your Android) Your scheduled events (on iOS), reachable after tapping the button (≡) and then on the voice Events.
In case you want to modify a created event, after going to the preview of the latter, tap the button Modification (l'icona della pencil located under the event title) and make any necessary changes. If, on the other hand, you want to delete the event, just tap on the button Cancel event / Delete event, located at the bottom of the screen, and confirm the operation by pressing on the item Confirmation (on Android, you need to select the option before doing this Delete event) or on the item OK (its iOS).
How to create a Facebook event from a computer

You wish to know how to create a Facebook event from a computer? Basically, just follow the same steps that I indicated in the previous lines: access the function dedicated to the creation of new events, provide all the details concerning the same and publish it.
To proceed, therefore, access Facebook from its main page (or from its application for Windows 10), click on the button Crea, located at the top right (on the top bar of the social network) and select the item Event on the menu if you press.
At this point, all you have to do is fill in the form that is proposed to you with all the information relating to the event you want to invite your friends to: first, choose whether to create a public or private event by opening the menu located in the top of the pane and selecting an option from Public event o Private event.
In choosing whether to create a public or private event, I remind you that by creating a public one, anyone will be able to view it (potentially even those who are not subscribed to the social network); by creating a private one, however, only the people invited will be able to see it. Please note that once the event is created, it will no longer be possible to change its privacy.
At this point, choose a theme among the predefined ones or upload a photo or video, so as to create the cover of the event. Then fill in the text fields Event name, Location, Description, Date hour and so on specifying all the details of the event you want to organize on Facebook. As soon as you are ready to do so, complete the event creation operation by clicking on the blue button Create / Create a private event located in the lower right corner of the pane.
I remind you that if you have decided to create a public event, you have the right to select as an organizer of the same a page of which you are administrator: by doing so, if you wish, you can give greater visibility to the event itself by sponsoring it.
Once the procedure for creating the event is finished, you will be redirected to the page of the event and from there you can see in real time how many participants in the event, invited users and so on.
If you want to change the details of an event created, go to this page, click on the button Edit event located at the event you want to change and use the form that is proposed to you to change all the information you want. To permanently delete the event, however, click on the item Cancel event, located at the bottom of the opened box, then select the option Delete event and click on the button Confirmation, so as to complete the procedure.
Tips for organizing an event on Facebook
We conclude this guide "in style", with a series of tips for organizing an event on Facebook. After having seen technically how to create an event on the famous social network founded by Mark Zuckerberg, I am sure you will like some practical "tips" on how to proceed in this direction.
- Use an eye-catching cover - you know, the eye wants its part and this also applies to the covers of events on Facebook. The cover is probably the first thing others will notice about the post related to the event you are advertising, and for this reason, if you want it to be successful, you must choose one that is suitable for the purpose.
- Not leaving anything to chance - try to be as specific and detailed as possible, indicating precisely the exact place and time when the event will be held. Use the text field dedicated to the description of the event to enter specific information on what will be done during the program, any guests present and, if you deem it necessary, also give some information on how to reach the location that will host the event.
- Sponsor the event - if you have created an event using your Facebook page, consider sponsoring it through a paid advertisement, so as to give it greater visibility. More info here.