Record Mac audio from the microphone
Do you want to make simple audio recordings using the built-in microphone or connected to your Mac? So why don't you turn to one of the two resources listed below? They are both very simple to use, capable of guaranteeing good results and usable without having to spend even a cent. Just think, there is even a resource integrated directly into macOS!
QuickTime Player
If you want to make simple audio recordings, without special effects, filters and whatnot, you can use QuickTime Player which is capable of capturing audio from the Mac's microphone and, more generally, from any audio input device connected to the computer.
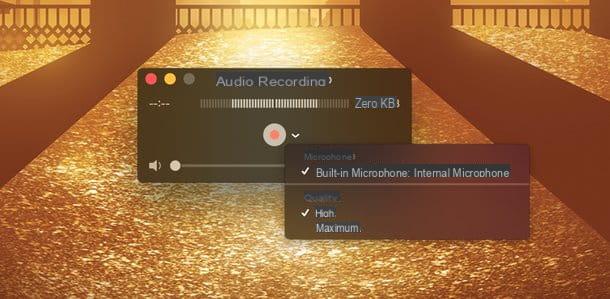
To start an audio recording with QuickTime Player, launch the application by clicking on its icon attached to the folder Applications or by selecting it from Launchpad, from Spotlight or by recalling it using Crab, right click on its icon in the tray Dock and select the item New audio recording give the menu check if you press.
At this point, click on white arrow located next to the record button, select the device from which to record audio (eg. Microphone internal) e cheap with REC to start audio recording.
When the operation is completed, click on the button Stop, go to the menu Fillet attached in the upper left part of the menu bar, click on Export and then select the Audio Only option .... Then indicate the folder in which to save your recording (in M4A format).
Audacity
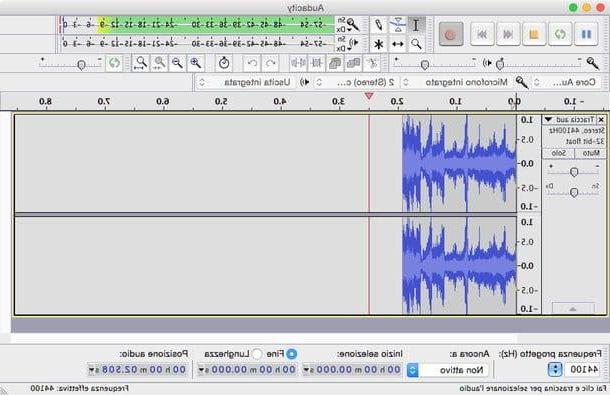
If you need more control over the quality of your recordings, you can contact Audacity, an excellent free and open source audio editor that includes a wide range of controls, filters and special effects.
To download it to your Mac, connect to its official website and click on the item first Audacity Download, then on the link Audacity for Mac OSX / maxOS and subsequently on Audacity 2.xxdmg file. Then open the package in .dmg format that was just downloaded on your Mac and that contains the software (eg. audacity-macos-2.1.3.dmg) and drag the folder of Audacity in the folder Applications say macOS.
At this point, if you intend to export your recordings in MP3 format, you need to get yourself a free plugin called MP3 BLADES. To download it to your computer, connect to its official website and click on the item Lame_Library_v3.99.5_for_Audacity_on_macOS.dmg.
When the download is complete, open the package that contains LAME MP3, start the file Lame Library v3.99.5 for Audacity.pkg present inside and click on Continue/Install to install it on your computer.
At this point there is not much more to explain. Start Audacity, select the audio source to use for recording from the drop-down menu located next to the del icon microphone e pulsing sul pulsating REC to start recording. When the operation is completed, go to the menu Filletclick your Export audio, choose the file format in which to export the recording (from the drop-down menu Size) and that's it.
Record Mac audio played on your computer
Are you interested in understanding what to do to be able to record the audio played by your Mac? If the answer is affirmative then you can appeal to one of the ad hoc tools that you find indicated in the following lines. Even in this case, these are fairly simple solutions to use even for those who do not consider themselves exactly a great expert in IT and new technologies. Seeing is believing.
Soundflower
Do you want to record Mac audio in the sense that you want to “capture” the sound played by the computer while listening to an online radio, watching a movie or playing a game? Then you can resort to Soundflower.
Soundflower is a free kernel extension for macOS that "captures" the audio played by the Mac and allows you to record it using any software suitable for the purpose, such as the aforementioned QuickTime Player and Audacity. It hasn't been updated for some time, in fact its validation certificate has expired, but it still seems to work fine.
To download Soundflower on your computer, connected to the MacUpdate website linked above, click on the item Download placed at the top, select Older (OS X) from the menu that is shown to you and declines the invitation to create your account on the site by clicking on No thanks, take me to my download. Then wait for the download procedure to start and complete then open the package in .dmg format that contains the application, start the executable Soundflower.pkg present inside and click on the button Continue four consecutive times. Also ignore the fact that the software certificate has expired.
Next, tap on Accept to accept the conditions of use of the software, click once again on Continue and complete the Soundflower installation process by clicking on Install. Finally, type the password of your user account on macOS (the one you use to access the system), press Submit And that's it. Once setup is complete, agree to restart your computer.
Upon new logon to macOS, to record audio played by any software running on your computer, you will need to set Soundflower as the default audio output device. How you do it? Don't worry, it's very easy.
First, head to the System preference and click on the icon Sound. Then select the tab Exitclick your Soundflower (2ch) and metti il segno di spunta accanto alla voce Show volume in the menu bar to make the audio control icon appear in the macOS menu bar.
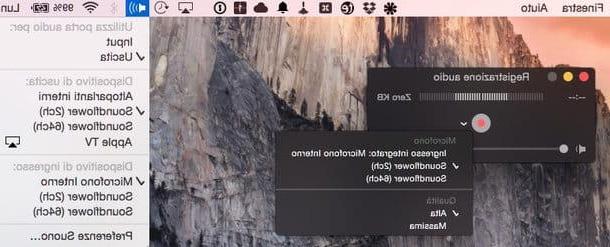
At this point, start the application Soundflowerbed contained in the folder Soundflower in Applications of your Mac, click on the icon flower that appears in the macOS menu bar at the top right and select the item Built-in audio found under the heading Soundflower (2ch) in the menu that appears.
After this step too, do it alt + click destro audio icon in the menu bar and make sure there is a check mark next to the item Soundflower (2ch). If it's not there, put it on yourself.
Mission accomplished! Now you can open QuickTime Player, Audacity or any other audio recording software and "capture" your Mac audio by selecting Soundflower as the source of the recording. In Audacity, for example, you have to select the voice Built-in Input from the drop-down menu with the microphone icon and you need to make sure that in the menu Activities (top) the item is not selected Playthrough software.
After the recording is complete, you can restore your Mac's default audio output device by doing alt + click destro audio icon in the menu bar and selecting the option Internal speakers give the menu to compare.
In case Soundflower doesn't work properly, you can easily uninstall it by going to the folder Soundflower in Applications of your Mac and opening the script Uninstall Soundflower.scpt. A Script Editor window will open. To uninstall Soundflower, click on the button Play at the top left, type the password of your user account on macOS, press Submit and restart your computer.
Audio Hijack
If you can't get Soundflower to work, or are looking for a more complete solution to record Mac audio, don't think twice and install Audio Hijack.
It is a commercial application, which costs $ 49 but is available in a free trial version that allows you to create recordings of up to 10 minutes, thanks to which you can capture system audio from Mac or individual applications.
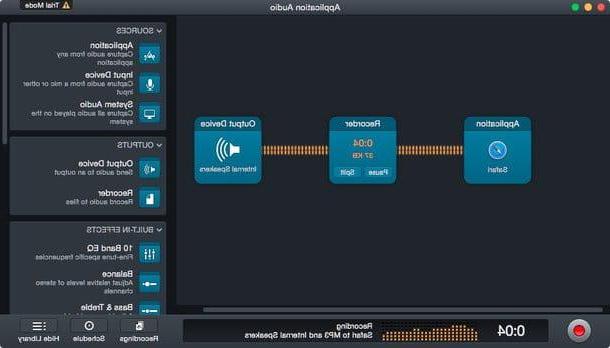
To download it to your computer, connect to its official website and click on the button Free download. When the download is complete, open the package in .dmg format that contains the program and drag its icon to the folder Applications of macOS. Then start Audio Hijack, watch the initial tutorial and click on Dive Right in to start using the application.
In the window that opens, then presses the button New session, choose what type of registration to make (eg. Application audio to capture the audio of a single application or System audio to capture the audio of all applications) and presses the button REC to start your registration.
Please note that you may be required to install some add-ons required to use some software features, such as Instant on e Schedule Helper. Accept by clicking on the button install and enter the password of your account using your macOS.
At the end of the recording you will find the list of all your audio files in the section Recordings of the program, from which you can export recordings to other applications, view the folder that hosts them in the Finder and more.
How to Record Mac Audio