Preliminary information
To continue with the registration of your game it is necessary that you are aware of some important details about this feature already included in Nintendo Switch.
Fundamental premise is that it doesn't matter which game and in which mode you are playing it, but the video capture time can be at most 30 seconds. Clearly this is true at the time of writing this article, as Nintendo itself may be introducing future updates that extend the lifespan of the recordings.
Don't worry too much about the 30 seconds, too, they seemed too few to me, but it must be said that they are more than enough to record the most salient and interesting parts of the plays. In fact, the recording refers to the previous 30 seconds from the moment the key is pressed Capture, so just remember to press it after the event you want to store in video happens (like a nice kill in Fortnite).
In order to use the video capture function integrated in the console it is also essential to install the latest version of the firmware, to be precise you must have at least the Switch firmware version 4.0.0. But I tell you that this is a step that occurs almost automatically when a new version of the software is released, but I still want to briefly explain how to make sure you have the right version.
To verify that you have the latest system software update, even from the menu HOME Switch and scroll down to the item Settings: then select the latter and tap on the item System. Then, start the check and any automatic firmware update by selecting the option Console update. If the console does reboot, rest assured because this is something foreseen by the procedure.
Now that you have dispelled all doubts about the Nintendo Switch update, an additional requirement for recording videos is to play titles that actually offer this possibility. Fortunately, most of the popular and popular games for Nintendo Switch have it, I mean titles like Fortnite, The Legend of Zelda: Breath of the Wild, Mario Kart 8 Deluxe, Splatoon 2 e ARMS.
In compatible games you will be able to record every mode, including multiplayer sessions. By the way, do you already know how two play Nintendo Switch? How do you say you haven't tried it yet? Don't miss out on this game feature! If you don't know how to do it, I invite you to consult my guide on how to play for two with Nintendo Switch.
This is what you must necessarily take into account when you want to record videos from Nintendo Switch. Nonetheless, I want to provide you with further information that may be useful to you. For example, you may be wondering if you need additional storage to save videos, such as a good large microSD card.
Well, this is not strictly necessary because the videos can be stored in the internal space of the console for a total number of about 100 files. This amount can go up to 1.000 videos if you have a large capacity microSD memory instead. Is it necessary then? No, or rather, it becomes if you really want to save a lot of videos, otherwise you can very well do without them.
The last piece of information I want to give you is more of a technical note. I refer to the limitation of the resolution of videos captured by Nintendo Switch, or that of 720p. The quality of the videos is therefore HD Ready and at the moment it is not possible to change this type of setting. Nothing worrying or dramatic, the overall quality, as you will experience for yourself, is more than enjoyable.
How to Record Video on Nintendo Switch
Once you've cleared your mind about capturing video on Nintendo Switch, it's time to take action and find out how to record on Nintendo Switch.
As mentioned, the procedure to follow is the same for each title, so you want to know how to record Fortnite on Nintendo Switch, how to register Zelda, Mario or any other game for the “big N” hybrid console, just follow what you are about to offer. Action!
How to Record Gameplay on Nintendo Switch

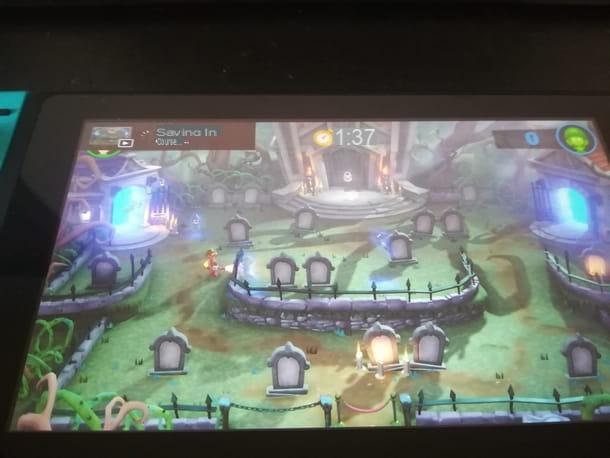
At the beginning of the video recording of your gameplay there is a very simple step: starting the game. Nothing could be simpler, as you usually do, just go to thetitle icon you want to play and record and tap on it (or select it with the buttons of the Joy-Con or the controller connected to the Switch). Then wait for all the necessary uploads and start the game in the mode you prefer. I just remind you that some titles may not be compatible, in which case try a different one.
Also remember to update the game if the system suggests it to you. If this happens, tap on the item Update in the window that opens automatically.
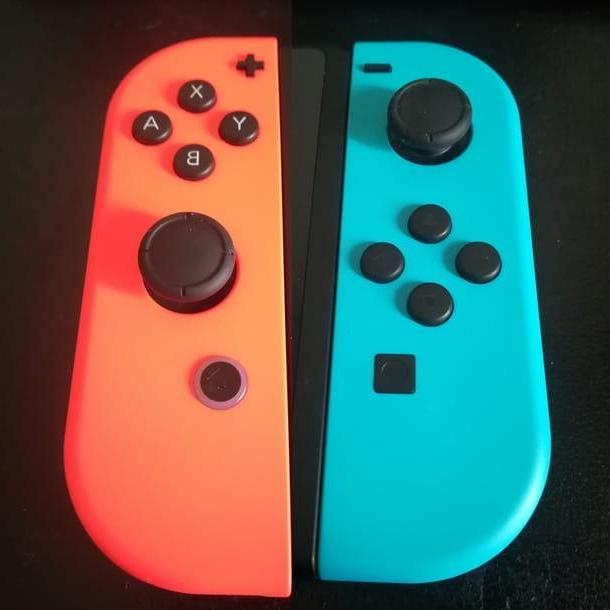
With the game started, if the game is compatible, you can start recording at the time you prefer by simply pressing the button Capture of the Joy-Con sinistro.
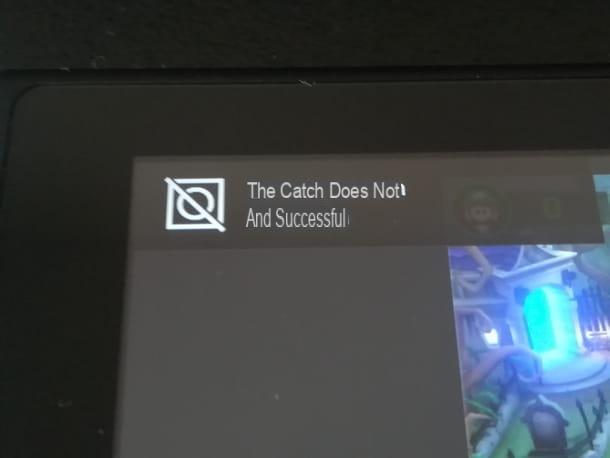
If gameplay recording is not allowed, an error message will appear in the upper left corner of the screen. Can't find the Capture button? Quiet, it is easily recognizable because it is square in shape and placed immediately below the directional arrows of the left Joy-Con.
Keep in mind that if the button is pressed quickly once, you will “take” a snapshot of the game screen. Since your intent is to save a video of the last 30 seconds of play, be sure to hold down the capture button for a long time. Only in this way, in fact, will the console understand that you intend to store a video of your game.
See how quick and easy it was to save the video? Now all you have to do is find out what you can do with captured gameplay footage, such as editing and posting to social media!
How to edit videos
Now that you have successfully recorded the portion or portions of your gameplay, they are automatically stored in the Nintendo Switch memory or on the microSD.
By default, if you have a microSD installed in your console, the videos will be saved to the card, otherwise to the Switch's internal storage. To change this setting, go to the menu Settings> Data Management> Manage Image and Video Captures> Save Destinations.
From the same menu, using the section Copy or delete snapshots and videos, you can manage images and videos and move them from one unit to another, if you have installed a microSD in the console.
More precisely, the videos and screenshots of the games can be viewed in the menu Album, accessible directly from the HOME screen. You can access it with a simple tap on its icon. Once you have opened the Album of your console, you are in the section All image captures and videos, from which you can immediately have all the videos and images of your games available. From here you can choose if and how to edit and share them.
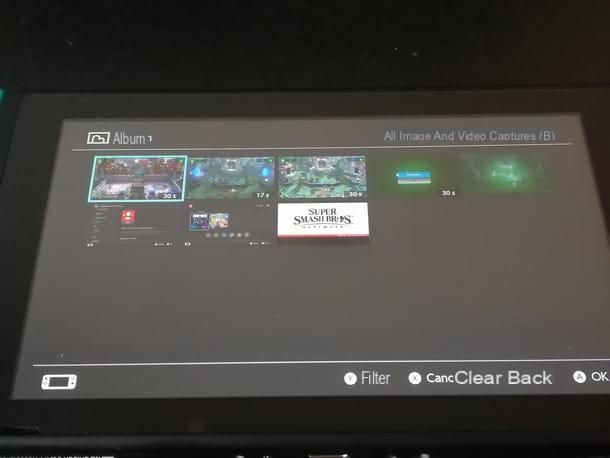
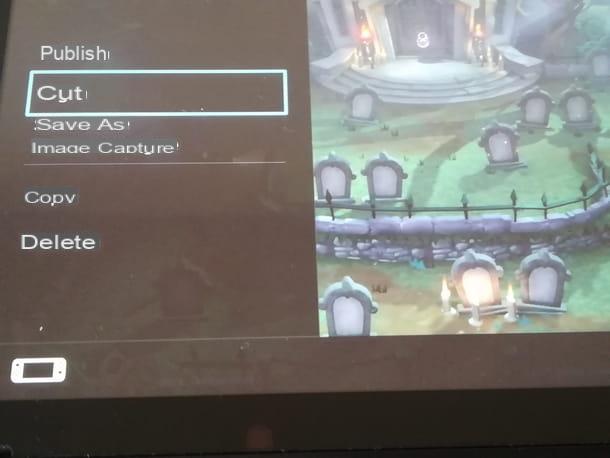
Start immediately by selecting the video you prefer, with a tap on its preview. In this way, the video playback starts: you can stop it at any time by pressing the button Y Joy-Con, so as to open the menu as well Edit and publish.
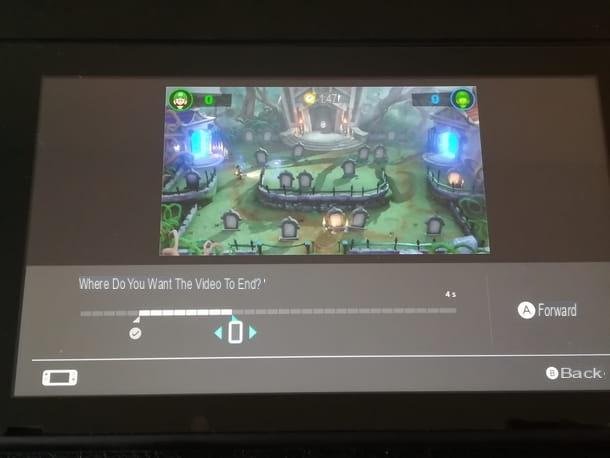
For example, you can cut the video with the appropriate option. In this case, a screen with the video and a bar with two indicators opens: swipe the indicator to the left to choose when the playback should start, then tap the button NEXT to be able to scroll the right indicator and thus choose when the playback is to end.
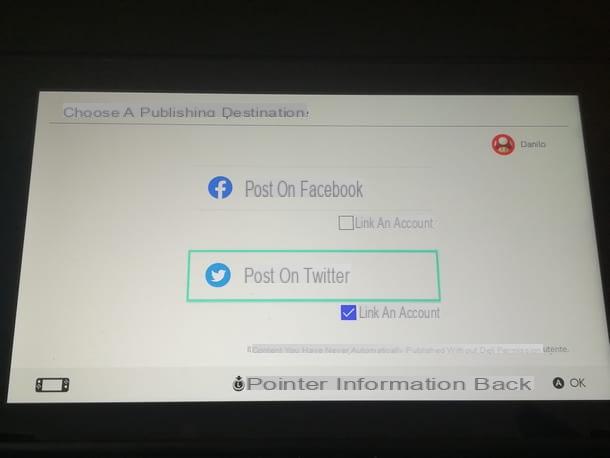
After your video editing operation, all you have to do is tap the button Save, to create a new video file edited according to your preferences. Another possibility offered by the editor is publication. To post a video online, select the entry Public and the profile of the player he is publishing and then select the social networks, with a tap on the corresponding icon.
Those available are Facebook e Twitter, of course you must also tick the box Collect an account, so you stay connected to your social account with the one you use on your Nintendo console.
After choosing the social, enter in the text boxes Username or email e Password the corresponding data and tap the button Authorize app.
This is a step to be taken for the first time you publish content from your console on one of the available social networks, the following times it will not be necessary, but you will always decide if and which content to publish and nothing will be done automatically without yours. permit.

If you miss the number of saved video contents and end up having too many, you should know that you can delete the ones you no longer need to free up space at any time you want. You can always free up space by going in Album. Then, locate the video you want to delete by navigating the menu, and when you figure out which one to delete, press the Joy-Con button X.
You can thus select one or more videos to be deleted and continue with their deletion by pressing the button A of the Joy-Con. You can also press the key + of the Joy-Con to play the video before deleting it, so you can make sure it is the one to remove.
Remember to follow this procedure to free up space, otherwise you will fill your memory and you will not be able to save anything else on the console!
How to capture images from video
If you have read how to record on Nintendo Switch your gameplay videos, then I am sure it will be a breeze for you to proceed with capturing the screenshots of the saved videos. I'll explain how to do it right away.
As for the videos, access the sections Album e All image captures and videos, and then choose the game video you want to save one or more screenshots of.
By doing so, the video will start playing, during which you can press the button Y Joy-Con to pause. With the video paused, select the button Edit and publish in order to have access to the voice Save as Image Capture.
The game, or rather, the game screenshot, is done; you just have to share it or show it to whoever you want, exactly as you can do for your gameplay videos. Easy, right?
How to Record on Nintendo Switch