How to record voice on cellphone
Let's start this discussion by looking first how to record voice on cellphone. That you have a smartphone Android or iPhone, it does not matter: in both cases it is a very simple operation to complete.
How to record voice on Android
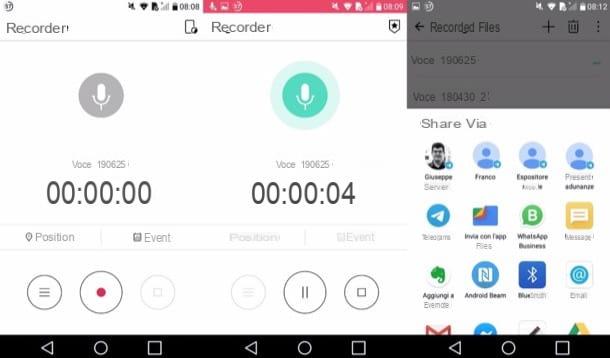
To record the voice on Android, puoi avvalerti dell'app Voice Recorder / Recorder present "standard" on your smartphone: please note that the name of the pre-installed voice recorder may change depending on the brand and model of device in your possession.
After starting the app in question, tap the button Rec which should be placed in the center of the screen (bottom), in order to start recording. Then make your registration and, as soon as you are ready to do it, press the button Stop (usually represented by the square icon), in order to stop it. The file will be automatically saved on your device.
To listen to the recording again, then, tap the button Play that appears in the center of the screen and, if you want, share the recording by pressing the button Share and choosing the sharing mode that best suits you among those available.
In the unfortunate event that your terminal does not have an app to record voice, you can rely on third-party solutions, such as the Voice Recorder by Triveous app, which I told you about in this other guide.
How to record voice on iPhone
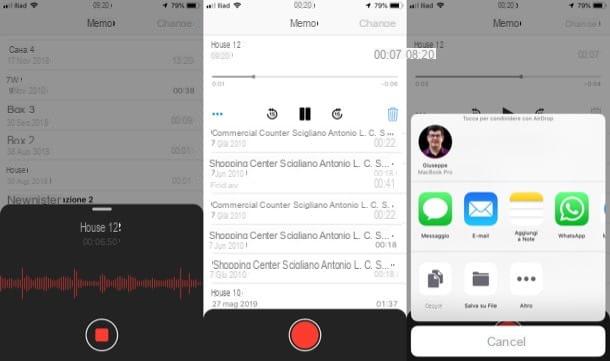
You have a iPhone? If so, know that you can record voice using the app Vocal Memo present by default on iOS. To use it, open the app in question by tapping on its icon on the Home screen and press the button Rec (The red dot at the bottom of the screen), to start recording.
Later, as soon as you are ready to do so, stop recording by tapping the button Stop (l'icona del red square at the bottom of the screen). In case you had enlarged the voice recording screen, instead, tap the button Pause located at the bottom of the screen and then on the item end located at the bottom right. You can then listen to the recording by tapping the button Play corresponding to the same.
In case you want to share the registration made, press the button (...) located on the left in the voice recording tab of your interest, select the voice Share… and then choose the sharing option you want from those available.
How to record voice from PC
Do you want record voice from PC? Well, then know that there are various programs suitable for this purpose. Let me illustrate the operation of some of them, which will surely be useful for the purpose.
How to record voice on Audacity
Audacity, a very famous free and open source audio editing program, is the first solution that I recommend you try. In fact, it allows you to record and edit audio tracks with extreme simplicity. In addition to being available for Windows, I point out that it can also be downloaded on macOS and Linux.
To use it, first download the program on your PC. Go to the Audacity download page and click on the button Download located on the left, in order to start downloading the program installation file. When the download is complete, open the file .exe you got, click the button Yes in the window that opens and click on the buttons OK, NEXT (four consecutive times), Install, NEXT e end.
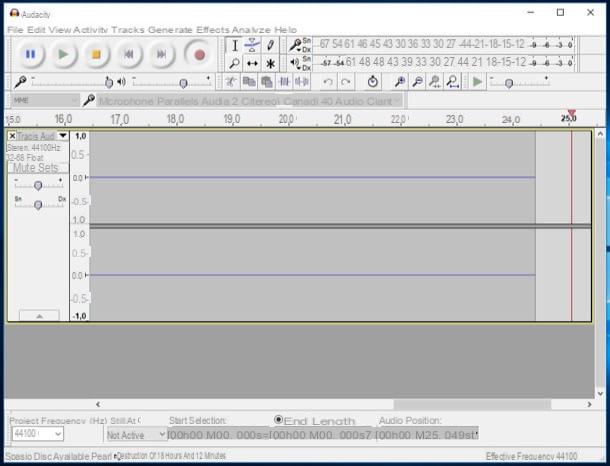
After installing and starting Audacity, you agree to the installation of all the proposed plugins by clicking on the button OK, and then press the button again OK present in the welcome window of the software. At this point, select the audio source to be used to capture the item (using the appropriate menu located at the top) and click on the button Register (The red dot which is located at the top), in order to start recording.
In case you want to intervene on some parameters, such as the balancing and gain, do it using the adjustment bars placed on the left. To adjust the audio volume, instead, use the adjustment bar located at the top left, next to the symbol of microphone.
When finished, stop recording by clicking the button Ferme (l'icona del yellow square located at the top left); if, on the other hand, you want to stop it temporarily, click on the button Pause, top left. To listen to the recording again, click on the button play located at the top left.
To save the recording, open the menu Fillet located at the top left, select the item Export audio ... from the latter, specify the position, name and format of the output file and, finally, click on the button Save.
I remind you that to save the audio file in the format MP3, you need to install a specific plug-in, as I indicated in my guide on how to use Audacity.
How to record vocals on FL Studio
You are building a project with FL Studio, famous semi-professional DAW software available for Windows and macOS, and would you like to know how to record voice with the latter? Let me first show you how to download the program to your computer (if you haven't already done so) and then how to do so.
I remind you that the FL Studio license costs starting from 89 euros, but you can test its features for free for 30 days. Also, keep in mind that to record vocals with FL Studio you need to connect the microphone to a sound card.
So, to begin with, linked to the download page of the program and click on freccia rivolta verse il basso corresponding to the operating system in use (eg. Windows). When the download is complete, open the file .exe obtained, click on the button Yes and then press the buttons Next, I Agree, yet Next 5 consecutive times and finally install.
At this point, install the driver ASIO4ALL: Click the button Next present in the pop-up window on the screen, put the check mark on the box I accept the terms in the License Agreement, click the button twice more Next and then click the buttons install Finish e, Next (twice) e Finish.
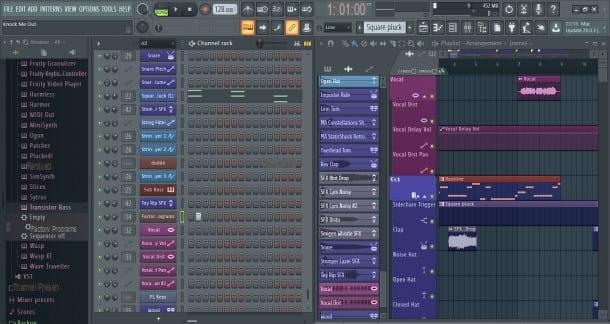
After installing and starting the program, you will find yourself in the presence of its editor, made up of numerous buttons and settings useful for mixing music, creating songs and so on.
To record the voice, first of all take yourself to an empty channel of the mixer present in the main window of FL Studio (eg. Channel 10), detach the master channel by clicking on the icon freccia rivolta verse l'alto, located at the bottom left of the window Wide, then select theinput that you intend to use to capture the item via the drop-down menu at the top right.
At this point, click on your button Song located at the top left, click the button Rec located at the top and, in the window that opens, click on the buttons Everything e Play, top left, to start recording. Once registration is complete, click on the button Stop, also located at the top left, and that's it.
For more information on how to use FL Studio, I suggest you take some time to read the in-depth study I have devoted entirely to the program.
How to record voice on PC without microphone

You have not yet purchased a microphone for your computer and, therefore, you are wondering if it is possible record voice on PC without microphone? Well, the answer is somewhat yes. I'll explain.
A first possibility you can consider is to record audio using the webcam integrated into your PC, or buy an external one, then using the software I mentioned earlier.
Alternatively, you can record your voice via smartphone, as I explained a few lines above, and import the recordings to your computer by following the instructions I gave you in my tutorials on how to transfer files from Android to PC and how to copy voice memos. from iPhone to PC.
How to Record Voice on Mac
Are you going to record voice on Mac? Well, know that you can do this using various programs, including the ones already mentioned Audacity e FL Studio I told you about in previous chapters. Alternatively, you can do this by using GarageBand, a software from Apple mainly intended for music production, but which can also be useful for voice recordings.
How to record voice with Garageband
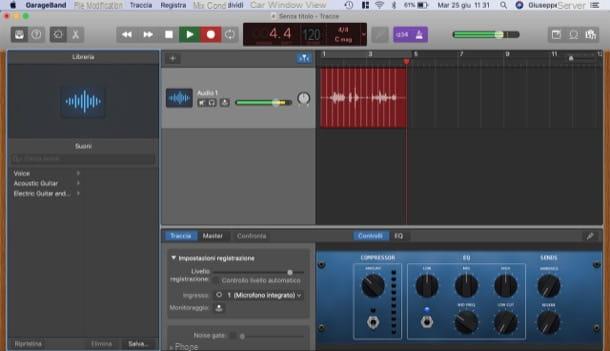
If you want record your voice with GarageBand, the audio production application developed by Apple and included "standard" in most Macs, know that you can do it in a very simple way: its well-organized interface, in fact, allows even inexperienced users to make recordings and possibly edit them with various tools and effects.
To proceed, all you have to do is start the application on yours via its icon in the Launchpad. If you do not find the icon in question, obviously the software has been uninstalled from your Mac and, therefore, you must re-download it from the Mac App Store by clicking on the button View in the Mac App Store and then Ottieni / Installa. If necessary, confirm the download by providing the Password of your Apple ID or with the touch ID.
Once you have started GarageBand, select the icon Empty project in the main program window and presses the button Choose. Then it indicates the track type you want to make (eg. Record using a microphone or line input, or drag and drop audio files) and the first button Crea.
Now, click on the button Rec which is located at the top, to start a new recording, and then, when finished, click on the button Stop, top left, to stop it.
If you wish, you can use the GarageBand editor to edit the audio track you recorded: on the left is the sound and instrument library of the application, at the top there are the tools through which to perform the mixing of songs, while at the bottom there are the controls and l 'equalizer. If you want to learn how to make the most of these advanced tools, take a look at the guide where I explain how to use GarageBand.
As soon as you are ready to do this, click on the menu Share (top) and select the item Export track to disc from the latter. Then assign a name to the output file, choose the format where you want to export it, set the quality desired, the position in which to save it and that's it.
How to record voice on PS4
If you have come to this tutorial with the intention of finding out how to record voice on PS4, perhaps because you want the audio of your voice to be captured within a gameplay you are making, this is the chapter of the tutorial that is right for you.
In fact, you will be happy to know that the famous Sony home console integrates a function for recording audio: to use it, press the button Share present on the controller and select the item Sharing and broadcast settings give the menu check if you press.
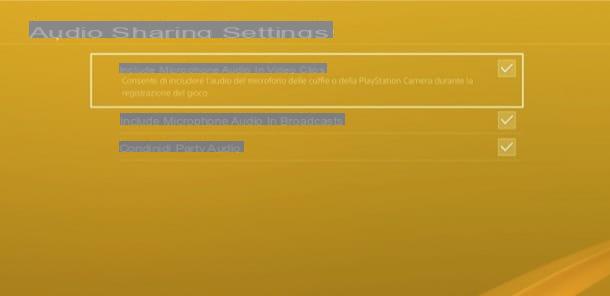
Then select the wording Audio sharing settings and check the boxes Include microphone audio in video clips, Include microphone audio in broadcasts e Share party audio.
To adjust the volume of the audio captured by the microphone, instead, go to the menu Devices> PS4 Audio Devices, select the voice Adjust the microphone level and set the output level according to your preferences using the adjustment bar Microphone level, which you can move with the directional arrows of the pad.
Clearly, in order for the registration to be successful, you must have activated the microphone and connected the headphones to the console, as I explained to you in the guides that I have just linked to you.
How to record voice