How to register electronic drums
Let's see immediately how to record electronic drums on the PC: if, in fact, you have a set of this type, things are simplified a lot, as the sound does not need to be switched, since it is already digital: one less job for the audio interface of your computer.
There are many applicable solutions, but below I will show you the most effective ones: you can register directly through the module integrated in your electronic kit, or use one audio card that acts as an intermediary with the computer. In the first case it will be sufficient to have a USB cable and connect one of the two ends to the relevant socket of the control unit, while the other will be inserted into the USB socket of the PC.
It will be necessary, at the same time, install the drivers related to the battery model you own, easily available from the manufacturer's website. I'll give you an example for the model DTX402K di Yamaha : in this case, you need to connect to the manufacturer's website and click on the driver version compatible with your operating system; then you must check the box for acceptance of the terms of use, next to the item Yes I agree, and click on the button below with the name of the driver YSUSB.zip, to start the download.
When the download is complete, you need to extract the zip file obtained and launch the Setup it contains: on the first screen, press the button Yes, then on the button Next, on the option I accept the agreement and then again on the button Next. It is therefore necessary to wait for the installation to complete and, in the last window, click on the button Finish.
In the second case, that is the connection via audio interface, you can evaluate based on the inputs and outputs available whether to make the connection via audio cables or cables MIDI. As for the audio cables, it is balanced TRS jacks equipped, at the ends, with two cylindrical pins with a diameter of dimension 6,35 mm: the first will be inserted in the appropriate output output of the control unit, the second in the socket IN of the sound card.
See offer on Amazon See offer on AmazonIf, on the other hand, you want to try making a link MIDI (Musical Instrument Digital Interface), check in advance on the control unit and on the sound card the presence of the relative inputs. This choice is indicated in case you want to later tweak the sounds to your liking, keeping separate the signals of the various elements that make up your electronic drum kit on the DAW (Digital Audio Workstation), which is the software installed on your computer for recording songs.
This protocol was created specifically to define a basic standard in the communication of electronic tools in the composition of digital music: every single signal can be easily converted into a virtual digital instrument, choosing i VSTi available on the music production software you use.
You will therefore need to find a MIDI cable, equipped with two hollow cylinder pins, inside which there are 5 connectors (DIN) arranged in a semicircle: insert the first pin into the outlet MIDI Out on the control unit of your electronic battery and the second in the entrance MIDI In of the sound card. Once the connection is made you will be able to operate on your favorite music production software. In the next paragraphs I will show you how to record electronic drums on some major DAWs.
See offer on Amazon See offer on Amazon
How to record electronic drums with Audacity
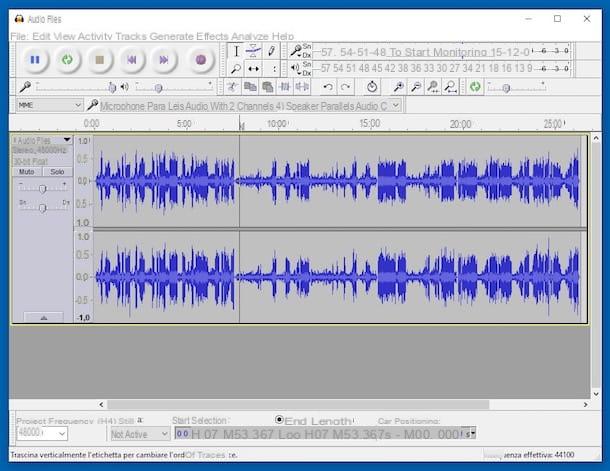
Let's start with one of the free software e . best known and most popular in the field of audio processing: Audacity.
Thanks to its ease of use and its intuitive interface, you will not have particular difficulty in understanding how to record electronic drums with Audacity in audio format (it is not possible, in fact, to proceed with MIDI, as it is an audio editing software and not a DAW for music production).
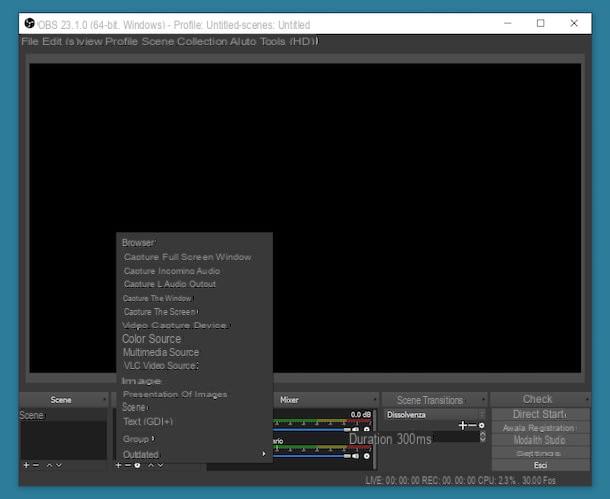
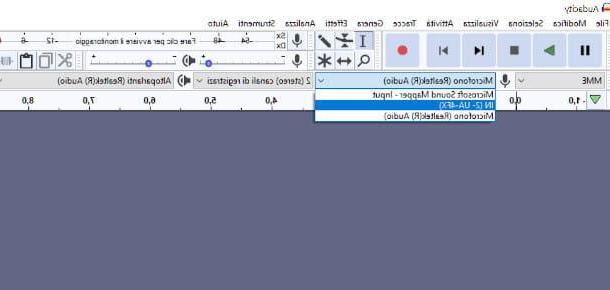
Once the program has started, the first thing to do is to select the audio source: in the main screen, at the top left, you will notice the presence of amicrophone icon, just below the command bar: click on the adjacent drop down menu, then locate the entry for the audio card or the electronic drums (in the case of USB connection) you are using and set it by clicking on it.
Now, tap onrecording level indicator, present centrally at the top (the wording click to start monitoring): this will allow you to verify that the input volume of the audio source does not exceed the decibels tolerated by the sound card. Ideally, during recording, the volume bars that dynamically show the volume should remain green, otherwise the audio could distort or generate annoying noises.
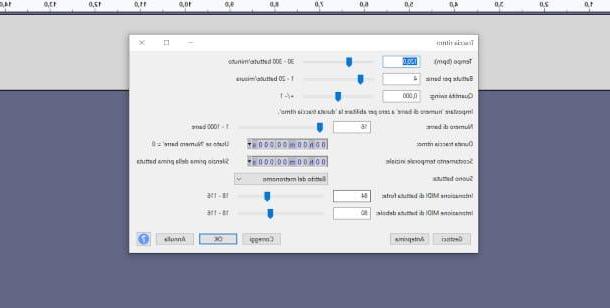
You are ready to proceed with the recording: if you wish, you can set up a track linked to the metronome clicking on the menu Generate> Rhythm Track. You will be shown a screen where you can set the click time and a whole series of parameters useful for perfecting the synchronization of your execution. Otherwise, if for example you already have a reference base or metronome, press the button directly Register (the one with the red dot in the center) in the command bar and you can start recording your electronic drum audio track.
If you want more details on how to use Audacity, in the guide I just linked you can find all the information you need.
How to record electronic drums with Cubase
Purposes Cubase for your musical productions? No problem. Learn how to record electronic drums with Cubase it will not be difficult at all: once you have determined the input channel of the audio source and the type of track to be recorded, the procedure to follow is quite intuitive.
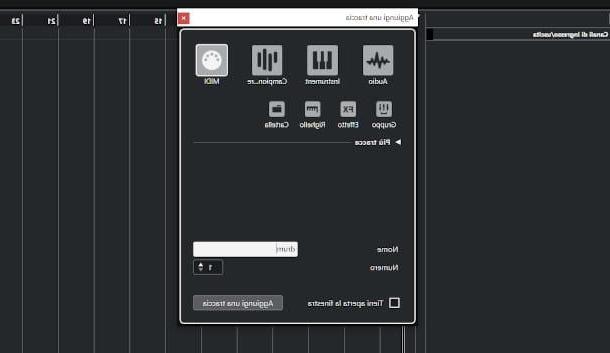
So start this famous software (for this tutorial I'm using the AI LE Elements 11) then from the main screen click on the button [+], in the left corner of the center pane to add a track. In the window that will be proposed, choose between MIDI o Audio, depending on the connections made between your drum kit and the computer. Press the button Add a track and you will immediately see it in the left column.
On the left side the panel will automatically populate Inspector, where it is possible to intervene on audio input and output interfaces by clicking on the relevant drop-down menus and, subsequently, on the wording relating to your sound card or electronic drums, again based on the connections made. Note that the icon with the outward arrow corresponds to the output devices, the inward arrow to the input devices.
If your choice fell on the MIDI, you can also choose to quantize your performance, or correct any out-of-time signals based on the BPM (beats per minute) set. First of all, therefore, change the tempo from the appropriate box at the bottom right (by default it is set to 120 BPM), by clicking on the up and down arrows to increase or decrease the speed. Then click on the box that shows theMIDI interface icon, at the bottom left and click on the box next to the item Automatic quantization to activate this mode.
As you will see, the track is already armed, that is, enabled for registration. Now all you have to do is press the button in the shape of hoops present in the control panel, at the bottom, to start recording and start playing. The progress indicator will proceed, modifying the MIDI notes or audio waveform of your performance as you go. Once finished, press the Stop button [◾️].
How to record electronic drums with GarageBand
Now let's move on to Garageband. This popular music production software, which you can find already integrated into MacOS, it is really excellent and professional in many respects and at the same time simple to use: below I will expose you, therefore, how to record electronic drums with GarageBand.
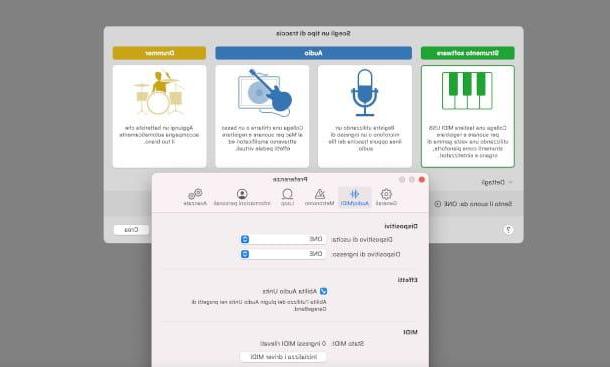
At start-up you must select the type of project compatible with the physical connection made between the electronic drum and the computer: if you have used TRS jack from the control unit to the sound card click, therefore, on the box with the image of a microphone (under the card Audio), then tap on the item My instrument is connected with to edit the audio configuration and select the interface used as input and output device.
If you have chosen a connection USB o MIDI instead, click on the image of the keyboard below the section Software tool and then define the audio input / output settings by clicking on the item below I hear the sound from: in the window that appears you can select the input and output devices (in this case it can be electronic drum or sound card).
In all cases, at the end of the configuration, press the button Crea and you will be redirected to the GarageBand main screen, already structured according to the choices made previously. Set the metronome from the top box: by default it shows the value 120 BPM (beats per minute), but by clicking on it, holding down the left button and moving the mouse up or down the pointer, you can increase or decrease it.
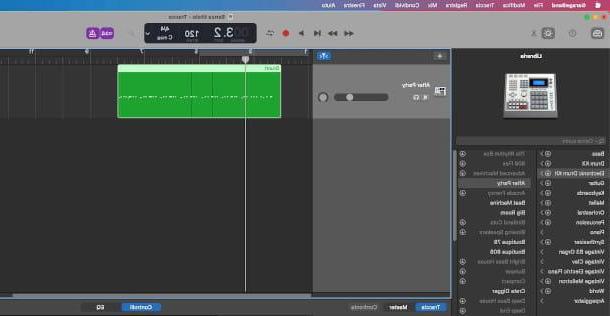
To start recording, press the red circle at the top of the command bar. When finished, press the Stop button [◾️]. If you have chosen MIDI you can easily load a different sound from the basic one generated by your electronic drum by selecting from the left panel with a click one of the preset present under the items Drum kit o Electronic Drum kit, eg.
The chosen virtual instrument will be immediately applied to the track. Also, by right-clicking on the latter and pressing on the last item Quantize, you can adjust the tempo of the notes by choosing one of the options relating to the tempo provided by the submenu that you will see appear. If you want to learn more about how GarageBand works, I suggest you read my dedicated guide.
How to record electronic drums with Ableton
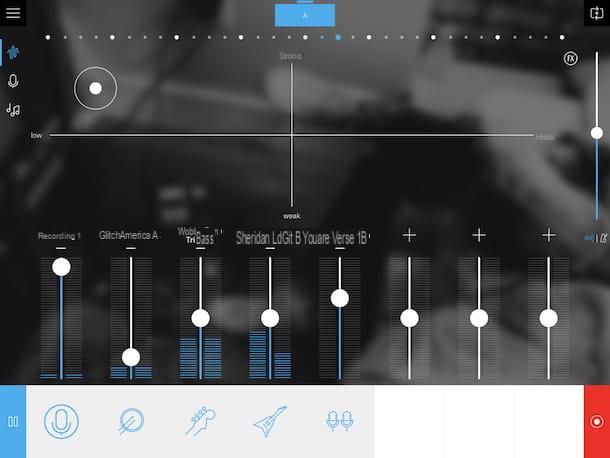
And here we are at the very famous Ableton. By following some simple tips that I am about to give you, you will have no difficulty in learning how to record electronic drums with Ableton.
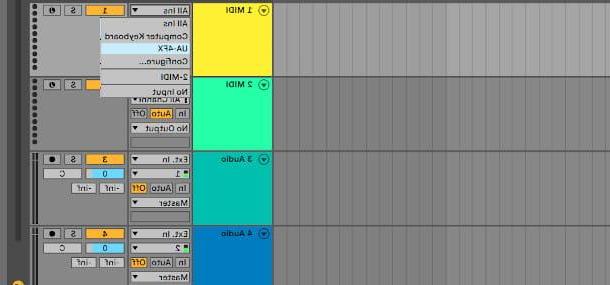
Once the software in question has been started (for this tutorial I used the Ableton Live 10 version), from the home screen I suggest you immediately enable the display Arrangementby clicking on the menu View> Toggle Arrangement / Session View, as it is easier to manage for registration (Session in many cases it is more suitable for Live).
In the central area you will notice the presence of some preset tracks for the different channels MIDI e Audio. Based on the connection choices made previously, therefore, it determines which type of track to use and identifies the box to its right where the fields of Input e output audio interfaces: by clicking on these you can define i sound input and output devices (electronic drums or sound card), or click on the item Configure to open the configuration window with all settings.
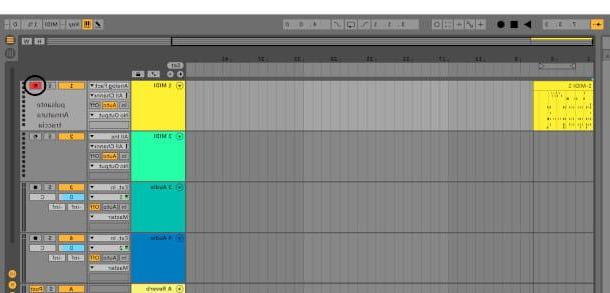
Before registering on Ableton you need arm the track, or enable it to acquire a sound source by opening the relevant channel. To do this, click on the button Weapon Registration, characterized by a black dot with a musical note inside, present on the right of each single track. You will also notice that the level meter next to the aforementioned button will dynamically start showing the input signal.
At this point all you have to do is press the record button (the black dot at the top of the command bar) and start the instrumental session. At the end, press the Stop button ◾️: for any further operation on Ableton, including thetrack editing or loading of virtual instruments, I suggest you read my dedicated guide.
How to record acoustic drums
You are a traditional drummer, therefore your interest is centered on how to record acoustic drums to your computer. Compared to the electronic one, this is undoubtedly another “ballgame”, but don't give up: you will see that, by following some essential precautions, you will soon be able to enjoy an excellent listening of your instrumental performances.
An investment commensurate with the number of microphones (e auctions) that you want to use for record the various elements that make up your drum kit. You will also need to consider purchasing a mix or one multichannel sound card, essential when dealing with multiple input channels.
If you have only one microphone, this must necessarily be omnidirectional, able, that is, to pick up the sound coming from any direction in the same way. It will be placed in one intermediate position between kick drum, snare drum, floor tom and tom, in order to capture as much sound as possible. The result, in this case, will be a great effect live, as this type of microphone tends to capture the reverberation and, in general, all the environmental characteristics of the surrounding space.
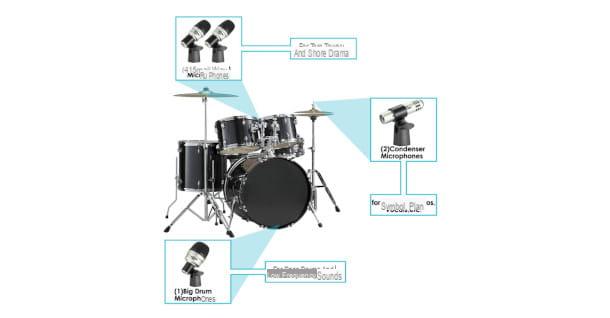
See offer on Amazon See offer on AmazonIf you choose to use two microphones there are kits specially made for this purpose. In this case it is better to opt for models cardioids o directional: the first should cover the bass drum frequencies, and therefore be placed at the same height. The other will be used to handle the higher frequencies, and will be placed in one panoramic position (although always in directional configuration), centrally but at a higher level than the plates (these models are generally named overhead), making sure that it does not interfere with the instrumental performance.
See offer on Amazon See offer on AmazonStarting from this configuration you can insert additional microphones: a third directional device can be added above the eardrum, at least 50 cm, by moving the central one to the opposite side in order to recreate a general view of the various components: the important thing is that they are equidistant from the center of the snare drum. a fourth directional microphone can be dedicated to snare drum, in order to bring out the function of this important element in the composition of the sound.
See offer on Amazon See offer on AmazonIt was arranged di complete kit of microphones for drums, consisting of 5 elements, you will notice that one of them is environmental: a configuration of this type, in fact, foresees, starting from the set-up with 4 microphones illustrated in the previous paragraph, an additional omnidirectional microphone to be positioned according to the sound characteristics of the room in which it is recorded.
With these opportune premises, I strongly recommend you to experiment with different configurations, in order to adapt them to your sound, to the genre you prefer and to the sound qualities you want to bring out.
mixer
In the next paragraphs I will show you, instead, how to physically make the connection with a mixer or sound card.
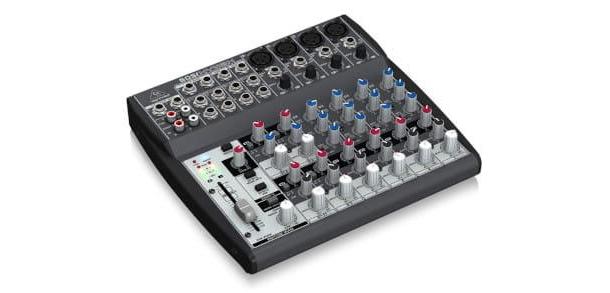
Il mix, as the name suggests, is a device that has the purpose of mix sounds from different audio sources. When it comes to acoustic instruments, the sound can only be captured by means of an appropriate microphone, as seen in the previous paragraph.
See offer on Amazon See offer on AmazonThe microphones used, cardiod or condensation, must be connected through special ones balanced cables equipped with connectors XLR (or Cannon) e TRS: the female XLR connector, consisting of three holes inside a circular plug, must be inserted into the socket of the same, while the male one (consisting of three pins inside a cylindrical cone) in the socket MIC In o Line In (the latter generally in the case of TRS) of the mixer.
In this way you can equalize the various elements of your drums by acting on the potentiometers (or knobs) for managing high frequencies (HIGH) old, media (MID) and low (LOW) of the relevant channel, in order to define the sound in advance before it is forwarded to the computer.
To connect the mixer to the PC, on the other hand, there are several possibilities. If you use a digital mixer you will surely be able to use the USB cable to connect it directly to the computer without intermediate audio interfaces.
If it is a analog mixer, you will also need to equip yourself with an external sound card that has special stereo inputs: you can therefore opt for the connection via a cable equipped with two male RCA connectors on the one hand, to be inserted into the sound card e two more male RCA connectors to be included in the outputs stereo out of the mixer.
See offer on Amazon See offer on AmazonAudio card
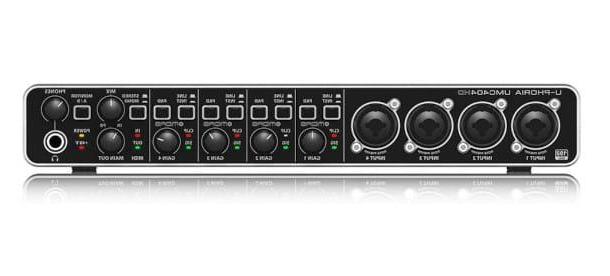
The best solution is undoubtedly to have one sound card with multiple channels, in order to assign every single element to a physical channel of the audio interface and to be able to record if necessary also in multitrack. The physical inputs can thus also be associated logically on the DAW to the various tracks, for accurate processing in post production of the sound of each element.
Le multichannel sound cards they are normally equipped with combo inputs, which accept the insertion of both connectors XLR and TRS of the cables coming from those microphones which, as I explained in the previous paragraph, are indispensable for recording the acoustic drums.
Therefore, if you want to record the drums with a sound card and get good performances, but you still have to proceed with the purchase of the aforementioned interface, I recommend that you evaluate one with at least 4 channels and follow the previously described microphone configuration.
See offer on Amazon See offer on AmazonThe sound card, in turn, can be easily connected to the PC with a very intuitive procedure. If you want to learn more about this topic, I suggest you read my dedicated guide.
How to register the battery