Preliminary information

Before getting to the heart of the matter and showing you, in practice, how to record on Twitch, it will be better to make a brief introduction that will help you "see clearly" on the rules concerning the registration and sharing of content on the site of the platform in question. Twitch's terms of service state that you can only share and stream content that you are on the platform owners or of which you are in possession of theautorizzazione sharing. It is also against Twitch's policies to download other people's streams.
This implies, therefore, that if you register and publish content of other users without their authorization, you are infringing the terms of service of the platform and the rules on Intellectual Property. Recordings of others' live streams and other content posted without authorization on your channel, therefore, can be removed at any time by Twitch following a report of infringement of the terms of service and intellectual property.
Additionally, please also note that repeatedly violating Twitch's established rules and guidelines of conduct can lead to permanent account suspension; therefore, please, always make sure that the content you publish on your channel is in line with the conditions of use of the platform that I linked to you above.
For the reasons that I have just explained to you, in the following chapters, I will show you, first of all, how to record the live broadcasts that you broadcast in first person and of which, therefore, you are considered as the owner. Is everything clear so far? Great, then I'd say it's time to take action!
How to record live on Twitch
There are numerous computer programs that you can use for to record your live on Twitch. Below, I have selected for you the most valid ones to use to perform this operation immediately. Here are all the details.
Twitch Studio (Windows / macOS)
To meet user needs, the developers of Twitch they released a handy program free which allows you to broadcast live and record them. The software I'm talking about is Twitch Studio and it is currently still in Beta phase but I assure you that it works properly. You have the option to install it on either Windows (if on your PC you have installed Windows 7 or a later version of this operating system) is on MacOS (in this case all versions starting from macOS 10.14 Mojave).
To download this software, all you have to do is open its official download page (you can do it with any browser) and press the button Download now. After that, if you use a PC Windows, open the file TwitchStudioSetup-network_ [referr-studio_page] .exe, award-winning Install in the window that opens and answer Yes at the Windows user control prompt.
If during the installation, the Windows Defender firewall reports a block of some of the features of the program you are installing, click on the button Allow access in the window that is shown to you.
If you intend to install Twitch Studio on a Mac, open the page that I linked to you in the previous paragraph, click on the button Download now and then on the button Allow. When the download is complete, open the file TwitchStudio_ [referr-studio_page] .dmg and drag theicon of the program to that of the folder Applications of macOS. Next, click on the latter icon and open, then Twitch Studio from the folder Applications. Infine, click your button apri. That's all!
Once you have accessed the program, log into your Twitch account by entering the username and Password of the latter in the appropriate fields and, finally, press the button Log in. Clicca, quindi, sul pulsating Start and the program will check the operation of your microphone (you can select a different one from the preset one by pressing the button Change microphone, to know how to connect a microphone to the PC, read my guide on the subject).
To go to the next step, click on the button go to webcam. Then select your webcam by pressing on button special placed at the top and then on device name. If you want to set a filter to the image, just press repeatedly on the icons of the arrows located on the left and right sides of the webcam video stream preview. To proceed, click on the button Continue his scene.
You can now set various screens to show at specific times during the live broadcast, such as when you are absent. To customize the screens, just click on them previews and then select, from time to time, the personalization elements that are shown on the screen, to add them. Once you are satisfied with the result, press the button end down below.
Then press the button Go to Settings: the program will carry out a general test of the hardware you are using and you can set a framerate and resolution for the live broadcast by pressing the button Change settings. To finish the configuration, click on the button end.
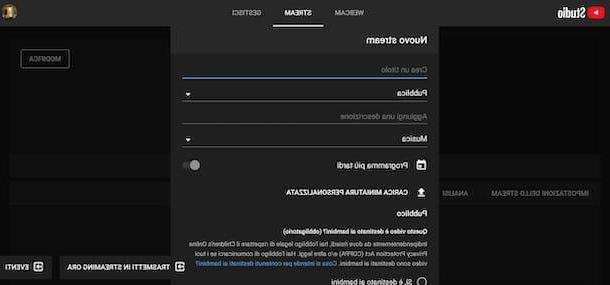
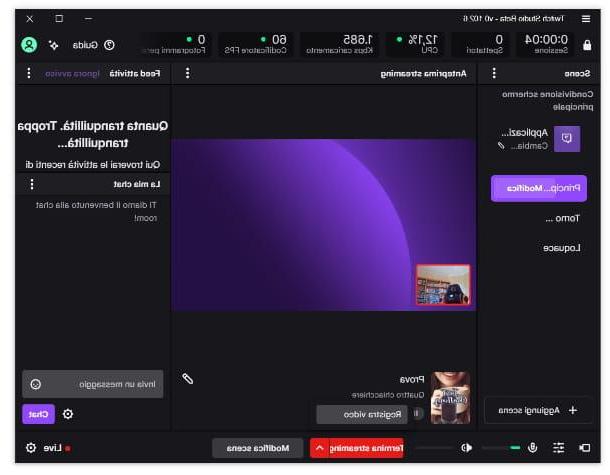
Now you just have to start the live broadcast and start recording. To do this, click on the button Start streaming placed at the bottom. The live configuration window will open: to select a screen to apply to the broadcast, press the button layout (if you want only the video stream coming from your webcam to be shown, click on the item Talkative), then select a category for the live broadcast by scrolling the page and clicking on the icon pencil located on the right, in the section Streaming information.
Then give a title to the live broadcast, typing it in the appropriate field at the top, and select the type of transmission you are about to make, by pressing the button Category. Finally, press on the buttons Save ed Enter live mode. In this way the live will start.
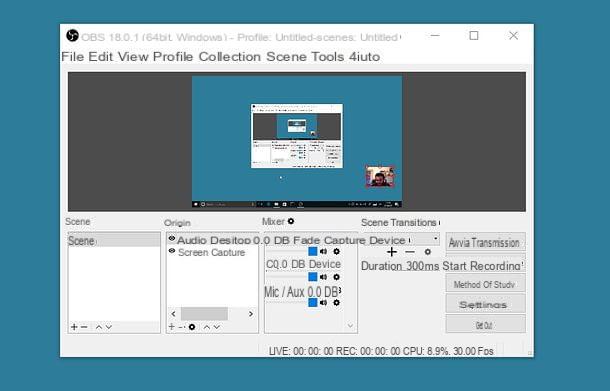
To start recording, just click on the icon first freccia rivolta verse l'alto next to the button End streaming and then on the voice Register video. You can then stop recording by pressing the same icon as the arrow and clicking on the item Stop recording only.
It was used Windows the recordings will be saved in the path C: Users [username] VideosTwitch; if, on the other hand, you use MacOS, you will find the recordings in the path / Users / [username] / Movies / Twitch Studio. The default format for recordings is FLV; if you want to change it, click on the icon ≡ placed in the upper left and then go up File> Settings> Recordings and from here press on button placed under the heading Registration form.
OBS (Windows / macOS / Linux)
Another software you can use for record on Twitch is the hugely popular Open Broadcaster Software, better known as OBS. It is a free and open source video broadcasting and recording program available for Windows (are supported Windows 8 and later versions), MacOS (starting from macOS 10.13 High Sierra) is Linux. OBS allows you to broadcast live your computer screen, the video stream of a webcam and many other video and audio content.
To download the software, connect to the download page of the official website and press on button related to operating system you use on your computer. Once the download is complete, if you intend to install the program on Windows, open the file OBS-Studio- [version number] .Full-Installer.exe and press pulsating Yes in the Windows authorization request window. Once this is done, click on the button twice consecutively Next and then on the button install. To conclude the procedure, click on the button Finish.
If, on the other hand, your intent is to install OBS on MacOS, after downloading the program from the page I linked to you above, open the file obs-mac- [version number] .dmg and drag theicon of the program to that of the folder Applications. Once this is done, click on theicon of OBS in the aforementioned folder and finally click on the button apri. Facile, see?
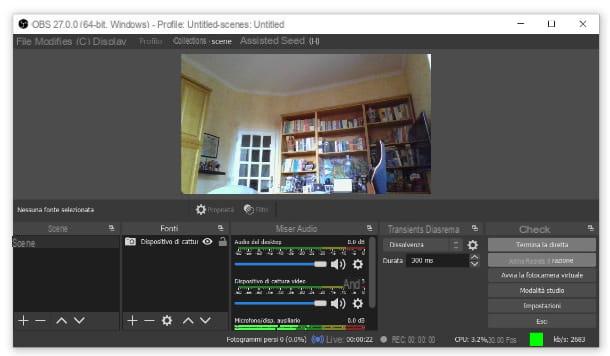
Once the program has opened, proceed by pressing on the item Ottimizza per le dirette, the registration is less important and click on the button NEXT. At this point, select a resolution and a framerate for the live broadcast by pressing, respectively, on the buttons next to the items Risoluzione di base (inquiry) e FPS and finally click on the button again NEXT.
Then click on the button placed next to the item Service e seleziona l'opzione Twitch and then press the button Connect account and enter yours credentials to login to Twitch in the appropriate fields. To conclude, click on the item Authorize and then on the button NEXT.
To continue, click on the button Apply settings and then configure the information of the live you are going to create. To do this, type a name in the field Title at the top (in the window on the left) and choose a category by typing text in the field below the item Category; from here, click on the button end down below.
Now you need to select the items you want to broadcast live (lo screen of your computer, yours webcam and so on). To do this click on the button + at the bottom, in the box References. To include the screen, select the item Capture the screen and press pulsating OK twice. If you want to broadcast the video stream coming from yours as well webcamclick on your button +, then select the item Video cattura device and press pulsating OK. Then click on button next to the item Deviceselect il name of the webcam you are using and, from here, press the button OK.
As for audio sources, you can choose betweenincoming audio (i.e. the one coming from the microphone) and / or theaudio output (the one that comes from the PC; if you have a Mac you will have to install ad hoc programs to record the Mac screen with audio).
Once you're ready to cast, click the button Start live that you find in the list of items at the bottom right. The broadcast will start immediately: to start recording, just click on the button Start recording. To pause the latter, click on the ▮▮ icon next to the item instead Finish the registration. Once you want to stop recording completely, simply press on this last item.
If you are using Windows, the recordings will be saved in the path C: Users [username] Video. On macOS, however, you can find them in the path / Users / [username] / Movies. The default format will be MKV; if you want to change it, just go to File> Settings> Exit and, from here, first click on button placed next to the item Size and finally on the button OK. For all the details on how this program works, I refer you to my tutorial on how OBS works.
How to Record Videos on Twitch
You would like to share on your social channels one piece from a recent broadcast you saved on Twitch or someone else's? No problem, you can do it in a snap (both on computer both mobile devices) thanks to the function clip of the streaming platform in question (however, I warn you that other users may have disabled clip recording for their content, so the feature is not always available). Find all the details below.
From computer
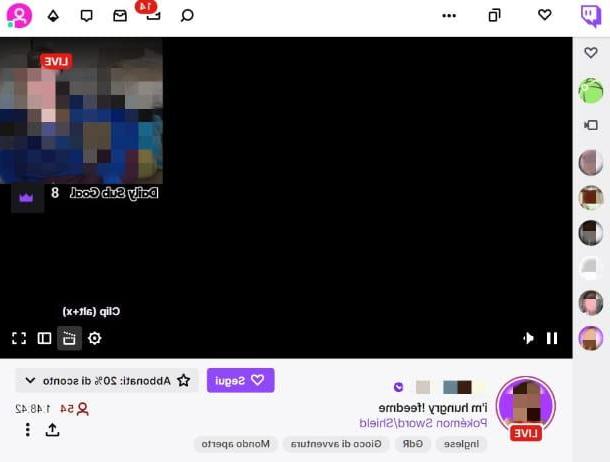
Creating a clip is super easy and you can do it either from one direct transmitted by another user, or by a video saved on Twitch. To start, connect to the home page of the service and log in by entering your credentials (via the button Log in located in the upper right corner).
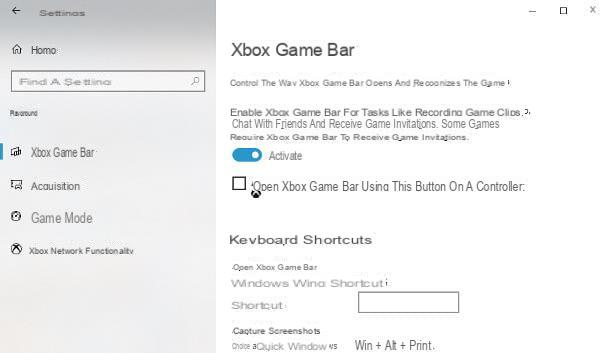
Once you have found and started the live stream or video from which you want to share a clip that you think is interesting, click on the clapperboard at the bottom right (next to the symbol of thegear). Alternatively, if you use Windows you can also use the key combination Alt + Xwhile on MacOS you can use the combination option + v.
You will be redirected to a page where you can select a maximum of 60 seconds from the moment you clicked on the clips option. To do this, press and hold the click mouse on the left or right edge of the blue rectangle on the yellow bar and move the border to the right or left to extend or shorten the clip you are creating.
Then type a title for the content in the title provided field located at the bottom and then press the button Public. When the upload is complete, a link: just click on it to copy it; then paste it on a post or chat on the social network you prefer and that's it. Really simple, isn't it?
Give smartphone and tablet
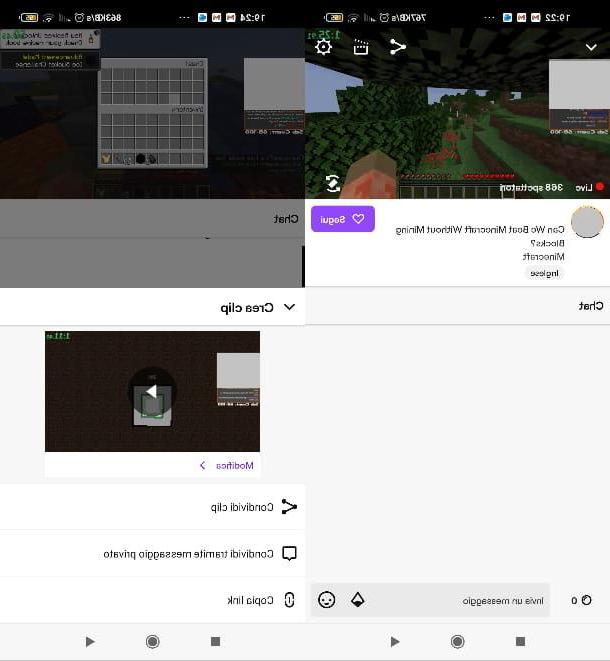
The clip function I mentioned earlier is also available on mobile devices and to take advantage of it you will need to install theWhatsapp di Twitch available for free on Android e iOS / iPadOS. To download the latter on a tablet or smartphone with the "green robot" operating system, open this page of the Play Store (also take a look at the alternative stores if Google services are not available on your device) and press on the button Install.
If you use a iPhone or iPad, proceed by opening this page and pressing the button Ottieni / Installa, then verify your identity via Face ID, touch ID o password dell'ID Apple (if necessary). Once you have started the app and logged in by entering your credentials (username e Password) in the appropriate fields, you can browse the main page of the application to search for a video or a live broadcast.
Once you have found and started the one you are interested in, if you use Android, tap the video screen and then press the del icon clapperboard film located at the top right. Wait, then, for loading and once completed you can cut the clip by tapping on the item Modification placed under thepreview. Once you want to share your creation, click on the button Copy link or on the button Share clips. If you use a device Apple, tap the video you are watching, then tap on the item Share and, finally, on the voice Create clips placed at the bottom. Easier than that ?!
How to Record on Twitch