Preliminary information
First anchor to enter the live of this guide and the spiegarti how to create a canadian account on android, let me give you some more information about the procedures that I am going to illustrate to you.
To begin with, according to the current Google regulations, a fundamental requirement for obtaining an account relating to a particular country is to actually be in the country of reference, and to be connected to the Internet through a connection, cellular or Wi-Fi, made available by a local manager.
So, if you are actually in Canada, all you have to do is follow the classic procedure for creating a new Google account, which you can put into practice from Android (but also from devices equipped with iOS, or from a computer) by following the steps that I showed you in this guide.
If, on the other hand, you do not reside in Canada but in another country, things get slightly complicated: in order to create a Canadian Google profile, in this case, you must "fool" Android and make the operating system believe that you are in the place of your interest. , disguising the IP address (used for geolocation) and preventing the system from "correcting" the location in any other way.
Since Google has extremely advanced geographic localization techniques, it is not always possible to carry out such an operation: it may happen, for example, that you are asked to enter a Canadian phone number to confirm your identity; or, again, Google could detect your position during the creation of the profile, thus associating it with your real country of origin (presumably the city).
Throughout this tutorial, I'll show you a process that, in most cases, will allow you to successfully create a Google profile associated with Canada, no matter where you are.
How to create a Canadian account on Android
Now that you are aware of the restrictions relating to the creation and management of "foreign" Google profiles, it is time to explain to you, in practice, how to create a canadian account on android. Generally, this procedure is divided into three different points: the first, the most important one, consists in making Android believe that it is in the country of your interest (in this case, Canada); the second involves the elimination of the original profiles; the third, finally, consists in the actual creation of the new foreign profile. Find everything explained below.
Configure the VPN

The first step to make Android "believe" it is in Canada involves acquiring a Canadian IP address. If so, you can rely on one VPN, ie a system capable of "masking" its IP address, using various servers located in other countries. For more information on this subject, I suggest you take a look at my guide to how VPNs work.
There are so many VPN solutions available, such as the great ones NordVPN (which I told you about in depth here) and Surfshark (of which I have spoken in depth here), which allow you to encrypt the connection data and your location to overcome regional blocks, censorship and avoid tracking. They are both very easy to use, compatible with all devices and very cheap.
For the purpose of this guide, however, you can also use the app Avira Phantom VPN: this is a service made available by Avira (also usable by iOS, Windows and macOS), which allows you to obtain for free 500 MB of data traffic per month (which can be increased to 1 GB / month by registering for the service via email), choosing to freely use 25 servers located in as many countries, including Canada.
If you need to get rid of the traffic limit, you can sign up for a Pro plan, with prices starting at 4,95 € / month, for use on mobile devices only (more info here).
Anyway, once you have downloaded the app, start it and tap the button Sign up now, to start the service configuration phase; then, swipe left to view the app's welcome pages and, when prompted, indicate if Activate the 7 days Pro service trial, if Log into with an Avira account, or whether to use the free 500 MB of the app immediately, by tapping on the item Not now.
Once you have reached the main screen of the app, tap the button Closest location, touch the item for Canada located in the on-screen menu and tap the button OK, to authorize Android to connect to a VPN; then, tap the button Enable VPN and wait for the wording to appear on the screen Secure connection (sign of successful initialization of the VPN connection).
If you want to learn more about how to use Avira Phantom VPN, I invite you to read the tutorial I have dedicated to it.
Disable Location Services
Once the Canadian IP address has been obtained, it is essential to ensure that Android cannot detect the real position of the device in other ways (by exploiting, for example, data from the GPS, surrounding wireless connections, and so on). To be able to do this, it is essential to disable all the location services provided by Android.
How? I'll explain it to you right away. First, tap the icon of Settings of Android (the one in the shape ofgear situata nel drawer of the device), fai tap sulla voce Safety and location, tap the option Find my device and move up OFF the lever located on the next screen, to disable the Google anti-theft function (which requires access to the location).
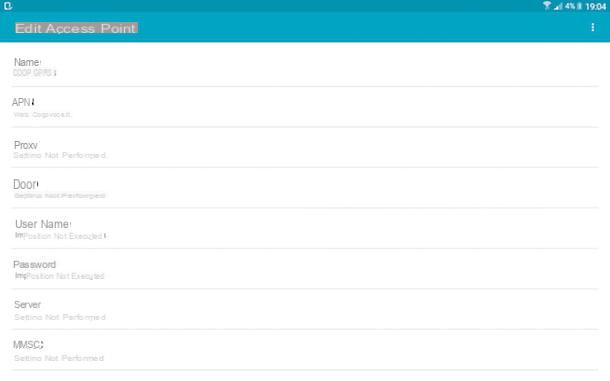
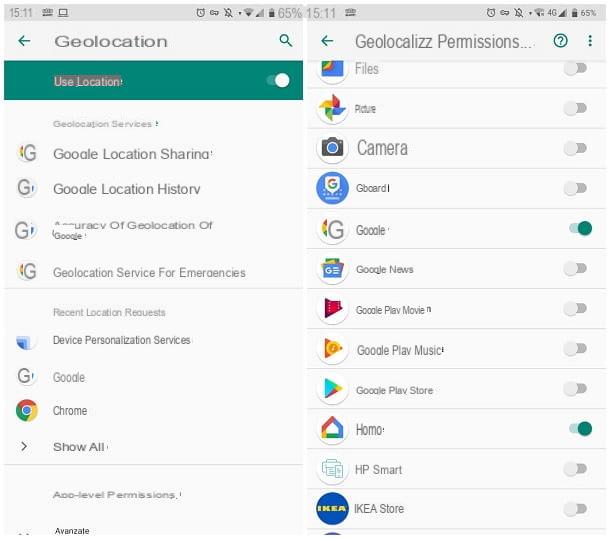
In Seguito, fai tap sulla voce Geolocationsposta su OFF the corresponding levetta alla voce Use location and, returned to the previous screen (you can do this by pressing the key Go back of Android or the arrow located at the top left), tap the item Accuracy of Google's geolocation and move up OFF the relative levetta all'opzione Improve the accuracy of geolocation.
After this step too, go back to the screen again Geolocation Android, tap the item Geolocation service for emergencies and move up OFF the levetta relative alla voce Send location to ELS.
In Seguito, fai tap sulla voce App-level permissions, sfiora il pulsating (⋮) and play the voice Show system apps, to view, within the proposed list, all the apps installed on the device. At this point, to remove the location access permissions to apps that could, in some way, "betray you", move to OFF the levers relating to Carrier Services, Device Personalization Services, Google, Google Play Film, Google Play Music, Google Play Store e LocationServicesanswering Deny anyway to the warning message that appears every time.
We're almost there: now, tap on the item Scan twice consecutively and, having reached the next screen, move up OFF the levers relating to the items Scan for Wi-Fi networks e Scan for Bluetooth devices.
After this step too, go back to the screen again Settings Android, tap on the items System e Date and time and move up OFF the levers corresponding to the items Automatic date and time e Automatic time zone. Finally, tap on the items Select time zone e Geographic area and choose the item Canada from the next list.
By doing so, you should have blocked all Android attempts to access your real location by bypassing the IP address (which, when connected to the VPN, should be Canadian): once you get the result you are looking for, remember to cancel the changes made previously, by moving back to ON all the levers that you have deactivated in this phase.
Disassociate the original account
The last step to take, to prepare the phone for the creation of a new account, is to disassociate the currently configured your language Google account (the one that, presumably, you should have added during the first configuration phase) from the device.
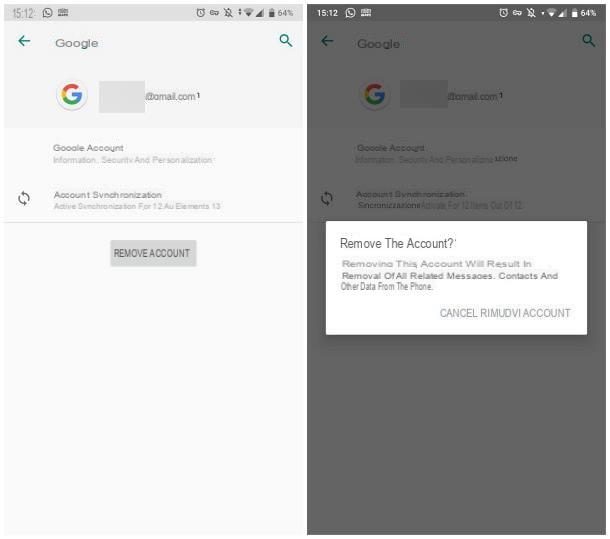
Keep in mind that, following this operation, all data relating to the Google account in question, such as contacts, Gmail emails, calendars, notes, SMS etc. they will be deleted from the phone.
All clear? Very well, let's proceed: tap on the icon of Settings Android, tap the item Accountselect il name of the Gmail profile currently configured on the phone and, to disassociate it, tap the button Remove account twice in a row. If necessary, repeat the operation for all Google accounts configured on the phone.
Now, to delete all the residual traces of the newly disassociated profile, all you have to do is clear the cache and data of the Google Play Store and other Google apps connected to it.
To do it, always give it Settings of Android, go to the section App, tap on the item All apps and identify, in the list that is proposed to you, the item relating to Google Play Store.
When you have found it, tap on it and temporarily stop the Play Store from working by touching the buttons Force break e OK; then, tap the item Storage space and, to delete the data, tap the buttons Clear storage space e OK.
At this point, go back to the previous screen (the one relating to the Google Play Store app) and, as an additional security measure, repeat the steps performed previously also for the apps Google Play Movies, Google Play Games, Google Play Music e Google Play Services (if possible).
Create a new Google account
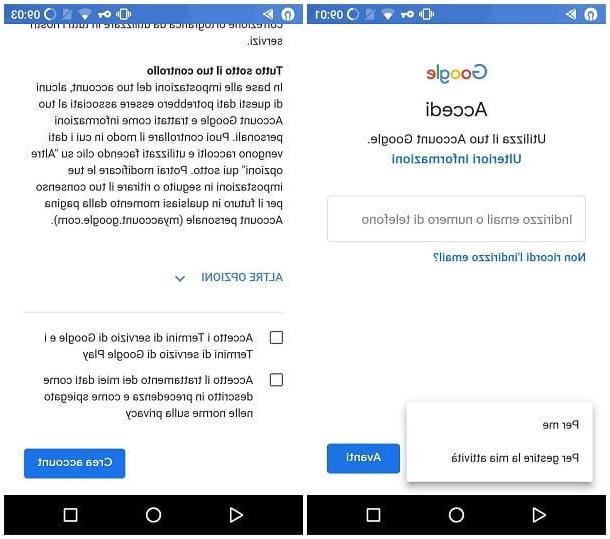
Finally here we are! After making Android believe you are in Canada, it's time to create the new Canadian Google profile. To do this, start the Google Play Store, tocca il pulsating Log in and, when you are asked to log in with your Google account, tap on the item Create account, to proceed with the creation of a new Gmail profile.
Now, select the option For me from the menu that is proposed to you, to specify your intention to create a personal account and follow the instructions that are proposed to you: indicate, therefore, name e last name in the appropriate text fields, enter yours date of birth in the following fields, select theGmail indirizzo to be associated with the profile and then proceed to create one secure password, typing it in the appropriate text boxes.
At this point, tap the item Salta, to avoid associating a phone number to the account, tap the button NEXT and finally, put the check mark next to the items I agree to the Google Terms of Service and the Google Play Terms of Service e I accept the processing of my data as described above and as explained in the privacy regulations, then tap the button Create account, to create the new profile.
Finally, tap the buttons Accept e No, to accept the terms of use of Google Play and Google services and avoid receiving updates on news and promotions, and that's it: the Canadian Google account is served!
Concluding operations
The big part is done but, at this point, it is necessary to check that the operation has been completed smoothly and that the newly created account actually belongs to Canada.
If, for example, you were interested in understanding how to create a canadian account on android for Rush Wars (game usable, in the initial test phases, only in Canada, Australia and New Zealand), you must necessarily verify that, once the new account has been associated, the Play Store is actually in use by Canada.
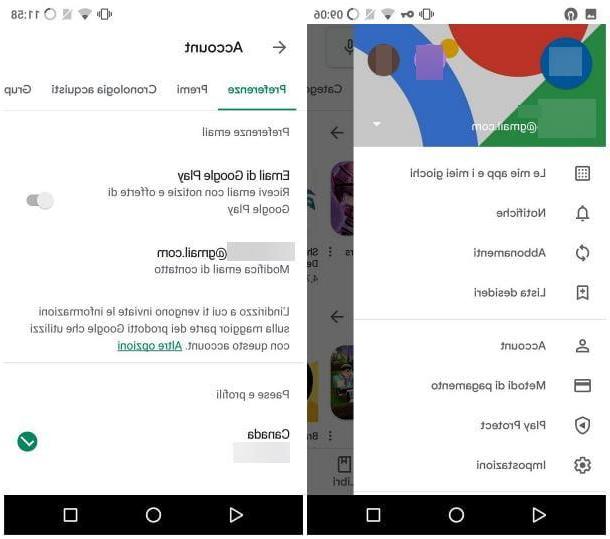
Doing so is very simple: once the Google market is open, tap the ☰ button at the top left, select the item Account from the list that is proposed to you and make sure that, in correspondence with the box Country and Profiles, the voice is present Canada with check mark attached.
If so, you can be satisfied: the account you created is actually Canadian and you can use it as you see fit, even to download the apps available in Canada (but not in the city), exactly in the way you would act for an your language account.
Once you have achieved your goal, you can bring your phone back to "normal": re-enable the location services you previously deactivated (following, "backwards", the same steps shown in this section), restart it to completely disable the VPN and, if you wish, configure your your language account again.
To proceed in this sense, access the sections Settings> Accounts> Add new account Android, select the item Google from the proposed list and follow the instructions that are proposed to you to re-associate the device with the profile in question.
Once this operation is complete, you can use both accounts (both the Canadian and the your language one) to download apps from the Play Store: to quickly switch from one profile to another, start the Play Store, tap the ☰ button located at the top left and tap onprofile picture of the account you are interested in using.
If, on the other hand, the newly created profile is not Canadian (in this case, the Account from the Play Store should show you the wording Go to the Play Store Canada), then take a look at the next chapter of this guide.
In case of problems

Although you have slavishly followed the instructions I gave you a moment ago, were you unable to correctly create a Canadian Google account because, for some reason, your device has "understood" that you are in town?
Don't worry, all is not lost: in that case, what you can do is manually change the Play Store country for the newly created profile. Before proceeding in this direction, however, it is good that you are well aware of the conditions in which this can happen and of the limitations that this entails.
- Since it is only possible to change country if you are already in the nation to which you intend to make the change, you must still use the VPN with a Canadian server, at least during the change phase.
- Yes, it can change country only once a year.
- After changing country, it is no longer possible to use any Google balance or previously associated payment methods.
- In order for the change to be successful, you must have a payment method from the country to which you intend to "migrate" the profile, in this case the Canada.
So, if you have a suitable payment method, you can easily transform the previously created profile (or your "original" profile, bearing in mind the consequences of the case) into a completely Canadian account, following the steps I gave you in my tutorial on how to change country on the Play Store.
How to create a Canadian account on Android