Preliminary information

Prima di enter the dettaglio della procedura su how to create a plugin for Minecraft, I think it might interest you to know more about this possibility.
Ebbene, i plugin venvenono utilizzati nel titolo di Mojang per espandere le possibilità offerte da spigot, delle API (cioè delle librerie software) modificate che consentono di creare server Minecraft con funzioni personalizzate, molto più ricchi e di possibilità e flessibili rispetto a quelli ufficiali. Il tutto comes through il Java programming language, pertanto, eat avrai già intuito, I modified che andrai to fare saranno attuabili only sulla Java version for PC di Minecraft.
Obviously, I have changed in the server in at your server, it is your fantasy and your story. programming skills. It was degli esempi concreti in merito a thing hanno creato gli sviluppatori from the tutto il mondo, you consiglio di dare un'occhiata alla page dedicated to the plugin per Spigot.
As you can see on the page that I quote, which is true, I vera di di tutto. C'è chi has created the personalization and the chi has introduced the vulcanic eruzioni nel titolo di Mojang. Insomma, I will make a programmare plugin For minecraft server, it is particularly interesting.
Prima di partire con le istruzioni, però, è bene sottolineare due aspetti: in this tutorial it was a practical example legato a a Spigot server, ma your Minecraft is svariate typology of stanze virtuali, come puoi leggere in this page (in English). I communicated, my soffermerò the typology of server in oggetto, qua qua più utilizzata, ma sei se appassionato potresti voler dare un'occhiata anche alle altre soluzioni availabili.
For the rest, come già citato in precedenza, to create a plugin for a Spigot server è necessary programming in Java. In questa guida ti spiegherò semplicemente come realizzare en breve tempo il tuo primo plugin funzionante, sfruttando i rudiments of this programming language.
Sarebbe infatti impossibile spiegarti come programmare in Java in advanced mode in a single tutorial. Ci vogliono mesi, se non anni, di studio per imparare really a linguaggio di programmazione. Ecco perché, qualora volessi approfondire l'argomento, ti consiglio di consulre i miei tutorial su come iniziare a programmare, come programmare in Java e come imparare Java, nei quali ti ho consigliato tantissime risorse adatte a questo scopo.
I will create a server and scaricare i programmi necessari
Fatte tutte him premesse of the case, è giunta l'ora di passare all'azione sticking in piedi un Spigot server for Minecraft in localhost (quindi sul proprio computer) e scaricando i giusti programmi per realizzare a plugin. Per farti degli esempi concreti, it will start in that creation of a Spigot server its Windows.
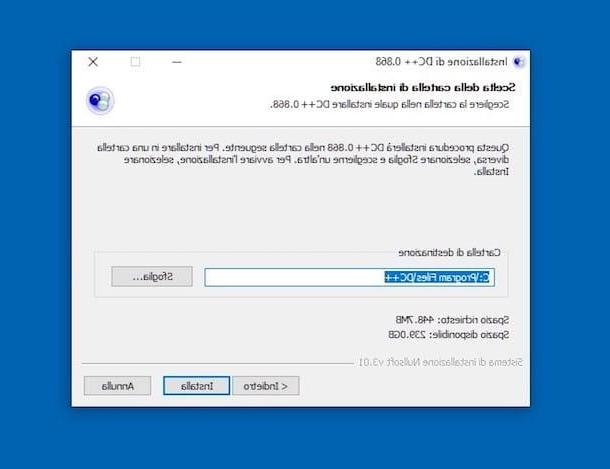
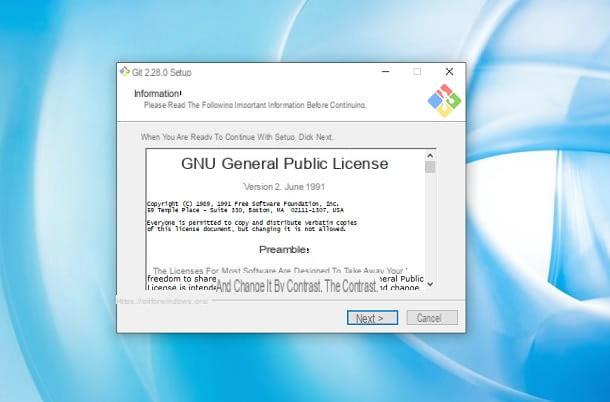
Ebbene, the first thing che devi fare è installare Go e OpenJDK 8Due software destined to the programmazione necessari per realizzare a stanza virtuale of this type. Per fare questo, collegati al sito ufficiale di Git e premi sul pulsado Download. Then open the file Git- [versione] .exe obtained and press successively on the buttons Next (12 times), install e Next, but I will complete the installation.
Dopodiché, collegati at the OpenJDK site, spunta la casella OpenJDK 8 and premium tasto Latest release. In this way, verrà scaricato sul tuo PC il file OpenJDK- [versione] .msi. Apri, dunque, quest'ultimo, fai clic sul tasto Next, check the box linked to I finished my license and press in succession on the buttons Next, Next, install, Yes e Finish.
Piccola note: gli sviluppatori di Spigot consiglierebbero di utilizzare Java SE Runtime Environment 8, scaricabile processes the portale ufficiale, at the OpenJDK8 post. Tuttavia, in which case by avviare il download è necessario register a Oracle account e nella procedure vengono richieste compulsory anche informazioni come il name of the company for which you work and the telephone number dell'ufficioQuindi ho preferito suggerirti una strada più semplice.
Ciò detto, a volta installati i succitati programmi, devi compile il file del server tramite BuildTools.java: file che puoi scaricare simply clicking here. A complete download, apri Go Bash, che fa part of the program che hai installato in precedenza, e sposta il file BuildTools.java on desktop. Take your time Go Bash, type the command cd desktop and press Submit on the keyboard.
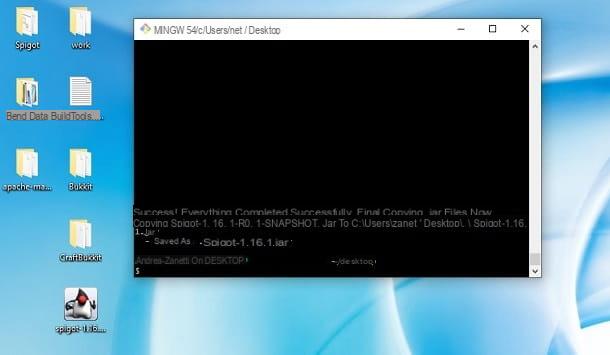
At this point, type the command java -jar BuildTools.java and press Submit. Perfetto, vedrai comparire sul terminale lo stato di Avanzamento della file jar creation from the tuo server Spigot. Potresti dover will attend every minute, data that has been published in several pages, and is available for all the useful information.
In any case, a volta terminates the procedure, it is done correctly, it is correct, it will be compared to the file on the desktop and it will be published. Go Bash c'è la scritta Success.
At this point puoi chiudere la finestra di Git Bash e avviare il file spigot- [versione] .jar present your desktop. It tutto è stato svolto correctly, dovrebbe will share schermo la finestra Minecraft server. In the case of non fosse, prova ad aprire il file eula.txt che trovi sul desktop and will change the value false in true.
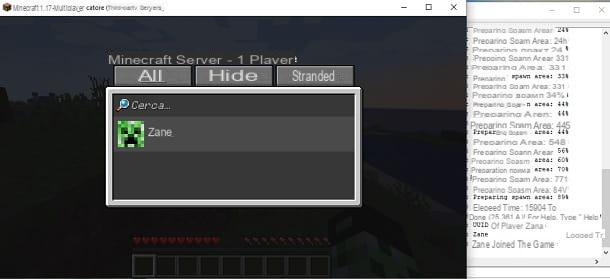
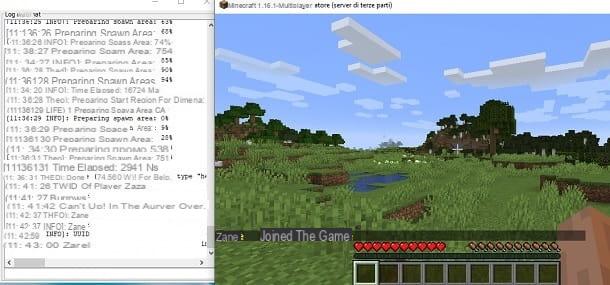
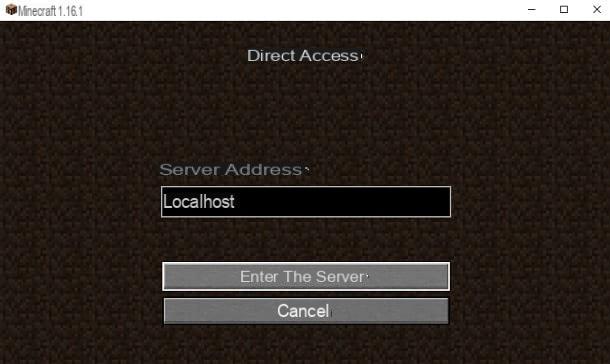
Perfetto, ora il tuo server è attivo. To verify that it is functional, you will have enough Minecraft nell'ultima versione available, premere sul pulsating Multiplayer, then on the key Direct access, to type localhost e premere sul pulsating Enter the server.
It is tutto è stato fatto in maniera corretta, vedrai che il tuo personaggio entrerà all'interno del server e che nella finestra Minecraft server will share il nickname you chose for the title of Mojang. Congratulations, now you have it available a working Spigot server!
Per maggiori informazioni in merito alle modifiche che si possono effettuare di default alla stanza virtuale e per ulteriori dettagli in merito alla phase di installazione, anche per quanto governs altre versioni e piattaforme, I invite you to consult the site of Spigot (in English).

Adesso che has seen that the stanza virtuale works, puoi disconnetterti e chiudere sia il gioco che che la finestra di Minecraft server.
You serve, but, anchor a last program prima di poter I will start to create the plugin: a Integrated Sviluppo Environment (IDE). In parole povere, if I try a program that you want to write and compile, I will code Java.
This system does not seem to be a program of this type, as it can be done with my guide dedicated there. Ad ogni modo, io ti consiglio IntelliJ IDEA che è relatively semplice da usare. Per scaricarlo, you enough collegarti al suo sito ufficiale e premere due volte sul pulsado DOWNLOAD.
A volta ended the scaricamento, apri il file idealC- [versione] .exe obtained and awards successively on Next, Next, Next e install, then check the box Run IntelliJ IDEA and click Finish, but will conclude the setup.
How to create a Minecraft plugin
Dopo aver created a Spigot server and installed the case and program of the case, and arrived at the “clou moment”, and created the plugin.
The indications for you have been followed in the preceding chapter, the end of the IDE has been made available Intellij IDEA sul tuo schermo. Premium, though, your pulse Skip Remaining and Set Defaults e fai clic sull'opzione New Project. Dopodiché, select the voice Java present in high to sinistra and premi due volte sul pulsating Next.
At this point, I gave a project name (eg Pluginconfigurehow) and click the button Finish. Puoi calmly preferred him Close, in the case compaiano to schermo alcune finestre di "tutorial".

After that, tap on the item Fillet present in high to sinistra and fai clic su Project structure. Move, therefore, to the card Libraries, premium sull'icona +, click on the item Javaselect il server file jar I awarded her OK.
Perfetto, now you have correctly imported your case file. Fatto questo, chiudi pure la finestra delle librerie, spread the poster of the progetto present your sinistra, fai click destroy on the folder src e seleciona le voci New> Package give the menu that you come purpose, assembling poi il name which you prefer (e.g. configurehow).
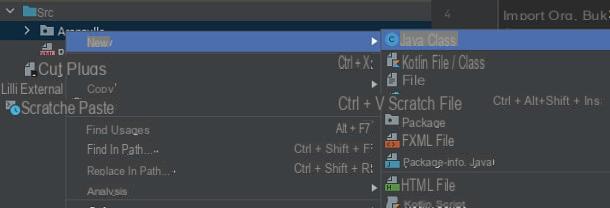
After that, do it click destroy on package che hai appena creato, che si trova sulla sinistra, e seleciona le voci New> Java Class give the menu that you come purpose. Dai dunque il name you want (eg Pluginconfigurehow) and press OK.
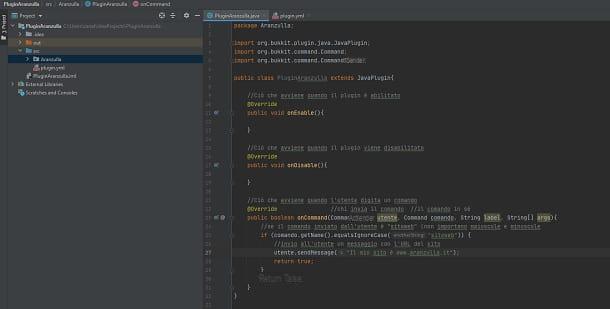
Perfetto, adesso è giunta l'ora di scrivere il codice. The first thing da fare è importare JavaPlugin: to do this, insert the line import org.bukkit.plugin.java.JavaPlugin at the top of the file, closing with semicolon.
Dopodiché, award Submit, to create some space line, and start to create your class, for example by writing public class Pluginconfigurehow extends JavaPlugin. Put simply, you are creating a class that extension quella JavaPlugin, use the dagli sviluppatori to create plugin for Minecraft.
Obviously, devi chiudere il tutto con parentei graffe. In the case JavaPlugin non venisse riconosciuto, prova to reimportare the file jar of the server in the way you and the illustrator in precedenza.
Successively, awarded with il right mouse button on the folder src e seleciona le voci New> File give the menu if you press, give it the name plugin.yml. Qui devi will insert tutte le basic information relative to the plugin, dal suo name to the class main, passing through the version, For the Description and for commands. In this case, è tutto molto semplice: you just use the variabili name, main, version, Description e commands followed by : and will insert the parrot "value".
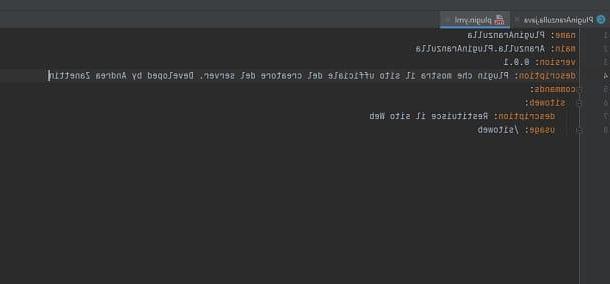
In particular, in name I will type it plugin name (non inserire spazi for some reason), in main the name of the class you created earlier (preceded by the package name and without extension), in version I inserted the version che ritieni più corretta (es. 0.0.1 se è a preliminary phase, 1.0.0 se ritieni “finito”) and in Description I will insert the Description of the plugin (eg Plugin created through configurehow tutorial).
Infine in commands è necessary inserire, dopo i due punti, il command name che vuoi utilizzare (es. sitoweb) I follow anch'esso dai : e avente al suo internal i parametri Description (describe) e usage (method with which I can use the command, en / sitoweb).
Perfetto, now there is available the "spazio" in cui effettuare le te modifiche. You made an example of a simple example of what you want to do for a plugin that is advanced. Più precisely, you spiegherò as I will create a plugin that permetterà all'utente di ottenere l 'Creatore ufficiale site url from the server simply using il / sitoweb command inside the server of Minecraft.

Per dare vita to this plugin, returns all'interno del java file you created earlier and add in the head two other imports, that is, import org.bukkit.command.Command and import org.bukkit.command.CommandSender. The latter are used to use the tools designed to "receive" the user's commands.
After that, you need to override the methods onEnable () e onDisable () inside the plugin class. To do this, just use an @Override before creating the methods public void. You consiglio di utilizzare l 'indentation with the button tab per rendere il codice maggiormente "leggibile". Ti ricordo che si possono scrivere dei Comments to the code via //, what is written in those lines will be ignored during compilation: it is only for you to remind you what that code is for.
In this specific plugin nonuseremo questi metodi, ma the struttura alone è questa e dunque was just spiegartelo. The method that we use will be invented by this time and that onCommand, thought per "rispondere" to the command dell'utente. Who diamo eats input, i.e. the variables in brackets, CommandSender, ovvero l'utente che invia il command, e Command, as the command in I know. Bisogna anche aggiungere a String it's a String [] in modo da effettuare correctly l 'Override.
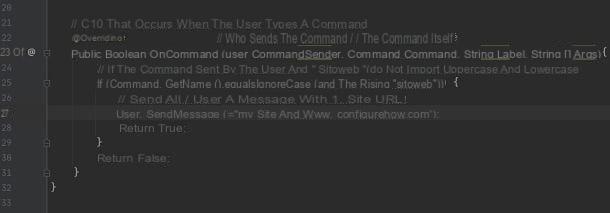
Inside the onCommand method, it must be sent when the user sends a certain command command. In this case, I now decide that the command must be used in order to obtain the URL of the website è simply / sitoweb. For this reason, bisogna effettuare un controllo sull'input inviato dall'utente. Ti ho già spiegato che esso è contentuto el nel tipo Command, che io ho “istanziato” processes the variabile chiamata command.
Per effettuare il controllo, if you use a if, or rather an "if". The code in this case is as follows: if (command.getName (). EqualsIgnoreCase ("website")) {user.sendMessage ("My site is [www.configurehow.com] (http: //www.configurehow. com /) "); }. Put simply, I take the command With the method getName (), I keep, senza tenere conto di maiuscole e minuscole, if the command and own "sitoweb" process the method equalsIgnoreCase and in the affermative case, he sent a messaggio containing the URL of the site where the procedure was processed. sendMessage.
At this point, I have correctly finished the program plugin che restituisce l'URL of the website all'utente when quest'ultimo uses il commando / sitoweb. Pray for the part of compilation, che andrà to create il file .jar del tuo plugin.
Per I will, premi sulla voce Fillet present in high to sinistra, fai clic su Project Structure, move to the tab Artifacts, award-winning + e seleciona le voci JAR> From modules with dependencies. Premium, although its OK, rimuovi, process l'icona -, the scritta Extracted file spigot [versione] .jar e premium prima sul pulsating Apply and in no time his quello OK.
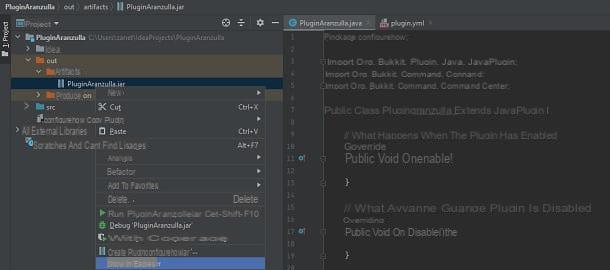
At this point, fai clic sulla voce Build present in alto e premi sull'opzione Build Artifacts. After that, click on the entry Build, attendi qualche secondo e il sistema ti informerà dell'avvenuta compilation. Vedrai comparire, in alto a sinistra, the cartella rossa out.
Therefore, expand its content, expand the folder as well artifacts and you will see the file .jar from tuo plugin. Adesso, awarded his birthday with him right mouse button e seleziona l'opzione Show in Explorer.
In this way, if you will learn schermo il percorso di File Explorer with the .jar file of your plugin. Now, you have to to shift il file in questione che hai generato all'interno della cartella plugins from the tuo server. The following is the case, dovresti trovare quest'ultima sul desktop.
Subsequently, avvia il file jar server e attendedi che compaia a schermo la finestra Minecraft server e che come eseguito il loading. A volta finished quest'ultimo, digita stop in the server console and press Submit. After that, restart the jar file again from the server. In this way, dovresti will sell the legacy scritta to you Plugin: means che è stato installato.
Now you just have to start Minecraft, first cousin sul pulsating Multiplayer and in no time his quello Direct access, I will insert l 'server indirizzo (e.g. localhost) and press Submit.
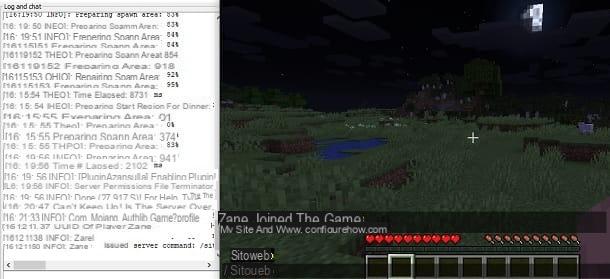
In this way, I will enter correctly into the interior of the stanza virtuale. To verify the functionality of the plugin, you only have to press the button T on the keyboard, type the command / website and press the button Enter the server. Compare to schermo il messaggio with the URL of the site, tutto è stato svolto correctly.
Furthermore, you can also see the attivi plugin list on the server using the / plugins command. In short, you have successfully created your first plugin for a Spigot di Minecraft server. Now you just have to sbizzarrirti with il codice Java But I will create your personalization experience on the inside of the Mojang title.
Seen che sei appassionato di Minecraft, you consiglio di dare un'occhiata anche alla página del mio dedicated to the gioco in questione, dove puoi trovare innumerevoli tutorial legati al titolo di Mojang.
How to create a Minecraft plugin