Create a second Gmail address

In this chapter I will explain how to create a new address gmail, so that it is associated with your existing primary Gmail address. The first thing to do is to open the main Google page from your browser: if you don't know how, click on this link.
Now, in the upper right corner, click on theimage of your Gmail profile, if your account is already open, otherwise click on the writing gmail and log in to your account by entering username e Password, and after entering your mailbox, click on your profile picture (the one inscribed in the circle), always in the upper right corner.
On the page that opens, click on the button Add account and then Create an account. Now all you have to do is enter your data in the various fields on the page Create your Google account: Your name, Last name, Username (which will be the main part of your email address, the part that precedes the domain) e Password (to be entered twice for confirmation). Once you have entered the main data, click on the button NEXT and fill out the personal information page, where you must enter a telephone number it's a indirizzo secondary email (these will be used in case of loss of your login details), yours date of birth and yours generally of belonging (male or female). Once this is done, click on the button NEXT, accept the Google terms of service and click on the button Create account.
The account you just created is associated with your old primary address: every time you click on your profile picture in Gmail, on the page that opens, you will also see your new secondary address (below the primary one). Just click on the second address and another tab will open from which you can manage your mail.
If you want to swap the two addresses so that your old account becomes secondary, log out by clicking on the button Logout (present in the box that opens when you click on your profile picture). Then log in to your new email address (the secondary one you just created) and click on the button Add account. At this point, all you have to do is add your old account, which in this way will become secondary.
You need to know that Gmail is also available on mobile devices. You will be able to create one or more accounts and manage all your email through its app, available for Android and iOS.
Create a second Outlook address
If you already use a Microsoft account (Outlook, Hotmail, Live), I will now explain how to create a second email address to associate with it. You must know, in fact, that with Outlook the new account will be associated as alias, in this way it will share the same incoming mail, the contacts and settings, and you will also use the same password as your old account: convenient, right ?!
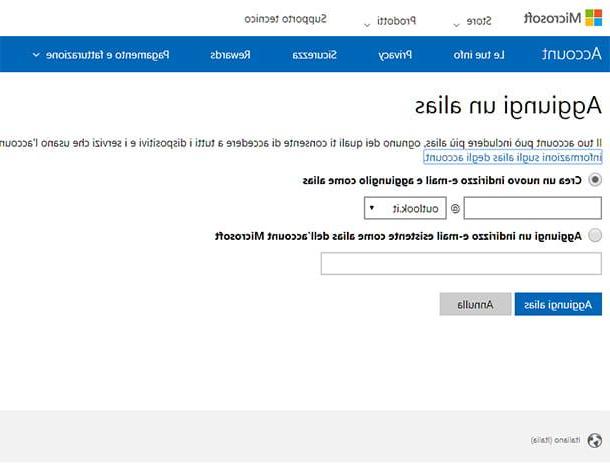
To add an alias, click on this link (if you are not already logged into your main account, you will be asked to log in by entering email address e Password). On the page that opens, select the item Create a new email address and add it as an alias, enter a name for your new email and choose the domain (Eg. outlook.com, outlook.com or hotmail.com) in the drop-down menu next to the name bar, then click on Add alias. Once this is done, to set the new email as primary, click on the option set as primary, at the newly created address.
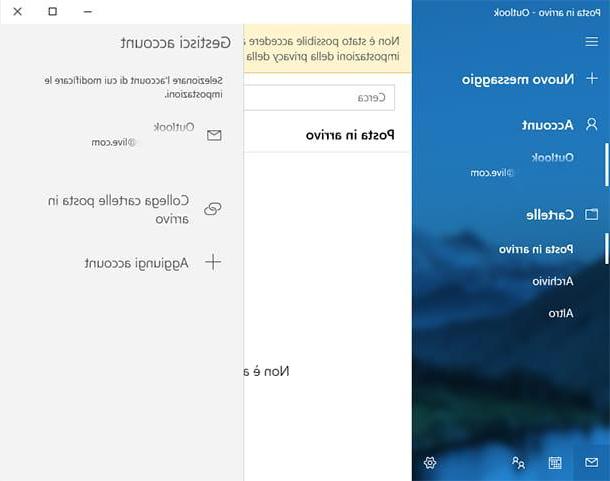
Once you have added the new address, you can decide which address to send your mail from. Doing this is very simple: go to settings (l'icona a forma di gear at the top right of your inbox), click View all Outlook settings > Mail > Synchronize your email and, in correspondence with the item set the default sender address, select the address from which you prefer to send your emails from the drop-down menu. To confirm the changes, click on the button Save located in the upper right corner.
Create a second Alice address (TIM)
If you want to associate another email address with yours Alice account (Now TEAM Mail), all you have to do is follow this simple procedure.
First of all you have to create another address, to do this click on this link and on the page that opens click on Subscribe. You can choose between three different registration methods: if you are already a TIM customer, click on the button Subscribe placed in the box Do you have ADSL or TIM Fiber? or in the box "Do you have a TIM mobile phone?”, If you are not a TIM customer, click on the button Subscribe placed at the bottom, next to the item Don't have TIM yet?.
I will now indicate the data to be entered in the respective fields according to the three different options: if you already have ADSL or Fibra TIM you must enter: name, last name, telephone number, cellphone number recovery e username e Password related to the new account. If, on the other hand, you have a TIM mobile phone, you must enter: name, last name, cellphone number (in the field Your mobile phone). After clicking on the button Continue you can enter theusername and Password related to the new account and set a security question (which will be used in case you lose your login details).
Finally, if you are not a TIM customer, you must fill in the fields name, last name, date of birth, sex e Postal code. After doing this, enter username e Password and provide a cellphone number for data recovery. At the end of the various procedures, remember to put the check mark next to condizioni d'uso and click on the button Subscribe.
Once the new address has been created, on the main page of your Alice inbox, select the item Settings (top right) and click on Configure Other Accounts. Now select the domain of your new account in the list of domains that are shown to you. On the next screen, enter your newly created email address and password and click Proceed e Close.
You must know that every time you write or reply to an email, you can choose which address to reply from by simply clicking on the item From: (which will be present in the upper part of the window in which to write the text of the email) and selecting the address you want from the drop-down menu.
Create a second free address
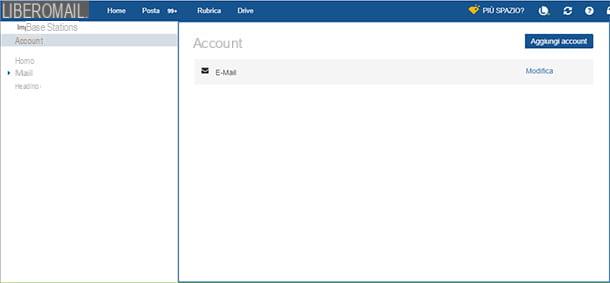
If you usually use the email service of Free, follow this simple procedure to add a second email address to your account: log into your Libero mailbox and click on thegear top right. The menu will open Settings: now, click on the entry Settings present in the latter and select the item Account in the left column of the screen.
Now all you have to do is press the button Add account (top right) and enter the email address and password of the new account. If you don't know how to create a new account, follow this simple procedure: first of all, click on this link. On the page that opens, click on Register a free email account and fill in the following fields: name, last name, e-mail (this will match the part of the new email address that precedes the domain), Password, date of birth, Province of residence, sex and finally indicated if you are a private or ancompany.
Also remember to provide an alternative email address and a mobile number, which are useful in case of loss of access data. Once this is done, put the check mark in the boxes I accept the general conditions e I'm not a robot e, infine, click on the button Subscribe.
As for the other mail services that I have illustrated to you in this article, even with Libero you can decide which address to send your emails to. To do this, simply click on Write (to start writing an email), click on the item Da and select the address you prefer.
You should know that Libero also has a handy app: Libero mail. This is available for both Android and iOS devices, so you can manage your email or create new accounts from the comfort of your mobile device.
Set up a second email address

So far I have explained to you how to create a second email address and how to associate it with the main address you usually use. Now you are probably wondering if there is a way to make all your emails converge, so that you can check them in a practical and fast way without having to juggle the various Webmail services. Well, don't worry, because the answer is yes! You need to know that there are programs and applications called client which are used to manage emails, thanks to which it is possible to manage multiple accounts at the same time, of various services and providers, without associating them with each other.
Before proceeding and seeing the individual clients in detail, you must know that in each program of this type, when you enter a new account, you will be able to choose from a predefined list the name of Webmail service to be configured. Then just enter address e Password account and that's it.
If, on the other hand, you are using an email service that is not in the list, you will have to enter the data manually. In this case, in addition to the address and password, you will be asked to enter a name, which will be displayed when you send an email, the parameters IMAP / POP3 (concerning the incoming mail server) and those SMTP (concerning the server that manages the outgoing mail) relating to the email service you are using. Do not worry! To know these data, just do a simple search on the Internet, consult my tutorial on how to activate IMAP or, if you were using a business account o institutional, ask your office, your company or your institution for such data.
I remind you that the mode IMAP allows you to keep your emails on the online server and synchronize them on multiple devices (so that's what I recommend you use) while the POP3, download the mail messages on the device in use and then delete them from the remote server.
Outlook (Windows / macOS)
The main program for managing emails in a Windows environment is undoubtedly Outlook. Outlook is part of the package Office 365, for which it is available only after purchasing a subscription to Office. However, you need to know that Microsoft has created a free application for users Windows 10 call Mail, with which you can easily manage your accounts. If you want to know how to use Mail, skip to the next chapter, otherwise keep reading.
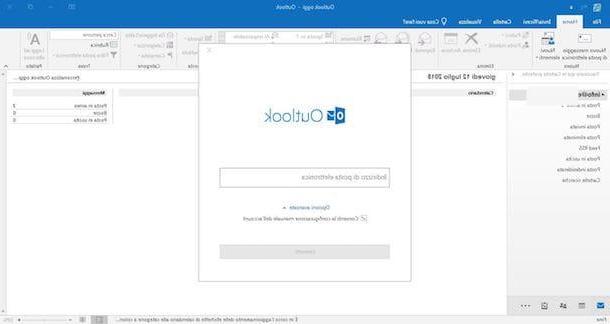
If this is your first time starting Outlook, enter your primary email address in the window that opens and click on Connect. After doing this, you will be asked to enter yours Password: insert it and press the button OK. On the next screen, you can already proceed to add another email address by entering, in the field add another email address, the address itself and clicking on the button NEXT. When you have finished adding addresses click on the button below Done.
If, on the other hand, it is not the first time you open Outlook, all you have to do is click on the item Fillet (top left of the main program screen) and click on the button Add account. After entering the email address, click the button Connect. You will be asked to enter the Password: enter it and click on the buttons OK and then Done. Mission accomplished!
Whenever you want to choose which email address to use while you are in Outlook, you can do it by clicking on Fillet and selecting it from the drop-down menu in the column on the right.
As for Gmail also for Outlook there is a convenient Whatsapp for Android and iOS mobile devices, which is completely free and does not require an Office 365 subscription.
Mail (Windows 10)
Mail is Microsoft's free program that allows you to manage all your e-mails in Windows 10. Now I will explain how to add more accounts in the latter.
First, search for the program by browsing your Windows applications or type "mail" in Cortana's Windows search bar (bottom left, on the taskbar), and open the program.
In the main Mail window, click on the item Account (in the left column) and then up Add account. In the screen that opens, select the type of account you want to add by clicking on the name of the email service with which you created the account (if present in the list), or click on other account.
Now all you have to do is enter theemail address and Password of your account and click on the button Log in. If you have selected an email service from the list, it will share the name you use with that service, otherwise if you have selected another account you will have to manually enter the other required data in the appropriate fields.
I will now show you in detail which fields to fill in: in the first three fields you must enter, respectively, theemail address, username and Password related to your account; in the field Account name you must enter the name of the account you want to add to Mail (if you want to enter a business or school email, this could be related to your company or educational institution). Subsequently, in the field Send messages with this name, enter the name under which you want your messages to be seen by recipients. Finally, in the field Incoming mail server, you must enter the IMAP / POP address for the e-mail service you are using.
After entering this data, continue by selecting the option in the drop-down menu IMAP4 o POP3 (depending on the type of mail) and entering the address of the server for outgoing mail in the field Outgoing mail server (SMTP). After entering all the data, click on the button Log in.
Apple Mail (macOS)
If you use a Mac or a device iOS, you can count on Mail, the Apple mail client, which allows you to simultaneously manage several email accounts belonging to various providers.
Therefore, open the program by clicking on its icon in the Dock bar or in the Launchpad (it has the symbol of a stamp). After that, if you are launching the software for the first time, you will see the window for setting up an account. Otherwise go to the menu Mail > Add account, which is located at the top left.
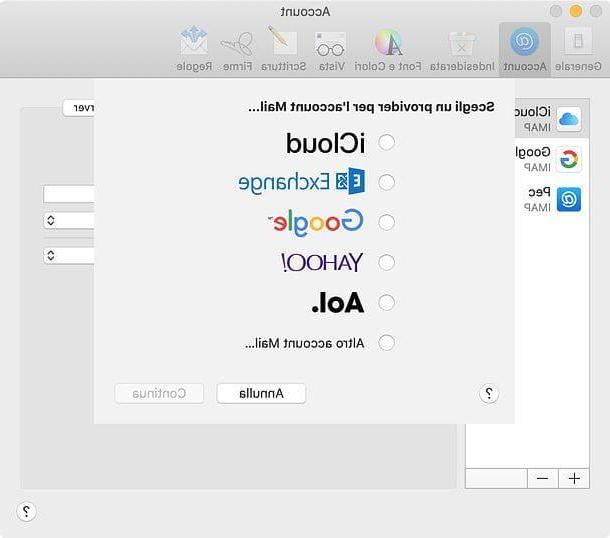
At this point, in the window that opens, proceed by selecting, from the list that is proposed to you, the name of the email service corresponding to the account you want to add, otherwise if the service is not present select Other Mail account ... and click on Continue.
On the next screen, if you have selected a service from the list, enter its address and password. Otherwise, if you have selected the option Other Mail account ... you have to enter name (in the field Full name), Theemail address and Password in the appropriate fields.
After doing this, click on the button NEXT, select the mode IMAP o POP (depending on whether you want to keep your mail on the server or on your computer as I explained above), enter in the field Server at posta the POP or IMAP address relating to the mail service to be configured and in the following fields the username and Password.
Now, click on the button NEXT and, in the next window, enter theSMTP address related to the mail service you need to configure, and related username e Password. After entering, click on Crea And that's it.
By following the directions I've just given you, you shouldn't have any kind of problem with most email services. However, should you want to set manually In more detail the various settings follow these simple steps: keeping Mail open, click on the item Mail at the top left of the screen and click on the item Preference ... present in the menu that opens. In the next window, click Outgoing mail server (SMTP), and select the item from the drop-down menu Edit SMTP Server List ....
In the window that opens, fill in the field Description with the name of your email (the part before the domain), in the field TLS certified select the item Nobody from the corresponding drop-down menu and then click the button Advanced. In the advanced options screen, you can change the port number, related to several factors. I will now show you how to make everything work smoothly.
You must know that outgoing mail can use an SSL (Secure Sockets Layer) encryption system for security reasons, if you want to use this system check the box Use SSL (adjacent to the entry Door), present in the window, and enter in the field Port the number 465. Otherwise, if you do not wish to use SSL encryption, uncheck the corresponding box and enter in the field Port the number 25 (this is a standard port that is used by any SMTP server).
Now, click on the item Strong and select the option from the drop-down menu Password, enter in the corresponding fields the username and Password of the email address in question, after doing this click on the button with the + plus sign (located below the white box within the same window) and then on OK at the bottom of the window, to confirm all changes.
I remind you that Mail also exists in the form of Whatsapp and it is already pre-installed on iOS mobile devices, as it is part of the operating system itself, you can easily recognize it because it has an icon that looks like an envelope. To add a new account in the latter, you have to go to the menu Settings> Passwords and Accounts> Add Account (on iOS 14 and later you have to go up Settings> Mail or Settings> Contacts) and choose your provider. For more in-depth information, read my tutorial on how to set up Mail on iPhone.
Thunderbird (Windows / macOS / Linux)

Thunderbird is a free and open source application that allows you to manage email on Windows, macOS and Linux. I told you about it in detail in my dedicated tutorial.
To install it, double-click the .exe file taken from its official website and click in sequence on the buttons NEXT (twice in a row), Install e end. A MacInstead, open the package .dmg that contains the program and drag it into the folder Applications of macOS. When the operation is completed, to start Thunderbird for the first time, bypassing Apple's restrictions on software made by non-certified developers, right-click on the software icon and select the item apri per due turn consecutive.
Once in the main screen of the program, regardless of the operating system you use, enter Your name, Email address e Password in the appropriate fields, check the box Remember password and click on the button Continue.
In the next window, the program will automatically detect the IMAP / POP3 parameters and you can choose which mode to use between IMAP (remote folders) e POP3 (keep mail on your computer). After choosing the mode you prefer, click on the button Done.
You will be asked whether to set Thunderbird as the default program for managing e-mails: click on Imposta eat predefined or on Skip integration if you don't want it set as default.
After configuring Thunderbird at the first start, to add another account, follow this simple procedure: in the main screen of the program, click with the right mouse button on the item Local folders present in the left column. In the window that opens, click on the button Account actions present at the bottom left and then up Add mail account ..., in the drop-down menu. Repeat the same procedure I explained earlier for the first configuration and then click on OK. Easy, right ?!
How to create a second email address