SimplyIcon (Windows)
If you want to create icons from images and if what you know using is a Windows PC, the best and most practical solution I can recommend is to try using SimplyIcon, a very practical free program suitable just for the purpose in question. Use it and the icons on your computer will become unique in the world.
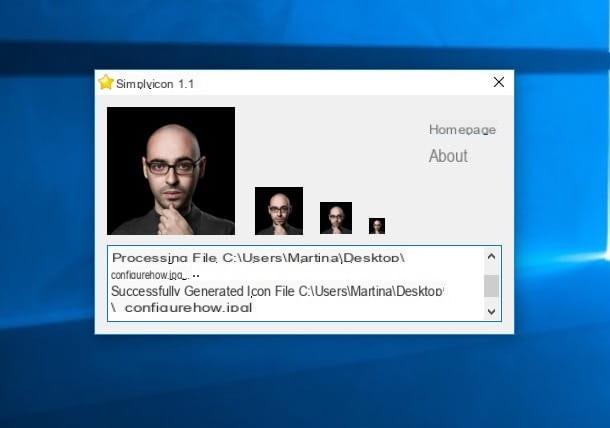
To be able to use it, the first step you need to take is to connect to the SimplyIcon website and click on the item version 1.0 in order to download the program to your PC. At the end of the download, open the compressed archive just obtained by double clicking on it and extract the contents in any position.
Then start the file SimplyIcon.execlick your Yes / Run and then drag the photo you want to turn into an icon in the program window that appears on the desktop. After a few moments, the program will automatically save the generated icon in the photo source folder. Easier than that?
Please note: In order to function correctly SimplyIcon requires . NET Framework 2.0 or later. If it is not installed on your computer, fix it immediately by downloading it from the appropriate section of the Microsoft website.
Image2Icon (Mac)

Do you own a Mac? Then the program I told you about a few lines above is not suitable. To create icons from images on Apple-branded computers you have to rely on other software, as in the case of the excellent Imag2Icon. It's free (but offers paid options to unlock extra features), super easy to use and the end results are guaranteed. In short, I suggest you try it instantly.
To serve, connected to the dedicated web page of the Mac App Store Online, click on the button See in the Mac App Store and, in the window of the “real” Mac App Store that has opened on the desk, he presses the button Get / Install the app which is at the top right. Therefore, wait for the download and installation procedure to start and complete (if necessary, also type the password for your Apple ID).
Then start the application by clicking on its icon that has been added to the Launchpad and drag the image you want to turn into an icon in the Imag2Icon window that appears on the desktop. If you want to remove the background, click on the button Background removal which is at the bottom left and use the adjustment bar you see appear to set the degree of transparency.
Then select the template you prefer among those in the list on the right, click on the button Export (which is always on the right) and choose the target format from those available. Here it is!
If you want, you can also apply the newly created icon directly to the reference element. To do this, also drag the folder or file to which you want to apply the customization in question into the program window after dragging the image from which to generate the icon and that's it.
If you then want to apply further customizations to the icon, press the button with the adjustment bars at the top right and use the sliders attached to the menu that has opened to adjust the orientation, zoom and degree of rotation of the icon. By pressing the button instead Aa appeared at the bottom of the application window you can insert a custom text on the icon and change the type of font used and the formatting.
Iconizer.net (Online)
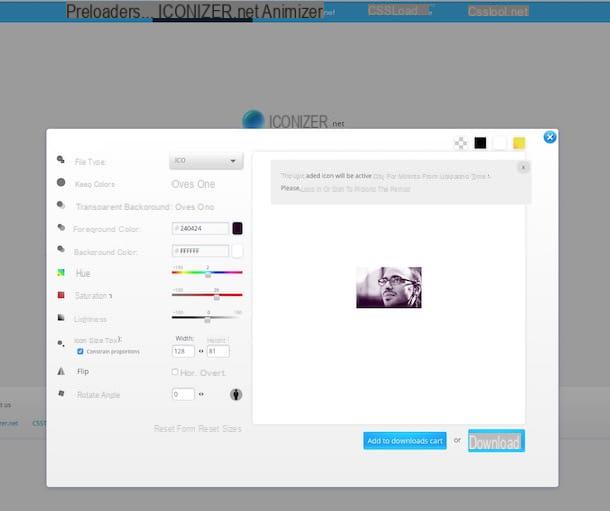
If the above resources did not convince you in a particular way because you would like to create icons from images but the idea of installing new programs on your computer does not excite you, then try now Iconizer.net and you will see that you will not regret it. It is in fact an online service at no cost and usable directly from the browser window (any), without having to download and install absolutely anything on the PC, which allows you to create customized icons starting from photos and images and which is inclusive of a full editor. chock full of options of various kinds to apply the most disparate customizations.
You ask me how to use it? I'll point it out to you right away. First of all, connected to the home page of the service, click on the field Click to select file which is at the bottom and select the image on your computer that you want to turn into an icon and then presses the button Upload to upload it to the site. If the image you intend to turn into an icon is found online, you can also upload it directly from the Web, by checking the box next to the item From web (http only) and pasting the relative link in the appropriate field.
Once the upload is complete, you will find yourself in front of the editor through which you can change your icon. Then use the tools in the left sidebar to select the final format of the icon, to apply the transparent background, change the degree of saturation, rotate the image and make all other miscellaneous and possible changes. On the right, however, you can preview the changes made to the icon.
When the changes are complete, press the button Download which is at the bottom of the screen and the created and customized icon will be immediately downloaded to your computer. Great, don't you think?
iConvert Icons (Online)
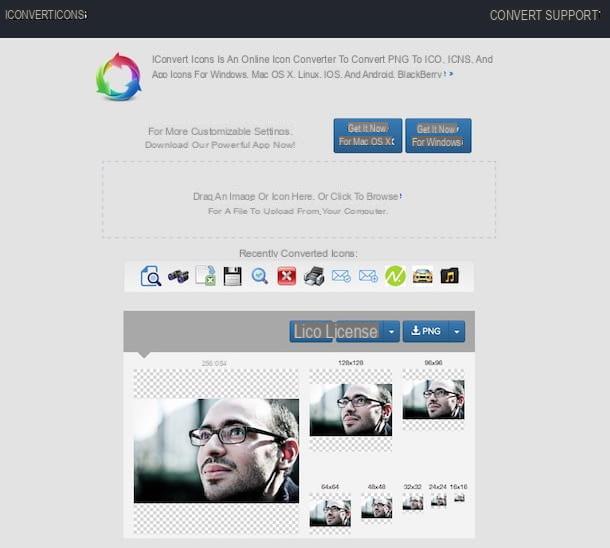
As an alternative to the aforementioned service, you can contact iConvert Icons. This is another online tool, free and working from any browser thanks to which you can create custom icons starting from your own immune. The final result is returned in all the most common formats of the category and it is possible to select its size.
To use the service, connected to its home page, drag the image from which you want to obtain your icon in the box located in the center of the screen and wait for the upload to be started and completed. If you want, you can upload the image on which to act also "manually", just click on the link click to browse and select the file on your computer.
Once the upload is complete, press the button corresponding to the format in which you prefer to download your image that has become an icon or on the menu on the side and then on the format of your interest and wait a few moments for the download to be completed.
Genfavicon (Online)
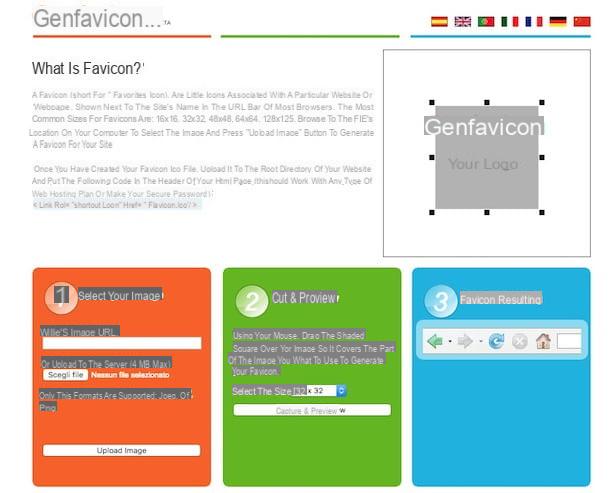
Another web service to create icons from images that I want to tell you about is Genfavicon. From the name you can immediately guess, it is an online tool that was created for the creation of favicons for Internet sites but is also particularly useful for creating icons starting from personal images. Even in this case, it is a free resource, very simple to use and usable without problems from any web browser.
To use it for your purpose, connect to the home page of the service and press the button Choose file / Open file in the orange box at the bottom to select the image saved on your computer to turn into an icon, then press the button Upload imagAnd. If the image is online instead of on the PC, fill in the appropriate field under the writing Write de image URL with its link.
Then select the final size that your icon must have using the appropriate drop-down menu that you find in correspondence with the green box. Meanwhile, a preview of the icon will be shown at the top right of the page. If you are not satisfied with the chosen shot, move the gray square on the image to the postpone you prefer. Then click on the button Capture & Preview.
You can then download the newly generated icon in .ico format by clicking on the link Download favicon photo in the blue box at the bottom right. If desired, the icon can also be downloaded in JPG format by clicking on the other available link.
How to apply the created icons
As I had anticipated at the beginning of the article, to finish off, as they say, I would like to show you how to apply the icons created from your images on Windows and Mac, in case you do not already know how to do it, of course. The procedure to follow is quite simple, you will find everything explained below.
On Windows
If what you are using is a Windows PC, you can find out how to apply the previously created icons for the following indications.
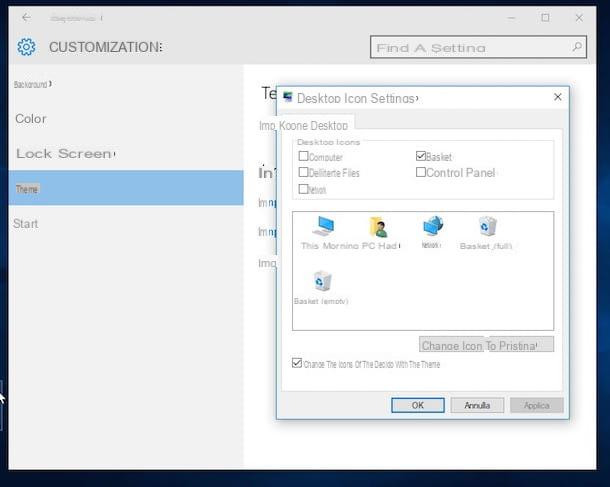
- To customize desktop icons, you have to right click anywhere on the screen, select the item Customize from the menu that appears and press on Change desktop icons in the left sidebar of the window that opened. Only on Windows 10, to succeed in your intent you must first click on the item Temi attached to the left sidebar and then you have to click on Desktop Icon Settings. Then choose which icon to modify and press on Change icon ... to select the file to replace the default Windows icon with.
- To customize program and folder shortcut icons, right click on them, select the item Property from the menu that appears and, in the window that opens, click on Change icon ....
- To customize folder icons, right click on them, choose the item Property from the menu that opens and, in the window that appears, click on the tab first Customize and then on the button Change icon ....
If you think you need more explanation on what to do, you can learn more by reading my tutorial on how to change file icon.
Your mac
If, on the other hand, what you are using is a Mac, you can find out how to apply the icons previously created by practicing the steps below.
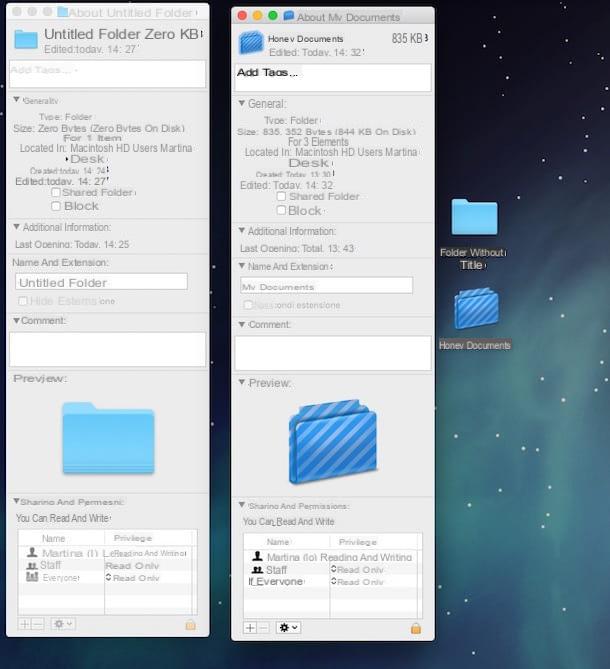
- To customize the icons of files, folders and applications, open the icon created using Preview, select the entire image using the key combination cmd + a and copy it by pressing cmd + c. Then select the folder or application whose icon you want to customize and press cmd + i to access its properties. In the window that opens, click on the thumbnail of the icon at the top left and press the key combination cmd + v.
If you need further details regarding the procedure to be initiated, consult my article entirely dedicated to how to change Mac icons.
How to create icons from images