P

The first online service that I suggest you consider in order to create images with writings is the website P. It is one of the most popular and used online services for photo editing. The strength of PicMonkey is given by the fact that among the many functions made available to users, it also integrates some through which, in fact, it is possible to add writings to your images. The service can be used for free but requires registration; moreover, for the use of functions and tools, such as access to some filters, it is necessary to subscribe to a paid plan.
To create images with writings with PicMonkey the first thing you need to do is to click here so that you can immediately connect to the main web page of the service. Then press the button Edit a Photo that you find located in the center of the screen. At this point you will need to import the image to act on. To do this, click on the button Open that you find at the top and choose whether to import the image from your computer or from Facebook. But if you press on the item Blackberries (dot symbol) you will have other choices for importing your image being able to choose, for example, whether to upload it from Flickr, from OneDrive or from dropbox by clicking on the relevant icon. Then select the image and wait for the upload procedure to start and complete.
Once the service editor is displayed, you will be able to access all the most common photo editing functions by clicking on the buttons located on the left sidebar.
To create images with text with PicMonkey click on the icon Text (symbol of letter T) and then type the text you want to add to the image by double clicking on the box Type your test here displayed in the editor. If you wish, before typing the text, you can change the type of font to use by choosing one of the many available in the left sidebar. You can also make changes to the text formatting using the box Text located on the right, for example you can change the text color, size, alignment and much more.
Instead, by placing the cursor on the box around the text, by clicking and holding down on one of the corners, you can manually change the size of the text. By pressing and continuing to hold down on the indicator located at the top of the box you can also rotate the text, while by clicking and continuing to hold down on the box placed around the text you can place your writing in another position on the image.
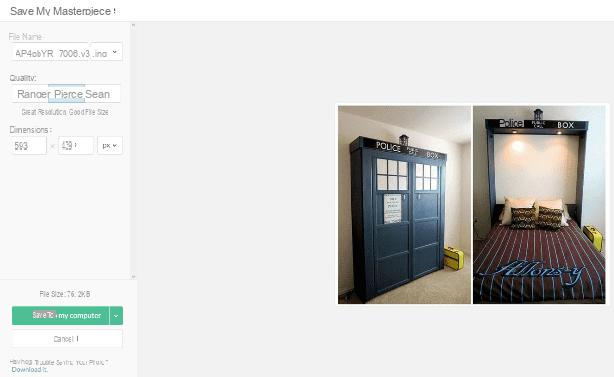
Once you have made all the desired changes you can then save the final result on your computer by clicking on the button Save which is located at the top. At this point, however, you will have to register for the service by registering via Facebook (button Sign up with Facebook) or via your email address (button Sign up with email).
Then assign a name to the image, choose whether to save it in JPG or PNG format using the appropriate drop-down menu, choose the image quality (Roger - low quality files and small files, Pierce - medium quality files, medium size files and Sean - high resolution files with large files) and presses the button Save to my computer but I will complete the operation.
canva
Another great online resource that allows you to create images with writings is given by the website canva. It is a service free but can be used after registration that allows you to create images with writings but also other interested graphic projects, returning simple but at the same time elegant and noteworthy results.
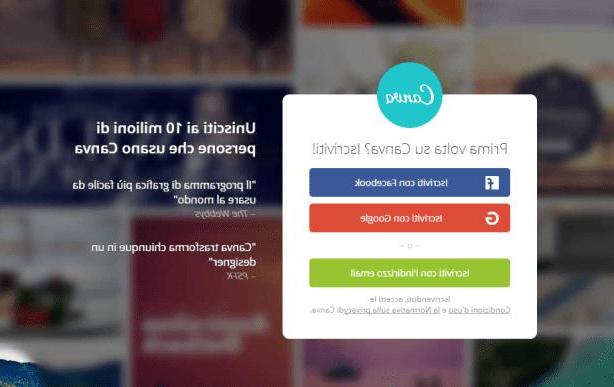
If you intend to start creating images with writings with Canva, the first thing you need to do is to click here so that you can immediately connect to the main page of the service. Then you will need to register by choosing whether to register via Facebook o Google (using the buttons of the same name) or by registering via email and then fill in the fields displayed by providing your e-mail address and a password to immediately create an account.
Once you have registered you will be able to view and then use the Canva editor through which you can create images with writings. To do this, select the type of design you intend to use for your image by clicking on the one you are interested in. You can in fact take a look at the examples that you find corresponding to the item Create a project and use for example a generic template for i Social Media, a Poster or model suitable for Facebook post.
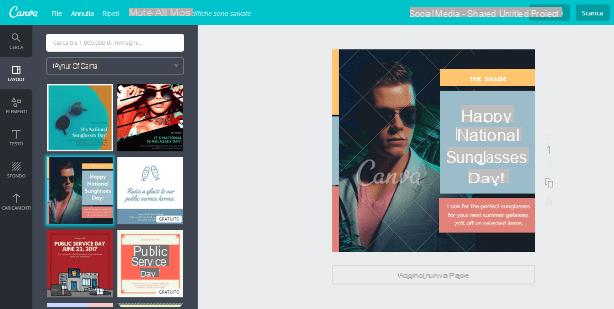
Once you have chosen the template and clicked on it, use the appropriate buttons located on the left side of the editor to choose and modify the layout you want to use (button layout), to select a background (button Background), to add your photos (button Uploads) and, of course, to add writings (button Text).
All the elements that you will import will be added in the central part of the editor and can also be modified in a very simple way, by clicking on them. For example, by pressing on the text you have added you can change the color or the size of the latter while clicking on the image chosen as the background you can choose to apply a filter, to increase the contrast or to improve its brightness.
Once you have obtained the desired final result, you can download the image with the newly created text directly to your computer by pressing the button Download that you find located at the top right. Also in this case you will have some options that will allow you to choose the format in which to save the image. You can then choose between JPG, PNG or PDF and download the image by pressing the button again Download.
Image Chef

Didn't the services for creating images with writings that I have already proposed attracted your intention? Are you looking for something even simpler and more intuitive? Try taking a look at Image Chef. It is one of the simplest Web services that allow you to create funny images by adding custom writings.
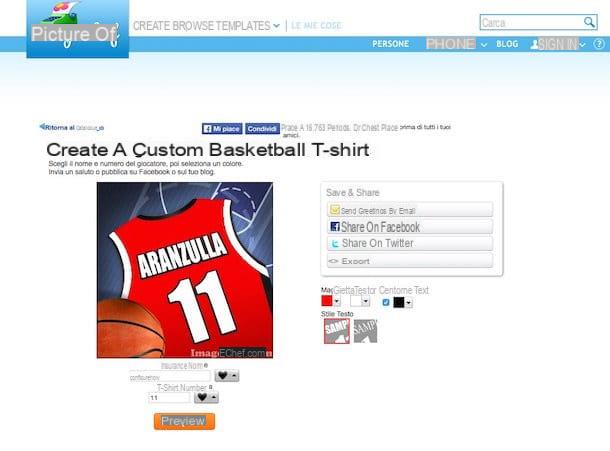
To create images with Image Chef written click here to connect to the main page of the service and then select one of the many models available by simply clicking on it. On the page that will subsequently open, type the text you want to add to the image in the text field under the heading Enter Name and modify any other elements of the image using the fields below and those located on the right side of the page. Then click on the orange button Preview to view the changes made to the image with the inscription.
Once you have obtained the final result that suits you best, you can share the image created with the personalized writing. To do this, just use the appropriate side buttons by choosing the social network in which you want to share your image. Alternatively, if you just want to save it, you can choose whether to save your creation directly to your computer. Then click on the image with the right mouse button and then click on the item Save the image like give the menu visualizzato.
Glitterfy
Although they have gone a bit out of fashion, according to many, images with glitter lettering always make a good impression. If you too are of this opinion you could try to give a look to the service Glitterfy which, in fact, allows you to create images with glitter lettering in a simple and fun way.
To start creating images with glitter lettering click here to connect to the website of Glitterfy. Then click on the entry Glitterfy Photo. On the Web page that will open at this point, press the button Sfoglia ... to upload your image. At this point, locate the image to which you intend to add a glitter writing on your computer and then double-click on it.
To start uploading the image to act on the service's website, click on the button Upload & Start. On the web page that opens, now select the glitter effect to apply to your image, choosing it from those available in the section Glitter Type.

If you wish, you can also add text to the image - use the field instead Text. By holding down the left mouse button on the text that appears on the uploaded photo, you can move the text inside the photo itself. When you have finished editing the image, you can see the final result by pressing the button Generate Glitter Graphic !.
Once you have the final result that suits you best, you can then download it to your computer by simply pressing the button Generate Glitter Graphic!, by right-clicking on the image displayed on the screen and then choosing the option to save the image on your computer.
How to create images with writings