Create a recovery disc for Windows 7
You are interested in understanding how to create a recovery disc for windows 7? Very well, then read the instructions on what to do that you find below. In no time at all, you will succeed in everything.
Creating the Rescue Disk
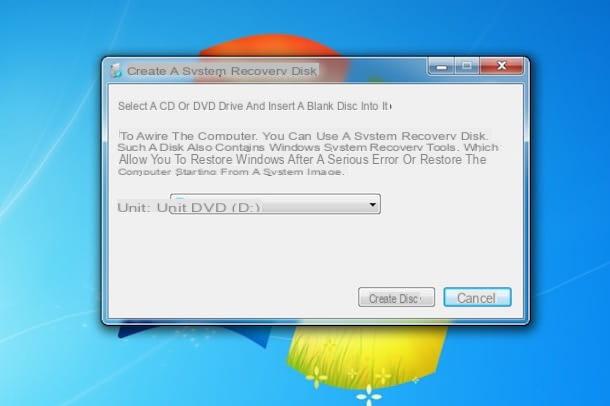
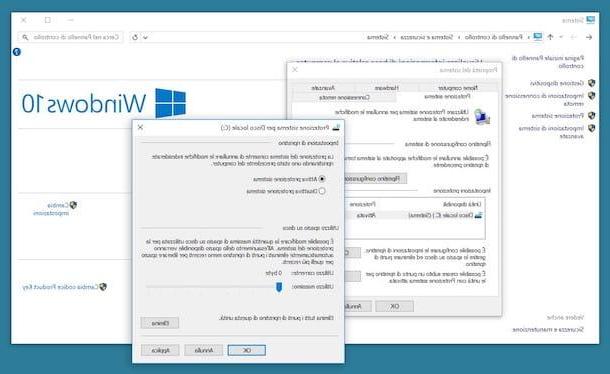
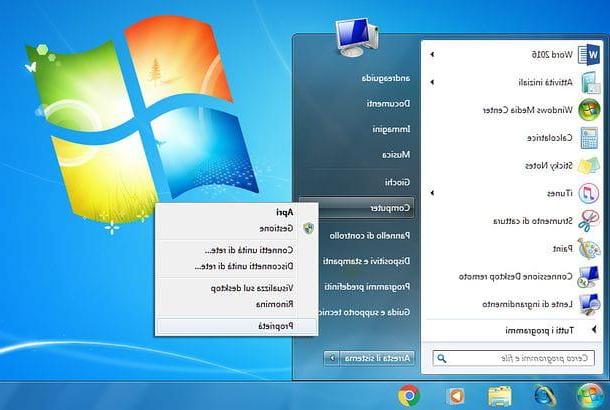
The first fundamental step you need to take to be able to create a recovery disk for Windows 7 is to click on button Home (I cheer with the pennant Windows) located at the bottom left of the taskbar, to type "restoration" in the field for quick search of the Start menu I will select the voice Create a system repair disc among the results that are shown to you.
Then enter a Blank CD / DVD in the burner connected to your PC and, in the window that appears, click on the button Create disc, to start the Windows 7 recovery disk creation procedure. This takes about 5 minutes. Once burning is complete, click on the button Close in the additional window that has opened on the desktop and presses the button OK, then remove the CD / DVD from your computer and store it in a safe place. Mission accomplished!
Using the Rescue Disk
Now that you know how to create a recovery disk for Windows 7, let's see how to use it to restore system access should the need arise. All you have to do is insert the CD / DVD you just created into the optical drive connected to your computer and restart the computer. When the message appears on the screen Press any key to boot from CD-ROM to DVD-ROM, press any key on your PC keyboard and wait for the OS recovery process to load.
If you don't see the message in question appear, log in to BIOS (if you don't know how to do it, you can consult my guide dedicated to the topic) to change the startup sequence and set the PC to perform the boot from CD / DVD.
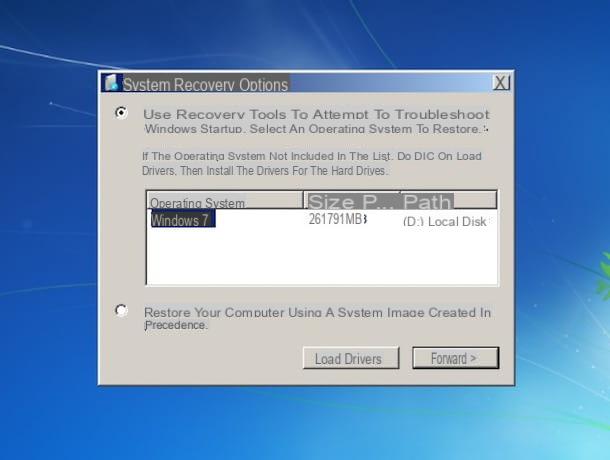
In the screen that appears, then click on the button NEXT and wait a few seconds for Windows installations on your computer to be detected. Then select the item relating toWindows 7 installation you want to restore (if you don't have a multi-boot system, there should only be one) and click the button again NEXT to leave the recovery disk to restore system access.
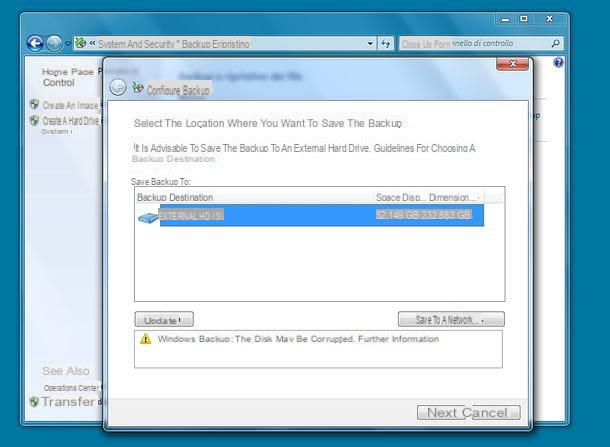
If you have been cautious and have made asystem image, as I explained to you in my tutorial on how to make a backup on Windows 7, you can restore that by selecting the option instead Restore your computer using a previously created system image and following the guided procedure that is proposed to you.
Create a Windows 7 recovery disc on USB
You do not have a burner at hand, so you cannot create the disc to restore Windows 7 and you would like to understand if this is also feasible on USB pendrive? Don't worry, the answer is yes and I can help you with that too.
Starting from the fundamental assumption that Windows 7, unlike later versions of the Microsoft operating system, does not offer any special option that allows you to create the system recovery disk on a key, it is still possible to remedy this by resorting to the use of third-party tools . Below you will find explained how to proceed.
Get the ISO file
First, you need to worry about copying the files for creating the recovery disc to your computer. To do this, use HoboCopy: a free and functional command line application that allows you to copy any file that may be in use by the operating system or other programs.
So, visit the application download page and click on the link for the Windows version you are using (64-bit or 32-bit). When the download is complete, create a new folder called hobocopy in C: and extract the contents of the ZIP file just got it. Next, create a new folder in C: called ISO.
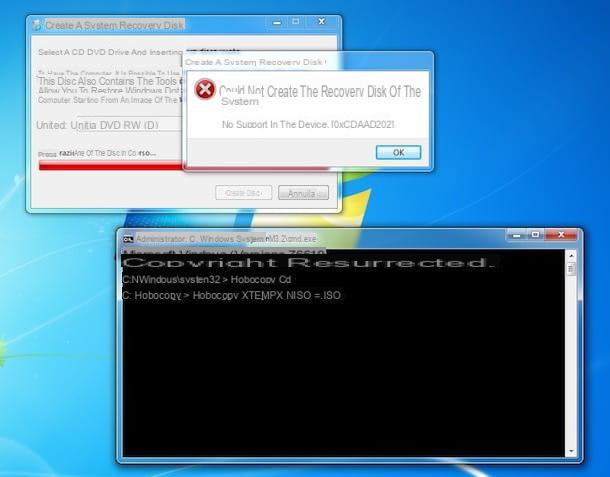
At this point, start creating the Windows 7 recovery disk as seen together in the dedicated step at the beginning of the guide. When you see the warning that it is impossible to create a rescue disk as there is no media, click on the Start button (I cheer with the pennant Windows) on the bottom left of the taskbar, type "Cmd" in the search field of the Start menu, right click on the corresponding result, select the item Run as administrator from the menu that appears and then presses the button Si, in order to open the Command Prompt with administrative privileges.
In the window that you will now see, type the command cdhobocopy and press the button Submit on the PC keyboard, in such a way as to bring you to the directory where you previously extracted the contents of the Hobocopy compressed file.
Now type the command hobocopy% temp% c: ISO * .iso always followed by pressing the key Submit on the keyboard, in order to extract the recovery disk ISO file from the temporary folder used by Windows. When the process is complete, the files will be saved in the folder ISO created earlier.
Creation and use of the USB key
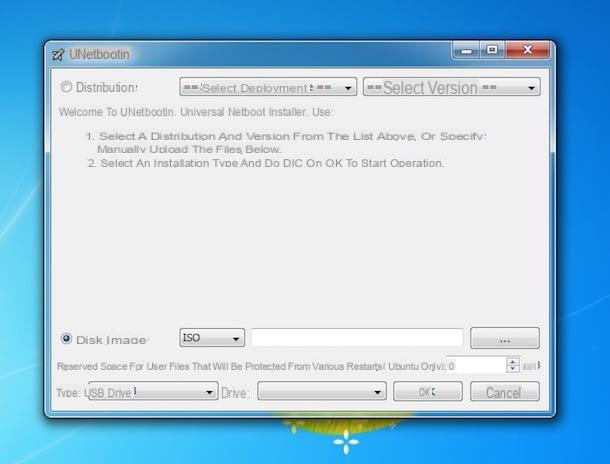
Once you have obtained the ISO image of the recovery disk, you need to worry about transferring it to your USB stick. To do that, you need to get hold of UNetbootin: a free software that, in fact, allows you to transfer the operating system installation files to a pendrive.
To download it, go to the relevant download page and click on the green button Download. When the download is complete, connect the la to your computer USB pendrive you want to use to install the operating system and start the .exe file just got it. Then click on the button Si in the window you see appear to confirm the software start.
In the UNetbootin screen that is shown to you at this point, put the check mark next to the item Disc image located at the bottom, click on the button [...] adjacent and select theISO image of the recovery disk obtained earlier.
Therefore, indicate the drive of the USB key from the drop-down menu Unit (always placed at the bottom) and click on the button OK located next to it to start the data transfer. The operation will go on for a few minutes and will delete the entire contents of the pendrive.
Once you have created your key, leave it connected to the PC, restart the latter, access the BIOS (if you don't know how to do it, read my guide dedicated to the topic) and change the boot sequence by going to set the computer for the boot from USB. Then follow the instructions I gave you in the step on how to use the Windows 7 recovery disk. The operations you will need to perform at this point to restore the system from the pendrive are practically identical to those relating to the use of the disk.
Please note: if you are using Windows 7 on a recent PC, equipped with UEFI instead of the classic BIOS, you need to create a stick optimized for the latter. In this regard, I recommend that you use the program Rufus, which I told you about in my tutorial on how to make a bootable USB stick.
Workarounds for recovering Windows 7
As anticipated at the beginning of the guide, creating a Windows recovery disc is not the only way to restore the system in case of problems. The restore points as well as the use of installation diskand the OS. In the most extreme cases, then, there is always the last resort of formatting. If you are interested in this, go on reading: you will find everything explained in detail below.
Restore points

I restore points they are archives in which all the settings, programs and drivers present on the PC at a given time are stored, so that they are always available and can be restored if necessary. Their use can prove to be a very valid alternative, as I told you, to the use of the Windows 7 recovery disk.
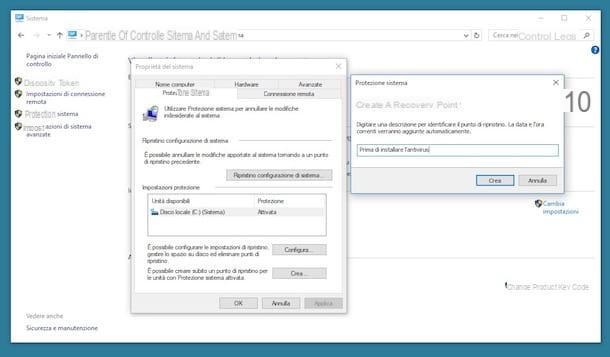
In order to be able to use restore points, you must first worry about creating them. To do this, click on the Start button (that over there pennant Windows) located on the bottom left side of the taskbar, right click on the item computer e seleziona l'opzione Property give the menu to compare.
In the window that opens on the desktop at this point, click on the item Protection system which is located in the left sidebar and presses the button Crea to start the process of creating a new restore point. If the button Crea it is not selectable, presses the button Configure, check the option Restore system settings and previous versions of files and click on the button first Apply and on that OK.
After clicking on the button to create the restore point, type the name you want to assign to the latter in the appropriate field, click on the button Crea and wait for the procedure to start and complete.
When you see fit, you can restore Windows 7 to a previous condition by searching "System restore" in Start menu, selecting the relevant result, clicking on the button NEXT in the window that opens and choosing the date to report the system status. If you do not find the one of your interest among the proposed restore points, check the item Show additional restore points and choose the one you want to use from the displayed list.
Once you have found the restore point of your interest, click on the buttons NEXT e end and the restoring procedure of settings, drivers and programs will start immediately. When finished, your computer will restart and you can then resume using Windows 7 as it was on the restore point date. For more details, please refer to my tutorial on how to create a restore point on Windows 7.
Installation disc and pendrive
If, for some reason, it is impossible for you to access your operating system and if you have been far-sighted and have made an image of the system following the instructions I gave you in my guide on how to make a backup on Windows 7, you can restore Windows 7 via its installation disc or by using a pendrive with the OS (if you remember correctly, I explained how to create one of my post on how to create a bootable USB of Windows 7).
To use it for this purpose, just insert the Windows 7 disk into the computer's burner or, in the case of the pendrive, connect it to one of the USB ports of the PC, restart Windows 7 and run the boot from CD / DVD or USB (depending on the media used), by changing the relevant settings in the BIOS (if you don't know how to do it, refer to my guide dedicated to the topic).
When the PC restarts, press any key on the computer keyboard, then click on the button NEXT to confirm the use of the your language and on the voice Reset the computer. Then put the check mark next to the item Restore your computer using a previously created system imageclick on your button NEXTselect il backup to use, still presses the button NEXT and wait for the recovery procedure to be completed.
Formatting
If creating a Windows 7 recovery disc didn't help solve your problem, and if none of the mentioned alternatives worked, you can get your computer back to working properly by formatting. The procedure to follow is the one that I have provided to indicate to you in my dedicated guide, in fact, on how to format Windows 7.
How to create Windows 7 recovery disk