Create a DIY photo book on Windows
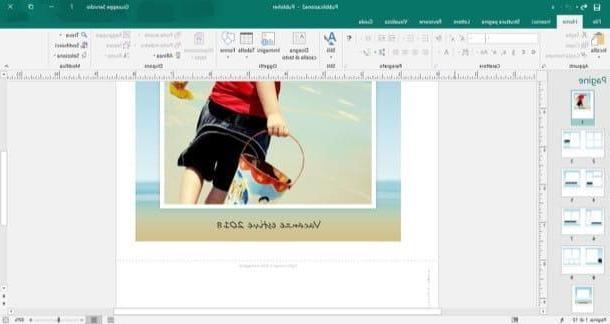
If your purpose is to create the photo book using a computer on which you have installed Windows, I recommend that you take advantage of the program Publisher, easy to use and very, very efficient: for your information, it is part of the office suite Microsoft Office, which is not available for free but can be obtained upon purchase of a one-time license (at the starting price of 149€), or by subscribing to a plan Office365 (with prices starting from 69 € / year). However, if you wish, you can download a trial version of Office that lasts for 30 days, enough to test if the package is right for you: I explained how to do it in my guide on how to download Office for free.
Publisher is perfect for creating photo albums (photo books included), especially thanks to the free templates that you can freely download from the Internet and use within the program: to do this, first start Publisher calling it up from the menu Home Windows (the icon in the form of pennant located in the lower left corner of the screen), type the word photo in the search field located at the top of the window that appears, then click on the shaped icon magnifying glass to start searching for templates.
If you wish, you can make your search even more specific by selecting the category Book from the list on the right of the screen, so as to display only the most suitable models for making a photo book. Next, double click on thepreview of the template that best suits the purpose of your photo book (there are many scenarios to choose from: beach holidays, winter holidays and so on) and wait a few moments for it to finish downloading.
Once this operation is complete, you can finally proceed with the creation of the photo book: double click on the areas dedicated to photos to insert the images you prefer, choosing, through the panel shown on the screen, the path from which to take them (from file, through Bing image search or from the OneDrive cloud space). If you want, you can also insert short comments or captions by intervening on the available text boxes: just click on each of them to enter the "classic" writing mode, typical of Office programs.
As for all software in the suite, Publisher also offers the possibility of making additional customizations, through practical functions that can be recalled via the tabs at the top: in the tab Home, for example, you can find useful tools for insert images, format the text and so on. In the card InserisciInstead, you can find tools dedicated to adding forms, BORDI, decorative items and other elements. Finally, in the tab Page structure, you can find the options that allow you to change the page structure (dimensions, orientation, background and much more). When you are done, you can go to the next page of your photo book by clicking on the preview available on the left side of the Publisher screen.
Once the work is completed and satisfied with your work, you can finally proceed to print your creation: if you have a printing device compatible with the watermark of the paper you intend to use (e.g. rigid cardboard), turn on the printer, load the cart with the sheets and, once back in Publisher, click on the menu Fillet and use your voice Print to be able to set printing options (e.g. double-sided printing and image quality) and to stamp your photo book on the paper.
In case you don't have such a printer, you can take a look at my guide on which printer to buy to get one; alternatively, always from the section Fillet, pigia sul pulsating Save with name to save the file on the computer disk, transfer it to an external device (eg a USB key) and go to your local printer to proceed with printing on paper. For greater compatibility, I recommend that you store the file in PNG o PDF, using the drop-down menu attached to the save window.
Create a DIY photo book on macOS
You want to make a DIY photo book using your own Mac? In this case you can rely on the program Gallery, included “standard” in the latest versions of the macOS operating system, since it offers all the tools necessary to create the photo book. For your information, Photos is a completely free application: therefore, except for printing costs, you don't have to spend absolutely anything to make your creation.
Having said that, here's how to proceed: first, what to turn on the Mac and, once on the desktop, start the application Gallery calling it via the icon in the shape of colorful flower attached to the bar Dock; if you can't find it, you can start the program by calling it directly from Launchpad (l'icona a forma di rocket, also located in the Dock bar).
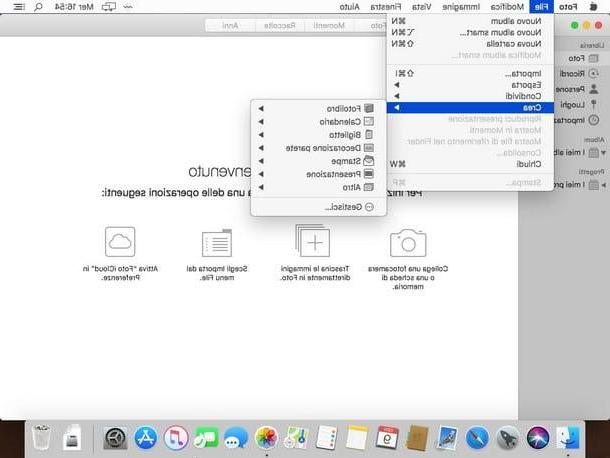
After starting the program, click on the entry Start present in the introduction screen, calls up the menu Fillet located in the top bar and, from there, choose the items Create> Photo Book. At this point, the program should show a window on the screen App Store, from which you have to download the extension necessary to create the photo book you have in mind: to continue, choose one of those proposed on the screen (Wik, Mimeo, Photos, Motif e ifolor are just some examples of free extensions) and click on the button Get placed in its correspondence. To finalize the installation, when prompted, enter the administrative password of the computer.
Once you have finished adding the chosen extension, call up the menu Create> Photo Book, click on the name of the extension downloaded previously and follow the instructions proposed to complete the initial configuration (which may differ from extension to extension): if requested, indicate the nation of your origin (to facilitate the calculation of printing and shipping costs), and then select the photo book template of your interest and / or the type of card to be used for its creation.
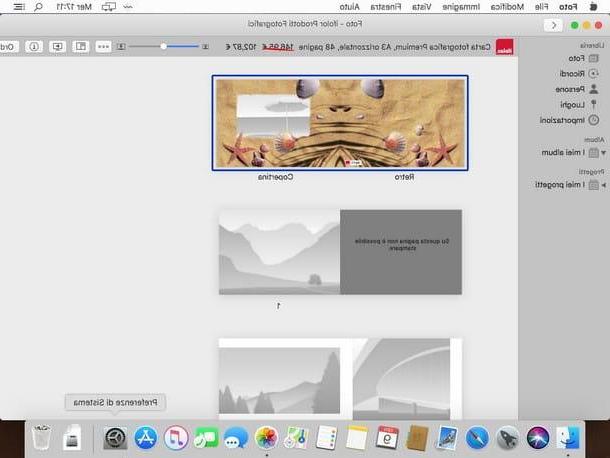
Once you have confirmed this information and loaded the model into Photos, the procedure is very similar for almost all extensions: click on the panes designed to contain personal photos and drag the images of your interest into them. If you wish, you can use the various buttons present in the extension to select the layout of the book, the cornice of photos, customize the font and color text and many other graphics.
When you are done, press on the voice Order located at the top right and follow the instructions shown on the screen to create and purchase the photo book using the service combined with the extension of your choice.
Create a DIY photo book online
Instead of using a PC program, you could make your photo book using a web service specifically created for the purpose: in this way, not only will you not need to install anything on your device, but you can also proceed with the creation of your work through very simple tutorials. Finally, you can take advantage of the printing services made available by the portals in question to buy the photo book and receive it comfortably at home within a few days. There are really many Internet sites of this type: below I point out the ones that, in my opinion, are the best in the category.
Photobox

One of the most used Internet sites for printing photo books is PhotoBox: in it, you can find various services for digital printing and numerous models for photo books, different in size, types of paper and covers (in particular, you can also choose flexible covers and special collections). PhotoBox ships quickly throughout the city and boasts very competitive printing and shipping rates: photo book prices start at 16,95 €, but they can come up to € 74,95 for those more expensive and with high quality print material (eg paper with a thicker and more resistant watermark).
You can choose the photos to add to your work either by uploading them from computer memory, if you care about the social network come Facebook, Instagram o Flickr: for a good result, it is good practice that the starting photos are in .jpg / .jpeg format and have a weight greater than 20 Kb, so as not to be too grainy when printing.
Photosi

If the solution described above was not satisfactory for you, you can give PhotoSì a chance, a web portal dedicated to the printing of digital files, which also includes the creation of real photo books among the services offered. Photosi site allows you to upload photos through a simple and immediate user interface, which can also be used by those who approach this type of creation for the first time. The prices for photo books, then, are absolutely advantageous: we start from 8,50€ for a compact photo book, to 29€ for a “Tales” photo book, one of the largest available.
One of the most interesting features of this site is the possibility to choose the method by which to collect the photo book after ordering it: it is possible to receive it at your home via Express courier, or choose the collection at a photographer or a PhotoSì partner center.
How do you say? Are you still not satisfied and would you like to know some other site that allows you to create a photo book by printing digital photos? Then I suggest you take a look at my guide on how to print digital photos, in which I have provided you with further insights on the services already mentioned and many other alternative solutions for creating your online photo book. Trust me, it's worth reading!
Create a DIY photo book on smartphones and tablets
You don't have a computer and want to leverage your smartphone or tablet for create a DIY photo book? For the purpose, I would like to advise you to use the service canva, also available in the form of a free app for Android and iOS: the only fundamental requirement to use Canva is to create a free account on the portal of the same name, an operation that can be carried out from within the application itself.
So, after downloading the Canva app, launch it from the home screen of your device and follow the instructions below to create a new account: if you are on Android, tap the button Continue with the email to carry out the operation using an e-mail address and, when requested, indicate a Password staff to access the service.
Alternatively, you can speed up the profile creation process by using the keys Accedi con Facebook o Log in with Google, so as to be able to use the same credentials for the new profile: in this case, you must log in to the chosen social network using the appropriate window on the screen, subsequently authorizing Canva to access the information contained therein.
If, on the other hand, you're using Canva for iOS (therefore iPhone e iPad), start the app and tap on the item SUBSCRIBE to proceed with the creation of a new profile: on the next screen, enter ae-mail valid and one Password in the appropriate fields and confirm the creation of the account by pressing the button SUBSCRIBE. Again, you can speed up the process of creating a new profile by using the keys Accedi con Facebook o Log in with Google.
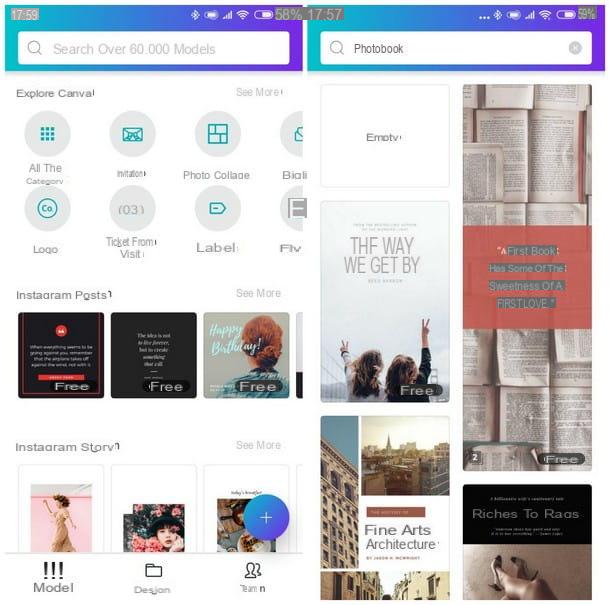
Once logged in, type the word Photobook in the top bar of the app, in order to retrieve all the models compatible with the creation you intend to create: the choices are so many, each with its own personalized style.
After selecting the model you like best with a tap, wait a few seconds and press on the various elements of the proposed preview (photos, text boxes, titles, footers and so on) to add a new image or modify the graphic details of the page, with the help of the proposed buttons. In some cases, you can zoom in, zoom out or rotate an element using the pinch or rotation of your fingers on the screen. To add new pages to the book, press the button capacitor positive (+) lead and repeat the same steps, until you reach the desired result.
When you are satisfied with the result, tap on the icon Share (The square with arrow towards l'tall) located at the top right to automatically save the project and share it, in the form of an image, with the app of your choice (if you wish, you can print the file directly or save it in the internal memory or on the cloud). If you find yourself on iOS, you can also download the photo book you just created using the button Downloadnext to the button Share.
How to make a DIY photo book