How to record video from PC with audio
To get started, let's see what the best programs are for record video from PC with audio: in most cases, they are free and already included in the Windows and macOS operating systems.
An important clarification: due to some limitations imposed by the operating system, macOS does not allow the capture of system audio, but only that of the microphone / webcam. To remedy the problem, you need to install third-party programs that allow you to record the Mac screen with internal audio (I told you about it in a dedicated tutorial).
How to record a video from Windows 10 PC with Xbox application
For example, if you have a computer animated by Windows 10, you can record what happens on screen (along with what is being reproduced by your computer or microphone) using the Xbox Game Bar, Also known as Xbox game bar.
Precisely, it is a small program included in the latest edition of Microsoft's operating system, designed to help gamers record game sessions; the Xbox Game Bar, however, can also be easily used to acquire other activities carried out on the screen. The program also automatically acquires all sounds played by the computer, and can be configured to record audio from the microphone.
Although the Xbox Game Bar is present on all editions of Windows 10, it can only be used if you have one of the following video cards on your computer: NVIDIA GeForce 600, 800M or later, AMD Radeon HD 7700 series, 7700M, 8500, 8500cm, R7 series, R9 or later versions.
If you are unsure of the graphics unit installed on your computer, you can easily find the information using the utility Dxdiag Windows: the guide in which I explained how to see which video card you have contains step-by-step instructions to follow in this regard.
Once the necessary checks have been carried out, if your computer is compatible with the Xbox Game Bar, check that this is active by going to the Windows 10 settings: therefore, open the Start menu by clicking on windows flag resident at the bottom left and press on the symbol ofgear placed in its sidebar.
Now, click on the i icon Toys located in the new screen that opens, select the item Xbox Game Bar visible in the left part of the window and check that the lever at the top is positioned on On, otherwise you do it. Once this is done, close the settings panel and press the key combination Win + G on the keyboard, to call up the game bar.
Alternatively, you can get the same result by typing the word in the Start menu or in Cortana's search bar xbox and selecting the result relative to Xbox Game Bar.
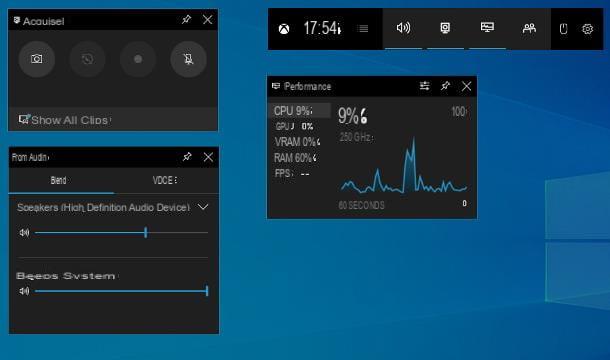
After a few moments, you should see the various panels of the program on your desktop: to get started, locate the tab Acquire, the one that contains the basic controls for registration; if you don't see it, click on the symbol camera, located on the main program bar, in order to make it visible.
Now, if you want to capture the audio coming from the microphone as well, click on the symbol microphone present in the Acquire tab; to change the input device and set its volume, you can use the box Audio (if hidden, you can make it visible by clicking on thespeaker located in the Xbox Game Bar main bar).
After making the necessary adjustments, click on the button Rec (Quello forma di hoops), present in the card Acquire, to start capturing the video; Once the recording has started, you can hide all components of the Xbox Game Bar, except for the control tools, by pressing the key combination Win + G.
When registration is complete, click on the button Stop (the one depicting a square), which resides in the card Acquisition status or in the quick controls bar, located on the screen: following this operation, the movie made will be stored in the folder VideoCapture of Windows.
If you prefer to act as a keyboard, there are shortcuts Quicks that allow you to control the Xbox Game Bar, without using the mouse: Win + Alt + R, to start / stop screen capture; Win + Alt + G, to make a 15-second recording; And Win + Alt + M, to activate / deactivate the use of the microphone during recording.
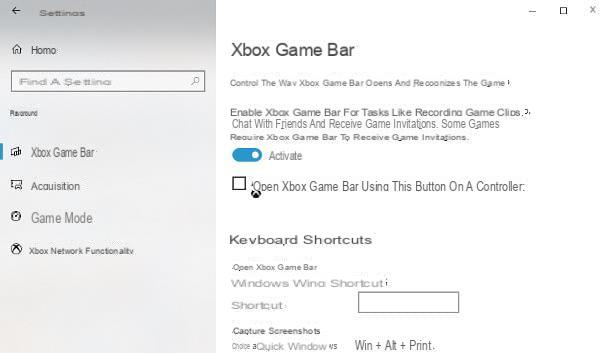
You can change the keyboard shortcut combinations by going to the section Settings> Games> Xbox Game Bar on Windows 10.
How to Record Video from Mac with Screenshot
If, on the other hand, yours is a Mac, you can get a more than appreciable result by taking advantage of Snapshot Screen, a utility present “standard” in all Macs with macOS 10.14 Mojave and later operating systems. It allows you to easily record the entire Mac desktop, an active window or just a portion of the screen, including sounds from the microphone as needed.
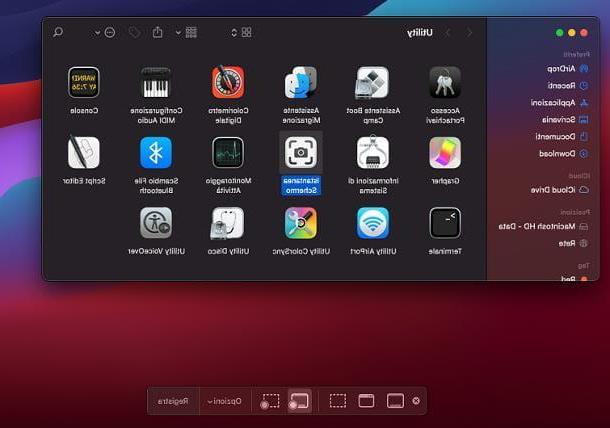
To recall Screenshot, use the icon accessible from the menu Or> Utility macOS (located in the top resident menu bar), or press the key combination cmd + shift + 5 on the keyboard: after a few moments, you should see the program toolbar superimposed at the bottom of the screen.
Now, to register the entire Mac desktop, click on the button Record the entire screen, identified by the symbol of rectangle with circle; to capture just a portion, click the button instead Record your selection, depicting a dashed rectangle with circle and use the cursor that appears on the screen to define the area to be recorded.
To ensure that the recording also includes the audio coming from the microphone, presses on the menu options program (located in the Mac menu bar), click on the entry Microphone and then on name microphone to be used.
Once the necessary adjustments have been made, press the button Register, to start capturing the video; when you are done, press the button Stop, the shaped one square that appears near the clock, to save the video on the desktop, in .MOV. That's all!
How to record a video from PC with VLC
Other software you can use for record video from PC è VLC: the famous free and open source program, in addition to being compatible with the vast majority of existing audio and video formats, also includes a practical screen recording function.
VLC is available for both Windows, macOS and Linux. If you have not yet downloaded the software, connect to its home page and click on the button Download VLC, located in the center of the page, to obtain the program installation package.
When the download is complete, open the file obtained and, if you are using Windows, click on the buttons Yes, OK, NEXT three consecutive times and then on Install e Close, to complete the setup and start the program.
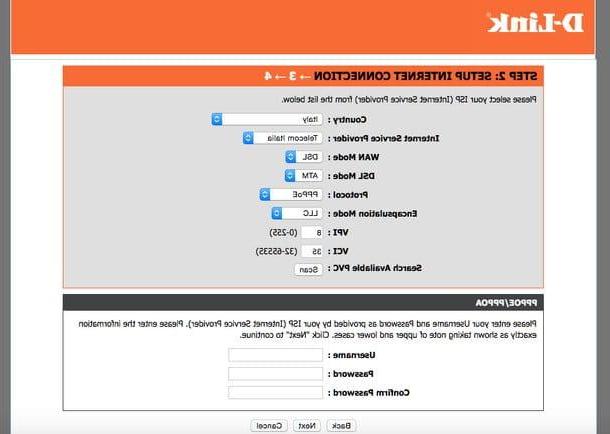
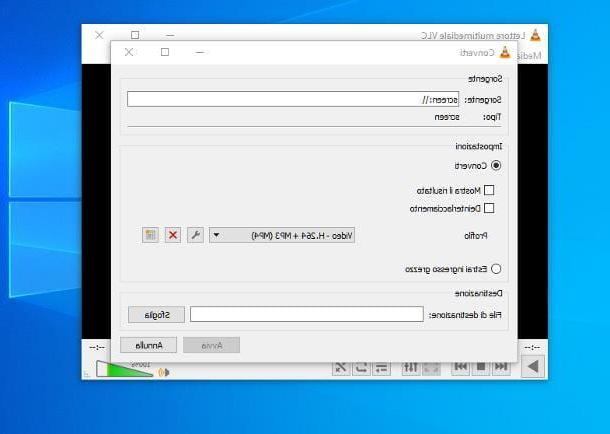
At the first start, choose whether or not to authorize access to the network for the retrieval of multimedia data and updates, click on the button Continue and press on the menu Media> Convert / Save, to access the appropriate registration function.
Once this is done, click on the tab Acquisition devices located in the new window that appears on the screen, sets the drop-down menu Method of acquisition su desktop and adjusts the frame rate on a value between i 30 and 50 fps, more than enough to get a good quality recording.
Now, click the button Convert / Save located at the bottom, check that the field Source is set to the screen: option (otherwise you do it), put the check mark next to the item Converted (if not already there) and indicates the type of compression to be applied in the drop-down menu Profile (personally, I recommend that you use the profile Video - H.264 + MP3 (MP4)).
When you are done, press the button Shop by Department located next to the box Destination file, indicates the folder in which to save the file and, when ready, press the button starts to start screen recording. When you are done, you just have to call VLC again and click on the button Stop located at the bottom: that's all!
If, on the other hand, yours is a Mac, april il .dmg file opened previously and use the window that appears to drag the VLC icon into the folder Applications of the Mac. Then, open the latter, start the program and press the button apri, to overcome macOS security restrictions on software downloaded from sources outside the Mac App Store (you only need to do this the first time).
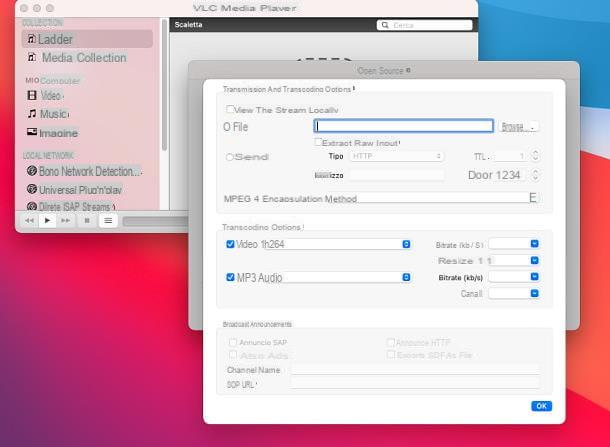
Now, choose whether or not to activate the download of multimedia data from the Internet, wait for the software to open and click on the menu File> Open Capture Device, to access the appropriate screen.
With that done, set the top drop-down menu to the option Screen, set the number of frames per second on a value between 30 and 50, put the check mark next to the item Flow output and press pulsating Settings ..., to go to the next window.
At this point, all you have to do is make the adjustments relating to the movie to be saved: put the check mark next to the item Fillet, select the voice MPEG 4 give menu to tendin Encapsulation method, put the check mark next to the items Video e Audio and finally set i codec to use for video and audio compression (personally, I recommend h264 e mp3) and the bitrate (2048 kb / s for movies and 128 kb / s for audio).
To conclude, click on your button Sfoglia ... to choose the folder in which to save the movie, and press the buttons OK e apri, in order to start recording; when you are done, open the VLC window again and press the button Stop, placed at the bottom. For more information, I refer you to reading my guide on how to record with VLC.
Other methods to record video from PC with audio
In addition to the solutions I have indicated to you so far, there are numerous other programs that allow you to record video and audio from your computer desktop: here are some of them.
- Camtasia Studio (Windows) - it is a software designed to make even quite elaborate screen movies, adding effects, music, real-time narrations and many other elements. The program is not free, it costs € 244,53, but it can be tried for free for a period of 30 days.
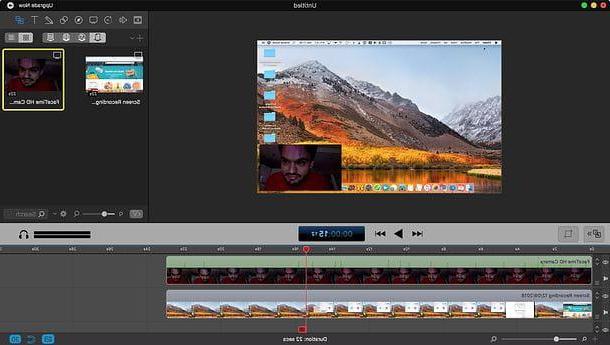
- Screenflow (macOS) - this is a program dedicated to professional editing. It is able, in addition to recording the screen, also to edit and edit the recorded videos together. It costs $ 129, but a free version is available that can be used without limits, which however affixes a watermark to the works created.
To learn more about the programs to record the screen, please consult the specific tutorial I have dedicated to the topic.
How to record video from PC with webcam

Do you need to make a recording of your computer screen, including the video stream from the webcam? In this case, I recommend that you give a chance to OBS, also known as Open Broadcaster Software. If you have never heard of it, this is a free program, available for both Windows that for Mac e Linux, which allows you to make screen recordings by adding other sources (including the webcam), but also to stream them directly on platforms such as Twitch e YouTube.
To download OBS, connect to its official website and click on the button that best suits yours operating system; when the download is complete, open the fillet obtained and, if you use Windowsclick on your button Yes, then on the button Next twice in a row and then on install e Finish, to complete the installation.
If, on the other hand, yours is a Mac, after opening the installation file, click on the button Continue twice in a row, then on Install and, when prompted, enter the Mac password in the appropriate text field. Next, hit the buttons Install software, Close e Move, to complete the setup. More info here.
Once the program is open, skip the first configuration procedure by clicking on the button Cancel and, having reached its main screen, click on the button Settings, located at the bottom right, and select the item Exit located in the sidebar of the new panel that opens.
At this point, set the drop-down menu Exit mode su Simpleclick on your button Shop by Department corresponding to the item Registration path, to choose the folder in which to save the movies, then set the drop-down menus Recording quality, Registration form e Encode, respectively, on High quality, medium file size, mp4 e Software (x264) (these are settings that are fine in general but you can change it to your needs if you want). Finally, click on the button OK to close the settings window and return to the program.
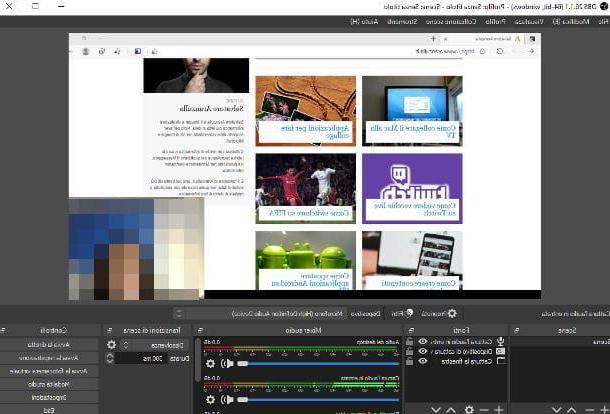
At this point, press the button capacitor positive (+) lead located in correspondence of the box References and select the item Capture the screen, to capture the entire desktop, or Capture window, to record only the contents of the window of a running program. Once this is done, click on the button again capacitor positive (+) lead located in the frame References, choose the item Video cattura device, premium pulsating OK and use the next panel to indicate the webcam to use and the acquisition quality.
When you are done, press the button OK and, if necessary, resize and / or reposition the box related to the acquired webcam image on the scene. Now, repeat the same operation adding a type source Incoming audio, to record sounds from the microphone, and / or Audio out, to acquire those coming from the computer.
Once you have finished configuring your "scene", click on the button Start recording, to start capturing the screen and webcam together; when you are done, press the button Stop recording, to finish capturing the movie and save the related file in the folder specified above. To find out more, please take a look at my guide dedicated to how OBS works.
How to record a video with the PC webcam
How do you say? You are not interested in recording desktop content, but you want to make a movie containing images from the webcam connected to the computer? In most cases, you won't need to install anything, as the necessary is already included in the operating system.
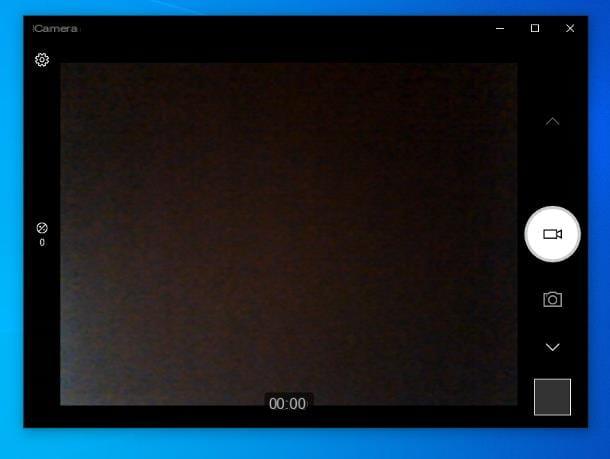
For example, if you use Windows 10, you can use the application Camera, accessible from the Start menu: after opening it, wait for the images to appear on the screen and, to start recording, click on the button Capture video (the one depicting a video camera).
At any time, you can pause the video capture by pressing the button Pause (||), or stop recording by clicking on the button Stop (shaped square). The videos created in this way also include audio and are saved in the folder ImagesCamera Roll Windows, in MP4 format.
Su Mac, you can perform a similar operation using the application Photo Boot, included “stock” in macOS and accessible from Launchpad (l'icona a forma di grid which resides on the Dock), or from the menu Go> Applications from the Mac.
After opening it, click on the symbol of video camera, located at the bottom left, to set the recording mode; to apply a filter, use the button instead Effects, visible at the bottom right.
To start recording, click on the button red camera, located at the bottom: following this operation, a three-second countdown will start, after which the acquisition of images will begin. When you are done, click on the button Stop, in order to interrupt the "filming"; to play the recorded video, click on its preview, located at the bottom right. To save the video, right click on its preview and select the entry Export ... give the menu to compare.
If you think that the software I mentioned are too "limited" in terms of functionality, you will be pleased to know that there are many other webcam programs available on the Net, mostly free, capable of adding effects and other elements to videos. realized: I told you about it in detail in my specific guide on the subject.
How to record video from PC