Preliminary operation
Photoshop is perhaps Adobe's best known program dedicated to professional image manipulation. Its latest version, included in the suite Adobe Creative Cloud (o Adobe cc), is available for both Windows that for MacOS, upon activation of a paid license.
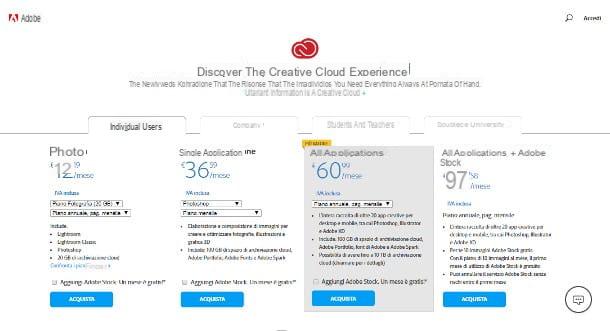
The subscription plans dedicated to Adobe CC programs are different and adapt to all needs: below I show you the most convenient ones.
- Photography - includes Photoshop, Lightroom and Lightroom classic programs, plus 20GB of cloud storage. The starting price is 12,19 € / month.
- Single application - includes Photoshop, 100 GB of cloud space and additional Adobe Portfolio, Adobe Fonts and Adobe Spark software. Prices start at 36,59 € / month.
- All applications - includes the entire collection of Adobe CC programs (Photoshop, InDesign, After Effects, Lightroom, Illustrator, XD and so on), 100GB of cloud space, Adobe Portfolio, Adobe Spark and Adobe Fonts. The starting price is 60,99 € / month.
- All applications + Adobe Stock - like the previous one, plus 10 free Adobe Stock images per month. The price is 97,58 € / month.
For more information on the pricing and licensing available for Photoshop, you can take a look at the official Adobe website.
Having said that, I am happy to tell you that Adobe also offers the possibility to download and try Photoshop at no cost by activating a free license lasting one week, which you can deactivate at any time (without constraints or additional costs): just create a new Adobe ID, match a payment method and proceed with the download of the trial version of the program. I have explained everything to you in detail in my guide on how to download Photoshop for free.
How to create an animated GIF in Photoshop
Now it's time to take action and explain to you, in practice, how to create a GIF with Photoshop. For convenience, I recommend that you collect all the images that will have to be part of the animation in a single folder, so as to greatly simplify the upload option.
Import the images

To get started, then, start Photoshop, go to the menu File> Script (top left) and click on the option Upload files in batch: by doing so, the procedure will be started that allows you to load various images by automatically positioning them in separate layers of the project, without having to proceed manually.
If everything went well, the window that allows you to load the layers should open: if you followed my advice and grouped all the images in a single folder, set the drop-down menu Use su Folder, premium pulsating Shop by Department and, using the panel of Esplora File / Finder displayed on the screen, navigate to the folder that contains your images. Finally, select it with a click and press the button OK.
Finally, put the check mark next to the item Attempts to automatically align source images (unless the images were made specifically for the creation of the GIF: in this case, this option is superfluous) and click on the button OK, to proceed with the creation of the levels.
Create the timeline
The next step is to create the timeline that the GIF must follow, i.e. define the order (and duration) of the images contained in it. To do this, you need to activate the camera Timeline by going to the menu Window> Timeline, in high.
Then click on the tab Timeline that appears immediately below the open image, press the down arrow located next to the item Create video timeline, choose the option Create frame animation from the menu that is proposed to you and click on the button of the same name that appears on the screen, to display the window for editing the timeline.
At this point, you need to convert the previously imported layers into frames to use for the GIF: to obtain this result, click on the button ☰ located to the right of the Timeline tab and select the item Create frames from layers from the menu that is proposed to you. The bulk is practically done! If everything went well, you should in fact see as many frames appear as there are previously imported images.
Now, you just have to define the details of your animation: to change theorder some images, take them and drag them to the right or left; to change its duration, take action on the drop-down menu 0 sec. located under each preview. Finally, if you don't want the sequence to repeat itself with an infinite loop (a GIF that never stops) but you prefer the animation to stop after a certain number of times, click on the item Everlasting located at the bottom of the card Timeline and choose the option that best suits you from the menu that appears on the screen.
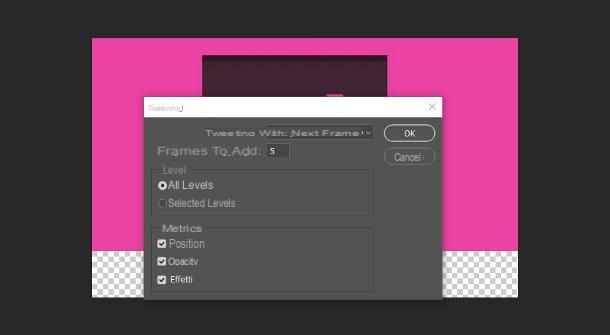
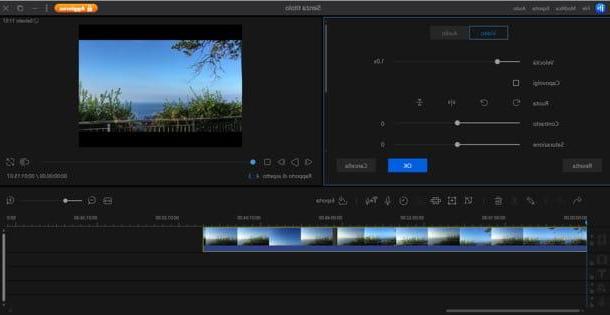
To check the result, use the control buttons (eg ► to start animation playback) located at the bottom. Should you notice a lack of fluidity between one image and another, you can try to stem the problem by using the feature Tweening Photoshop: it allows you to add semi-transparent frames generated automatically, in order to improve the transition between the images that make up the GIF.
To use it, click on the frame of your interest, then on the button Tweening located in the Timeline tab (the one in the shape of circular trace, third from the right), set the drop-down menu Tweening with on the option Next frame, indicates the number of frames to add automatically and press the button OK, to proceed. Repeat this on all frames that you find problematic.
When you are satisfied with your work, you can move on to the next step, that of exporting the newly created GIF.
Export the GIF
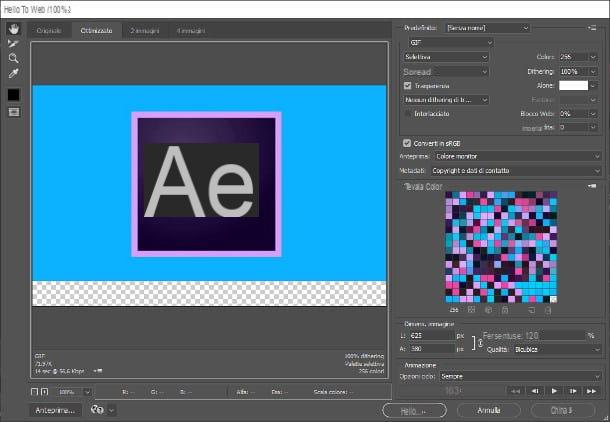
Once the definition of the animation is finished, you just have to save your work in GIF format: go to the menu Fillet (top left), move the mouse over the item Export e scegli l'opzione Save for Web (earlier version). Next, use the new window that opens on the screen to define the saving options: move the drop-down menu Size (placed immediately under the heading default) on the option GIF and, if you wish, adjust width e height of the image by intervening on the homonymous text fields located in the frame Dimens. image.
If you want to resize the GIF using a scale factor (eg. 50% to halve the size of the image), you can specify the percentage in the appropriate field of text.
Finally, make sure the box Convert to sRGB is checked, click on the button Save ... located at the bottom and use the File Explorer / Finder panel to choose where to save the image. Have you seen? Create a GIF with Photoshop it wasn't difficult at all!
How to make a GIF from a video with Photoshop
Do you want create an animated GIF from a video already existing? No problem: you can do it in a very simple way, using the appropriate functionality of Photoshop.
Before moving on, however, let me inform you about a fundamental detail: the higher the framerate of the video, the more frames that will make up the image. This means, in practice, that importing the file could take a long time and that, unless you manually delete some unnecessary frames, the GIF could really “weigh” many MB.
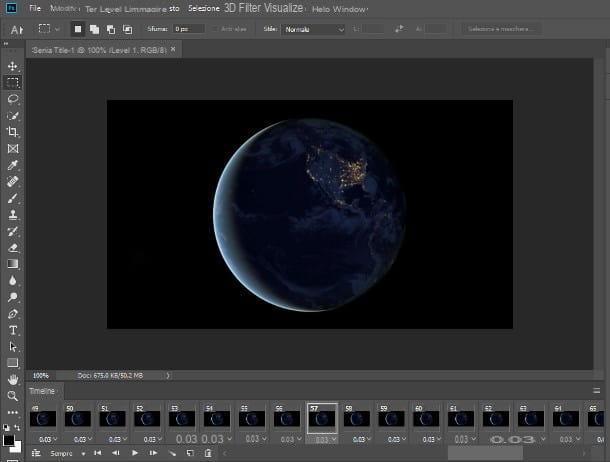
All clear? OK, so let's get started. First, open the menu Fillet Photoshop (top left), select the item Import> Video frames into layers and use the File Explorer / Finder panel to choose the video of your interest. Once this is done, specify whether to import the video from start to end, or select a custom range by ticking the box Selected range only and adjusting i start and end sliders which are located just below the video preview.
Finally, if you have a video with a framerate equal to or greater than 60fps, I advise you to restrict the number of imported frames, placing the check mark next to the item Only one each and specifying the number of frames to "skip": on a 60fps video, for example, you could only import one every 20 frames.
When you're done, put the check mark next to the item Create frame animation e premium pulsating OK to start importing the movie, which may take a few seconds. In case you should see a message about the high size / duration of the resulting animation, click on the button Cancel and increase the number of frames to skip, acting on the option I told you a little while ago.
At this point, if you want to customize the generated frames (change their duration, add tweening, move them and so on), you can change the Timeline tab as I explained earlier. If, on the other hand, you want to get an animation faithful to the video you started from, you can proceed directly with the export phase of the GIF by following the steps I illustrated a little while ago.
Other ways to create an animated GIF
Did you find the procedure to create animated GIFs with Photoshop very simple but you have no intention of paying to use the program, so would you like to experiment with other methods to obtain at least a similar result?
Then I think I have what you need: in my guides on how to animate images and how to create GIFs from videos, I have in fact provided you with a series of valid programs, apps and online services, many of which are completely free, useful for reaching the goal you have set for yourself. Trust me, it's worth it!
How to create a GIF with Photoshop