Program to record audio from PC for free
If you are looking for a program to record audio from PC for free, you can rely on the use of useful solutions, available for Windows, MacOS e Linux, which I have proceeded to include below. I am sure you will be able to find something that will satisfy you.
Voice Recorder (Windows 10)
Stai using Windows 10, I inform you that you can make use of Voice recorder, program to record audio from PC available "standard" on the latest operating system from Microsoft. As the name can easily guess, it is designed primarily to create voice recordings, but nothing prevents it from being used for anything else. It is completely free and is pre-installed on the OS (if removed or not present it can be downloaded from the relevant section of the Microsoft Store).
To be able to use it, click on the Start button (I cheer with the Microsoft flag) che trovi nella part in fund to sinistra della taskbar and select il collegamento relevant from the menu that appears.
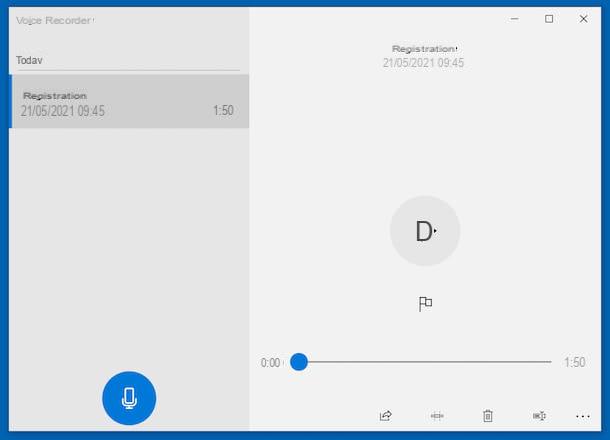
Now that you see the Voice Recorder screen on your desktop, press the button Yes to allow the voice recorder to access the microphone (if necessary), then click the button with the microphone which is in the center to start recording.
When you see fit, you can pause the recording by pressing the button Pause located at the bottom left (to restart it you will then have to click on the same button again). You can also decide to add a bookmark to mark a specific part of the audio file that you will be able to see when the recording is finished, by clicking on the button with the pennant.
To stop recording permanently, instead, click the button Stop. The resulting audio file will be saved automatically, in M4A format and in the location Documents> Recording Sounds Windows and you can play it through the main screen of Voice Recorder, by selecting it in the list on the left and pressing the button Play to the right.
If you deem it necessary, you can also cut the created recording by clicking on the button Size located at the bottom right. Also on the right side of the screen, I point out that there are also buttons to share, delete and rename the recording, while pressing the button (...) you can view the file path and adjust the microphone settings.
Voice Memos (macOS)
If you are looking for a Mac audio recording program, you consiglio di utilizzare Voice memos, the default macOS application for creating voice and audio recordings in general. It supports synchronization of recordings created via iCloud, is very easy to use, is completely free and comes pre-installed on your computer.
To be able to use it, click on theLaunchpad icon (Quella with i colored squares) present sulla Dock bar and select l 'Voice Memo icon (Quella with the black background and the audio track) that you find on the screen displayed.
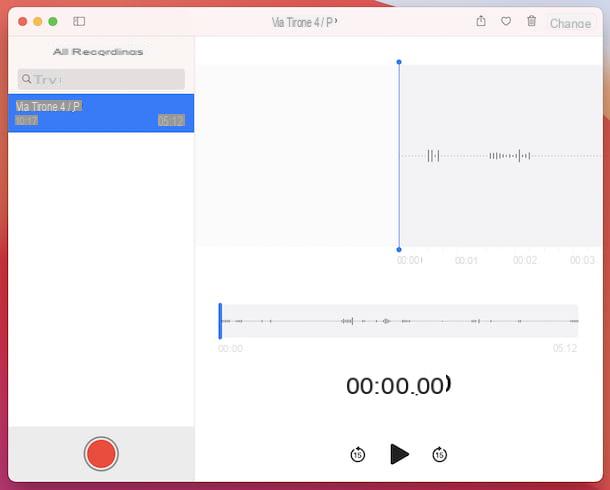
Now that you see the main window of Voice Memos, decide whether to enable the use of the location and the synchronization of your voice memos on iCloud, then start recording the audio file by clicking on the button with the red circle which is located at the bottom.
When you deem it necessary, you can momentarily pause the recording by clicking on the button with the two red fingers (to resume recording you will then have to click on the button Resume), while to stop it permanently and save it, press the button end. All created recordings are saved in M4A format and are visible in a list in the left part of the window.
To listen to a recording, select it and click the button Play located at the bottom right, to cut it or improve the sound click on the button instead Modification located at the top right. If you then wish to share a recording, click onshare icon (Quella with the square and the arrow) located at the top right, if you want to export it, drag it to the position of your interest, while if you want to delete it you have to press the button with the dustbin.
Audacity (Windows / macOS / Linux)
You ended up on this tutorial of mine because you searched for keywords on Google "Audacity audio recording program"? Well, you did well because the one in question is undoubtedly one of the best audio editors out there. It is, in fact, a software capable of combining an extremely intuitive user interface with a wide range of functions, effects and filters for processing recordings. It is multi-platform, therefore running on Windows, macOS and Linux, and is open source in nature. In addition, it is compatible with all major audio file formats and allows you to work with multiple audio tracks at the same time.
To download Audacity on your computer, go to its website and click on the button Audacity for Windows or on that Audacity for macOS, depending on the operating system you are running on your computer.
When the download is complete, if you are using Windows, april il .exe file obtained and, in the window you see appear on the desktop, click on the buttons Run, Yes, OK e NEXT (for four consecutive times). Finally, click on the button Install, still on that NEXT on your pulse end, in order to complete the setup and start the program.
It was used MacOSInstead, open the package .dmg just got it and drag theAudacity icon in the folder Applications on your Mac, then double-click on it and press the button apri, in order to overcome the restrictions imposed by Apple on the software of non-certified developers (an operation that must be carried out only at the first start).
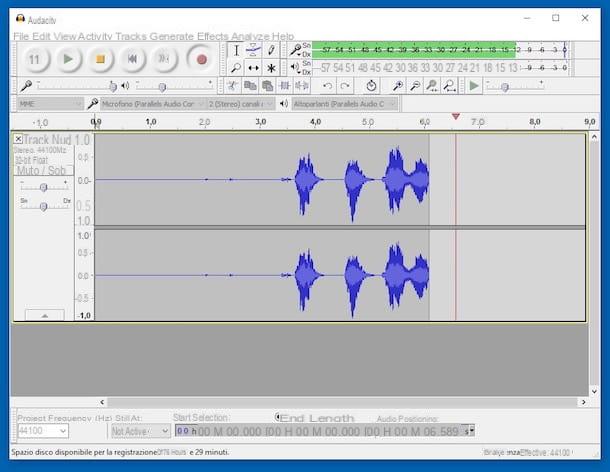
Now that the main window of the software is displayed on the screen, to start the audio recording click on the button REC (the one with the red circle) located at the top left. To choose the microphone with which to record, use the appropriate drop-down menu located at the top left (where it should be written Integrated microphone), while to change the volume of the recording use the adjacent adjustment bar.
When you see fit, you can pause the recording by clicking the button Pause (I cheer with him two fingers) which is always at the top, while to stop it permanently click on the button Stop (the one with the red square). If you want, then use the Effects available in the specific program menu to modify and / or refine what has just been recorded.
When you are satisfied with the result, select the item Export audio from the menu Fillet Audacity and choose the file format in which to save your recording from the window that opens, the output location and possibly also enter the metadata tags.
Note that if you want to enable exporting of recordings in MP3 format, you need to download and install the free plugin as well MP3 blades, proceeding as I explained to you in detail in my guide focused specifically on how to use Audacity.
Other programs to record audio from your PC for free
Haven't found a yet program to record audio able to satisfy you and, therefore, you would like me to report you other solutions useful for the purpose? No sooner said than done! You can find them in the list below.
- LMMS (Windows / macOS / Linux) - is an open source program dedicated to music production, but is also well suited for audio recordings in general. Moreover, compared to professional software of this kind it is very easy to use and - which is not bad at all - it is free. Note that it is multi-platform, so it can be used with Windows, macOS and Linux.
- WawePad (Windows / macOS) - this is a very good one program to record audio for free, thanks to which you can create and edit various recordings and audio files, applying sound effects and music samples to your work. Basically it is at no cost, but to unlock additional functions you need to purchase a user license (with prices starting from 60 $).
- GarageBand (macOS) - this is the free solution dedicated to audio editing distributed by Apple itself and pre-installed on most Macs (if the application has been removed or is not present, it can be downloaded from the Mac App Store). It is quite simple to use, even for novice users.
- 123Apps voice recorder (Online) - it's not a program to record audio from PC in the strict sense of the term, but it is an audio recorder that can be used directly online, from the browser window, without having to download and install anything on the computer. It doesn't offer advanced features, that's true, but it does allow you to adjust your microphone settings and automatically detect snippets of silence. It's perfect for voice recordings, but that's not all. Plus, it's totally free.
Program to record audio and video
What you are interested in doing is not only to record the audio, but also what is displayed on the computer screen or what is recorded by the webcam connected to it? In that case, you have to rely on a program to record audio and video, like those for Windows, MacOS e Linux that I have reported to you below.
OBS (Windows / macOS / Linux)
If you are looking for a program to record audio and video from your PC I recommend that you first rely on Open Broadcaster Software, otherwise known simply as OBS. It is a totally free and open source software, which can be used on Windows, macOS and Linux. Thanks to it it is possible to create recordings of what happens on the computer screen with audio, create combined recordings between desktop and webcam and also broadcast everything in live streaming (eg on Twitch).
To download the program to your PC, visit its website and click the button with the nome of the operating system in use on your computer.
Once the download is complete, if you are using Windows, april il .exe file obtained and, in the window that appears on the desktop, press the buttons Yes, Next (for two consecutive times) e install, then finish the setup by pressing the button Finish.
Stai using MacOSInstead, open the package .dmg ottenuto, trascina l 'OBS icon in the folder Applications computer, right-click on it and select the item apri from the context menu, then press the button apri in response to the warning that appears on the screen, in order to start the program, however, going around the restrictions desired by Apple against unauthorized developers (an operation that must be performed only at the first run).
Now that you see the main window of the software, to create a recording of your computer screen and / or webcam with audio without streaming everything, select the option Optimize for recordings only, I don't do direct that you find in the wizard configuration screen, then press the button NEXT (twice in a row) and on that Apply the settings.
Now, click on the button Settings located at the bottom right, select the item Exit from the sidebar and make sure that in the drop-down menu in correspondence with the wording Exit mode the option is selected Simple (otherwise you provide).
Then worry about indicating the folder in which to save the recordings by pressing the button Shop by Department that you find next to the field Registration path, make sure that in the drop-down menu Recording quality the option is set The same as the live one (otherwise always do it yourself) and choose the video format of the recording from the drop-down menu Registration form. Then save the changes made by clicking on the buttons Apply e OK.
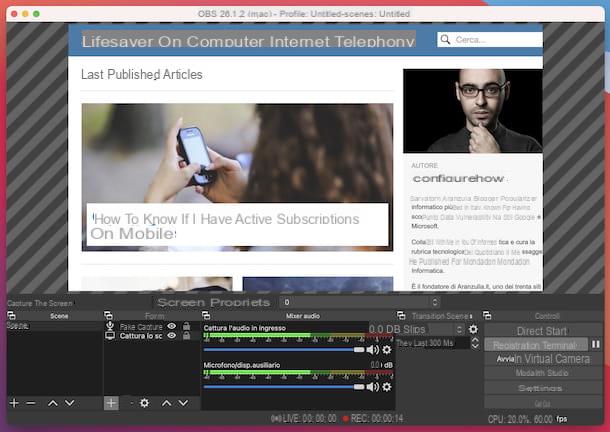
At this point, you need to worry about telling the program what sources it should use. So, click on the button capacitor positive (+) lead located in correspondence with the box References, choose the item Capture the screen from the menu that appears and click on the button OK (twice in a row), then move and / or resize the pane with the desktop in the OBS window, in order to frame the area of the screen that interests you.
If you want to add the webcam video stream to the recording as well, click the button again capacitor positive (+) lead that you always find in the box References and choose the item Video cattura device from the menu that opens. Subsequently, consent to the creation of the new source and click on OK in the panel dedicated to the settings that will open, in order to leave all the default settings (checking that the right webcam is selected in the appropriate drop-down menu). If you deem it necessary, then proceed to manually move the webcam frame to the point of the video you prefer.
To add audio to your recording, press the button once again capacitor positive (+) lead located in the box References and choose to add the incoming audio (i.e. the one coming from the microphone) and / or the outgoing audio (the one coming from the PC) to the recording, selecting the options Cattura l'audio in entrata e Cattura l'audio in uscita, then adjust the volume levels for the microphone and speaker using the box Audio mixer.
However, keep in mind that on macOS to record system audio it is necessary to resort to external solutions, as I explained to you in detail in my specific guide on how to record the Mac screen with internal audio.
Once you've successfully configured your use of OBS, there's nothing left to do but click the button Start recording located at the bottom right. When necessary, you can pause the "shooting" by pressing the button Pause (the one with the two lines), while to stop the recording completely, just click on the button Finish the registration. For more information, read my guide on OBS.
Other programs for recording audio and video

In the event that the program for recording audio with video that I have already proposed did not convince you in a particular way, you can consider resorting to the use of other solutions belonging to the category that I have included in the following list.
- Screencast-O-Matic (Windows / macOS) - this is an application available for both Windows and macOS that allows you to make free screen recordings, including webcam recording and microphone audio. Basically it is free, but the recordings can have a maximum duration of 15 minutes and a watermark is stamped on the videos obtained. To get around these limitations, you need to upgrade to the paid version (costs $ 1,65 / month).
- Camtasia Studio (Windows) - is a Windows-only program designed to film the computer screen in an elaborate way, adding real-time narrations, various effects, music and many other elements to it. It is paid (costs € 244,53), but can be tried for free for a period of 30 days. Read more here.
- Screenflow (macOS) - is a professional-style program that allows you to record your computer screen complete with audio and that provides users with many advanced tools for editing recordings. It is paid (it costs $ 129), but a free version is available that can be used without limits, which however affixes a watermark to the works created.
App to record audio

You don't have a computer close at hand, so you'd like me to suggest some app to record audio, so you can also act from your smartphone or tablet? I'll settle you immediately. In fact, below you will find listed some of the best solutions for Android e iOS / iPadOS.
- Triveous Voice Recorder (Android) - is one of the most popular apps to record voice and audio in general for Android devices. It allows you to create WAV, AAC and M4A files, increase the volume of recordings by up to 20 dB, and upload files to online services such as Dropbox and SoundCloud. Basically it is free, but offers in-app purchases (at a minimum cost of € 3,89) to unlock additional functions, such as functions to skip silences, cancel noise, echo and record via Bluetooth devices.
- ScreenCam Screen Recorder (Android) - specific app for Android devices that allows you to record everything visible on the screen of smartphones and tablets and that offers the possibility of including audio. By intervening on the settings, you can also define the resolution, the number of frames and the bitrate of the final movie. It's free, but offers in-app purchases (at a base cost of € 0,89) to support the developer's work.
- Easy Voice Recorder (Android) - is a simple, but very powerful audio recorder. It supports recording in three different modes: voice notes, meetings / lessons and raw music / sound and allows you to export the final result as a PCM, AAC or AMR file. It is free, but offers in-app purchases (with costs starting from € 1,29) to unlock extra functions such as recording via Bluetooth microphone, the ability to record in stereo mode and automatic skipping of silences.
- Voice memos (iOS / iPadOS) - is the version for iOS and iPadOS of the program developed by Apple to record audio files that I told you about in the passage at the beginning of the guide, the one present "standard" on Macs. It has the same functions as this one. last and it's free. Note that the app is also pre-installed on iPhone and iPad (if removed it can be downloaded again from the App Store).
- GarageBand (iOS / iPadOS) - is the variant for iPhone and iPad of the program to record audio specific for Mac that I reported to you in the passage at the beginning of the tutorial. It incorporates all the main features, including, of course, the ability to create audio recordings, but the controls are optimized for the touch screen. It's free.
- DU Recorder (iOS / iPadOS) - specific app for “bitten apple” devices, which allows you to film the screen by including both the audio of the running apps and the one that comes from the microphone. It's free, but offers in-app purchases (with costs starting from € 10,49 / month) to make direct on supported services.
For more details about the solutions that I have reported to you just now, and to find out what other solutions of this type you have from yours, I invite you to refer to my guides on how to record with your mobile phone and how to film the mobile screen.
Program to record audio