Programs for creating 3D images
You're looking for gods programs for creating 3D images? Very good: below you will find the best solutions in the category.
Blender (Windows / macOS / Linux)
If you are looking for a free but professional 3D drawing software, you cannot fail to try Blender: it is a useful program for creating three-dimensional models, modifying them and rendering. It is compatible with Windows, macOS and Linux and receives frequent updates.
To download it, visit its official website and click on the button Download Blender placed at the top. When the download is complete, if you are using Windows, start the .msi files obtained and, in the window that appears on the screen, click on the button Next. Then check the box next to the item I accept the terms in the License Agreementclick on your button Next two more times, press the button install and complete the setup by clicking on the buttons Yes e Finish. Next, launch the program by double clicking on the collegamento special that was added on desktop or call it back from Start menu.
Stai using MacOSInstead, open the package .dmg obtained and drag the Belnder's portfolio in the folder Applications Of computer. Afterwards, invoke Blender via the Launchpad, through Spotlight, through Crab or accessing the cartella Applications macOS and press the button apri, so as to run the program going to circumvent the limitations imposed on Apple towards applications from non-certified developers (an operation that must be carried out only at the first start)
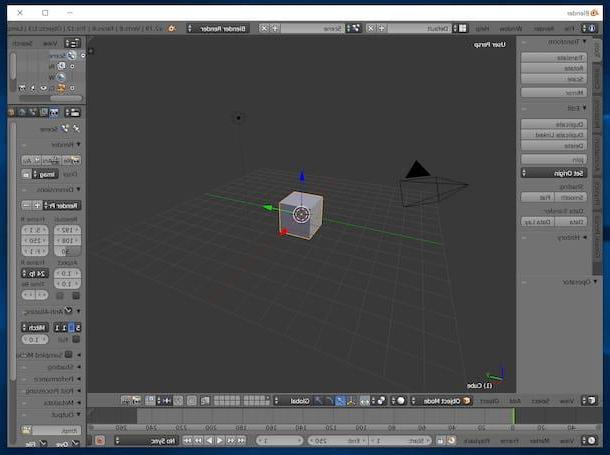
Once you have viewed the main screen of the software, begin to familiarize yourself with its interface, which is structured in different sections: on the right you will find the panel through which you can manage the scenes and the characteristics of the various objects, on the left there is the panel containing some of the main tools for making 3D drawings (in turn divided into various tabs), at the top is the functional menu, while at the bottom there are the commands to view and move the objects that are inserted in the project.
To insert your first solid, select the tab Create in the left panel, locate the figure of your interest and click on it. To change it, change the Blender display mode by selecting the item Edit give menu to tendin Object mode which is located at the bottom. Afterwards, deselect the object, click on the icon with the square and the dots which is found in the menu at the bottom and makes all the necessary changes.
When you want, you can save your project by clicking on the menu Fillet located at the top and selecting the item Save As from the latter. For more details, I refer you to reading my specific guide on how to use Blender.
SketchUp (Windows / macOS)
SketchUp is a famous software for 3D modeling, easy to use and very effective in graphic rendering. Yes it can be used on Windows and macOS and is available in various paid versions (with a base cost of $ 119 / year), however it is possible to request a free trial that works without limitations for 30 days. In addition, it is available in a totally free variant which however is more dated and generally not recommended.
To download the trial of the Pro version SketchUp (the basic one for professional use), go to the program website and click on the button Try it free for 30 days. Then specify, using the appropriate drop-down menu, the reason why you want to use the program and create your own Trimble account (essential to proceed with the download), by selecting the item Create an account.
At this point, fill out the form that is proposed to you with the requested data and confirm the newly created account by clicking on the relevant one link that was sent to you by email. Next, indicate on which one operating system you want to use SketchUp and click the button to start the download.
When the download is complete, if you are using Windows, april il .exe file ottenuto e, nella finestra che compare sul desktop, clic sui pulsanti Yes, Next (twice in a row), install e Finish. Then start SketchUp via the collegamento that has been added to the desktop or by recalling it from the Start menu.
Stai using MacOSapri invece il package .dmg obtained and move the software folder in the folder Applications macOS, then right click onSketchUp application icon contained within it and select the item apri for two consecutive times, so as to start the program, however, going around the limitations imposed by Apple on applications from non-certified developers (an operation that must be performed only at the first start). In the window that opens on the screen, check the box I accept the SketchUp agreement and click your bottone Continue.
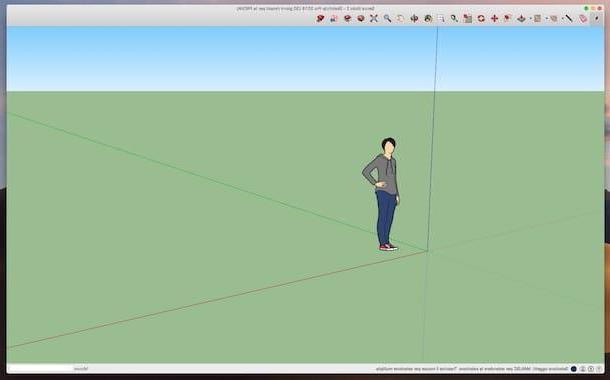
Once the main SketchUp screen is displayed, start drawing in 3D using the appropriate editor: in the center is the three-dimensional graph with a group of three axes, at the top you find the bar with the tools to create 3D models, while still further up there is the menu bar, through which to access further functions and tools.
After drawing lines and other one-dimensional elements on the chart, to turn them into 3D shapes, use the tool Push / pull (the icon with the base and the arrow) by clicking on the element of your interest and dragging the various parts while continuing to keep clicked.
When you see fit, you can save your creations by clicking on the menu Fillet located at the top left and selecting the item Save from the latter. To learn more about how the software works, I refer you to reading my article focused specifically on how to use SketchUp.
Programs for creating vector images
Let's move on to the programs for creating vector images. Below you will find the ones that, in my opinion, you would do well to put to the test. Have fun!
Inkscape (Windows / macOS / Linux)
The first of the programs for drawing vector images that I want to suggest you to try is Inkscape, one of the best known in the category. It's free, open source, easy to use, and runs on Windows, macOS, and Linux. It supports all major graphic file formats and complies with all popular web standards.
To download it, visit its website and, if you are using it, use Windows, click here operating system logo and on the link installer (msi) located under the heading Downloads for 32-bit Windows versions or the wording Downloads for 64-bit Windows versions, depending on the version of Windows you are using.
When the download is complete, open the .msi files obtained and, in the window that appears on the desktop, click on the button Next. Then select the item I accept the terms in the License Agreement and click on the buttons Next, Typical, install, Yes e Finish, but will conclude the setup.
Stai using MacOS, after going to the program website, first click on Apple logo and then on the link .dmg attached to the section Inkscape xx. Also download the component XQuartz (essential for Inkscape to work) by visiting this page and clicking the link XQuartz-xxxx.dmg.
When the download is complete, open the package .dmg which contains the XQuartz component, right click on the component executable and select the item apri from the context menu. In the window that then appears on the screen, click on the button Continue three times in a row and on the buttons Accept e Install. Therefore, type the Password of your user account on macOS and click on the buttons Install software, OK e Close, but I will complete the installation.
After installing XQuartz, proceed to install Inkscape. Then open the relative package .dmg and move thesoftware icon in the folder Applications of the Mac. Next, restart the Mac, start XQuartz again via the Launchpad, Crab, Spotlight or by going to the folder Applications, select the voice Pref Renze from the XQuartz menu located at the top on the left and modify its settings as follows: in the tab Entrance, verify that the items are selected Enable keyboard equivalents with X11 e Option keys send Alt_L and Alt_R and in the card Clipboard make sure the options are checked Enable synchronization e Update CLIPBOARD when notes change.
Once you have completed all the steps above, you are finally ready to start using Inkscape. So, if you are using Windows, start the program via its collegamento added to desktop or through the Start menu. If, on the other hand, you are using macOS, open the folder Applications, fai clic destro sull 'program icon and select the item apri from the menu that opens, in order to circumvent the restrictions applied by Apple to programs from non-certified developers (this is only necessary at the first start).
Now that you see the Inkscape window, use the tools located in the left bar to start drawing in the workspace (the one located in the center). To select colors, instead, use the palettes below. At the top, however, there are the settings related to the selected tools.
To save your vector images, then select the item Save eat from the menu Fillet And that's it. For more information, I refer you to reading my guide on how to vectorize an image.
Adobe Illustrator (Windows / macOS)
Impossible to talk about the creation of vector images without mentioning it too Illustration: it is, in fact, a renowned software from Adobe thanks to which it is possible to draw with a wide range of advanced tools, transform “standard” images into vector images and perform various other operations dedicated to this type of graphics. It is designed for professional use, but with a little practice it can also be used by the less experienced. It is compatible with Windows and macOS and is paid (costs 23,39 euros / month), however you can try it for free and without limitations for 7 days.
To download and install the program, access the Illustrator website and put into practice the instructions on what to do that I gave you in my specific tutorial on how to download Illustrator for free.
After completing the download and installation procedures of the program, you will find yourself in front of its main window, which is divided into various sections: on the left there is the toolbar with the various tools for drawing, while on the right there is a 'is the area through which you can manage the levels and properties of the elements added to the project.
When you deem it appropriate, you can save your creations using the appropriate item in the menu Fillet, located at the top left. For more details on using the software, I refer you to reading my guide on how to use Illustrator.
Programs for creating moving images
Looking for gods programs for creating moving images or, to better understand, GIFs? Then try the ones you find listed below: I'm sure they won't disappoint you.
OpenAviToGif (Windows)
Stai using a PC with your installato Windows and you are looking for a software that allows you to create moving images, I suggest you try OpenAviToGif. It is free, open source and allows you to turn AVI, MP4 and MOV videos to GIF. It is quite intuitive and, moreover, it does not require installation to be used.
You ask me how to make use of it? I'll tell you right away. First, linked to the program download page, select the tab Files and click on the item first win32 and then on that openAviToGif_x-x.7z.
When the download is complete, extract thearchive 7z you just got (if you don't know how to do it, read my guide on how to extract 7z files) and launch the .exe file contented to the internal suo.
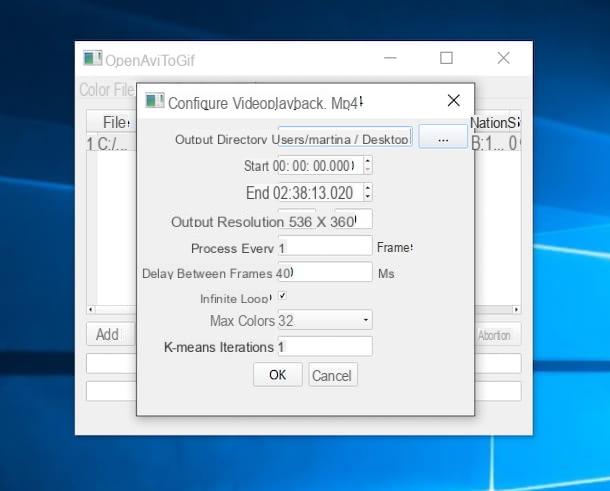
Nella finestra che si apre, click on your button Add, select the movie from which you want to get the animated GIF and double-click on its name that appears within the program.
Then proceed to adjust all the preferences related to the animation you want to obtain. To be precise, in the fields Home ed End you have to indicate the starting and ending points of the GIF, in that Output Resolution you have to set the resolution of the GIF and in that Delay between frames you must indicate the length of time that must elapse between the various frames.
Also, by leaving or unchecking the option Infinite loops you can enable or disable the infinite repetition of the animation, while from the drop-down menu Max colors you can select the number of colors from which the GIF should be composed.
Finally, click on the buttons OK e Convert and wait for your GIF to be generated. When finished, the image will be saved in the same location as the original movie. It was easy, wasn't it?
VideoGIF Free (macOS)
Se, invece, stai using MacOS, I recommend you to use VideoGIF Free: it is a free application with simple and immediate operation that allows you to import movies or record video streams with the webcam to be used later for the creation of animated GIFs. Eventually it is also available in a paid variant (costs 5,49 euros), which allows you to add texts, stickers, etc. to the GIFs you create.
To download and install VideoGIF Free, visit the relevant page of the Mac App Store, click on the button See in the Mac App Store and, in the window that appears on the desktop, click on the button Ottieni / Installa. If prompted, authorize the download by entering the Password of your Apple ID or using the touch ID (il il tuo Mac has this component).
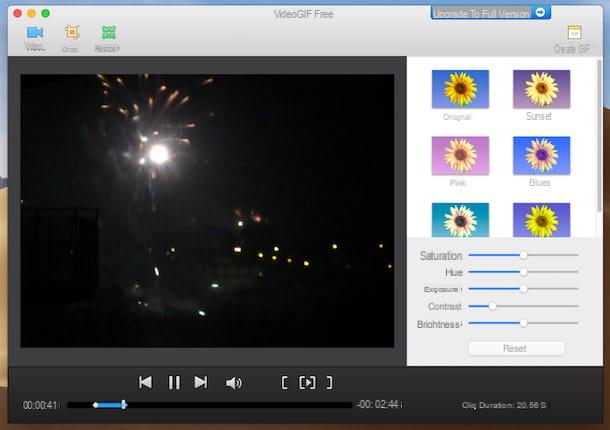
Afterwards, start the application by invoking it from the Launchpad, from Spotlight, Crab or dalla cartella Applications, and click the button Add Video (to select the video you want to transform into GIF) or press the button Webcam (to record a movie with the Mac webcam and use it to create your animated image).
After making your choice, wait for the video to be processed by the program and if you see a warning about resizing, you can agree to it by clicking on the button Reduce Size, to make your GIF take the right format. Then choose the portion of the movie you want to use for the GIF by moving the indicators on the timeline at the bottom.
Subsequently, if you want, select a filter to apply to the final GIF from those on the right, adjust the settings relating to saturation, exposure, contrast, brightness and brightness using the appropriate bars (always located on the right) and start the creation of the animated image by clicking the button Create GIF which is located at the top (always on the right).
Finally, define the settings related to the frames, click on the button Save and indicates the output location. It was easy, wasn't it?
Programs to create images with writings
If you need to add phrases on your photos, you can appeal to programs to create images with writings which you find listed below. They are all very easy to use.
Paint (Windows)
If you are using a PC Windows, you can add lettering to images using the classic Paint, which is free and comes pre-installed on any version of Microsoft's operating system. I think it needs no introduction: it allows you to make drawings and modifications based on images and it is very easy to use.
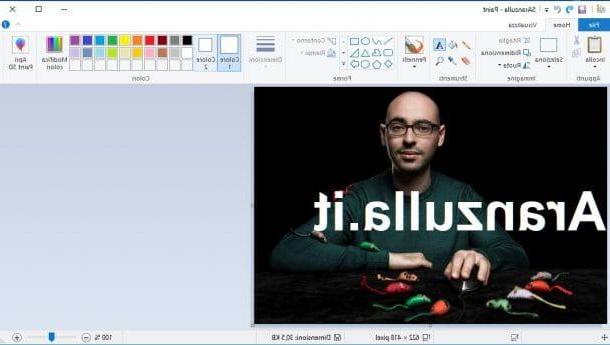
To use it, start it by searching for it in the Start menu and clicking on the relative icon. Once the program window is displayed, open the image on which you want to add the writing, by clicking on the menu Fillet which is located at the top left and then on the item apri.
Once you have imported the image of your interest, click on the symbol (A) placed on the toolbar, at the top, click on the point in the image where you want to insert the message and type the text you want in the appropriate field that appears on the screen.
If you want to change the color of the text, the font, the size of the characters, etc., select the text you just typed and use the drop-down menus that you find inside the menu Text.
To conclude and then to save the edited image, click on the menu Fillet (top left) and select the item Save da quest'ultimo.
Preview (macOS)
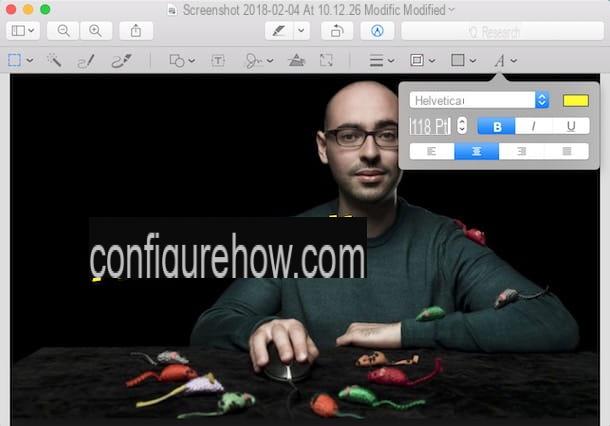
Stai using MacOS? So, to create images with writings, you can rely on Preview- This is the default application for Apple-branded computers to view and edit graphic files and PDF documents.
To use it for your purpose, double-click on the image on which you want to add the writing, in order to open it directly with Preview. If by chance you have changed some macOS settings and Preview is no longer the default image reader, click with the right mouse button on the image, then select the item Open with from the menu that is shown to you and select Preview.
In the Preview window that is shown to you at this point, click on the button with the pencil present on the toolbar, at the top, and click on the symbol (T) present in the toolbar that appears on the screen. In the text box displayed, then type the message of your interest.
If you want to change the font, size or color of the character, click on the symbol (A) located at the top right and make all the necessary changes through the menu that is shown to you.
Once you have finished making changes to the image, click on the option Save present in the menu Fillet (top left) to save everything.
Programs to create custom images
Are you looking for generic software for creating images? Then take a look at the programs to create custom images that you find indicated in the following steps. You will certainly find something that will satisfy you.
GIMP (Windows / macOS / Linux)
Have you ever heard of GIMP? No? Well, we need to fix it now! It is a renowned free and open source program for Windows, macOS and Linux, thanks to which you can easily improve the appearance of digital photos, apply special effects to images, distort them, resize them, rotate them and perform various other operations. In short, the best free alternative to Photoshop.
To download it to your computer, visit the program's website, click the button Download x.xx.x e poi quello Download GIMP x.xx.x directly present in the new page that is loaded.
When the download is complete, if you are using Windows, open the .exe file obtained and press on the buttons Yes, OK, Install e end, but will conclude the setup.
Stai using MacOSInstead, open the package .dmg ottenuto e trascina l 'program icon in the folder Applications Of computer. Afterward, right click on it and select the item apri from the menu that appears, in order to start the software, however, going around the limitations imposed by Apple on applications from non-certified developers (an operation that must be carried out only at the first start).
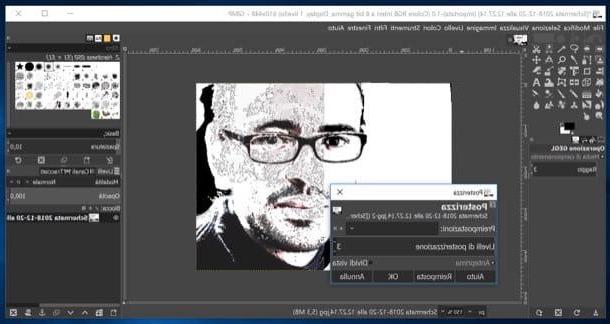
Now that you see the main GIMP window, start having fun creating your own image, taking advantage of the tools and functions available. To be precise, on the left you will find the toolbar that contains all the tools necessary to edit the images, in the center is the work area, while on the right you will find the bar with the advanced commands for managing the layers, displaying the history of changes etc.
To open an existing image, click on the menu Fillet in alto a sinistra and selects the voice apri from the latter. Instead, to save your creation or changes made to a pre-existing image, you need to select the item Save eat from the same menu.
For more details about how the software works, I refer you to reading my specific guide on how to use GIMP.
Photoshop (Windows / macOS)
Photoshop is the most renowned Adobe software, as well as the most widespread and appreciated as regards professional photo editing and the creation of various types of images. It is available for Windows and macOS and can be used upon subscription to a plan Creative Cloud for a fee (starting from 12,19 euros / month). However, it is possible to download the trial of the product, which works without limitations for 7 days.
To download Photoshop on your computer, go to the program's website and put into practice the instructions I gave you in my guide on how to download Photoshop.
After completing the software download and installation procedure, you will find yourself in front of its main window, which is divided into several sections: on the left you will find the toolbar with all the brushes and tools needed to draw , color and edit the photos, in the center there is the work area, while on the right there is a panel from which you can manage the layers that make up the images. At the top, however, there are menus to open and save photos, apply special effects to them and so on.
When you want, you can save the images created and / or modified by clicking on the appropriate item in the menu Fillet, top left. For further information on how the program works, I suggest reading my tutorial dedicated specifically to how to use Photoshop.
Programs for creating images online
You don't want or can't download new software on your computer and would like me to suggest you some programs to create images online? You are satisfied! Find them right below.
Photopea
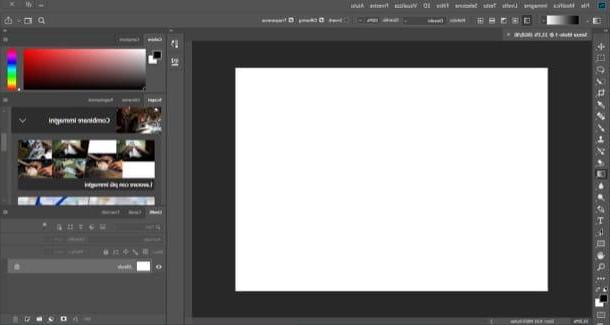
Photopea is one of the best online photo editors. It stands out for its user interface, chock full of tools and well organized, in the style of Photoshop. Furthermore, it is totally free (but eventually it is possible to remove the advertising by switching to the Premium version, with costs starting from 9 dollars / month) and to work it does not require the installation of any additional plugin, as it is made in HTML 5.
To start using Photopea, connected to its home page, click on [X] to remove the service welcome window and, if necessary, translate its interface into your language by clicking on the item More at the top and selecting the items Language e cityno give the menu check if you press.
At this point, click on the menu Fillet collocato in alto a sinistra and selects the voice New (if you want to create a new image from scratch or from pre-set templates) or that apri (to open an image already saved on your computer that you intend to modify) from the menu that opens.
Next, use the tools located in the toolbar on the left to add shapes, draw, insert shades, etc. On the right, however, you will find the panels with the levels and the history of the operations carried out, while at the top there is the menu bar with further commands and functions useful for creating and editing images.
When the creation is complete, select the item Exposed as from the menu Fillet (top left), select the output format you prefer and click the button Save, in order to download the image to your computer.
DeviantArt wall
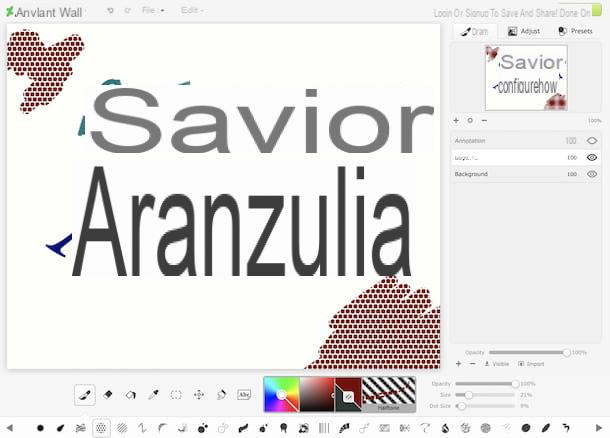
DeviantArt wall is another online service created in HTML5, working with any browser and operating system, without having to download and install additional plugins, thanks to which it is possible to draw and create images using the many tools made available. It is totally free and is made available by DevianArt, the famous online community of artists.
To use it, go to the DeviantArt wall home page and start creating your image, drawing it on the sheet in the center, using the many tools on the bar at the bottom. For some tools, after selection, an additional menu is available through which to make other customizations. Also at the bottom you will also find the selectors for the colors and motifs to use.
On the right, however, there is the card Draw to view and manage levels, that Adjust to make various adjustments to the image and that Presets to set the various presets available.
If you then want to make changes to an image that already exists on your computer, click on the menu Fillet which is located at the top and select it from there by clicking on the wording Open Files.
When you want, you can save your creations by clicking on the menu Fillet, choosing the voice Save File As and by registering a free account on the site by filling in the proposed form with the requested data.
App to create images
And on smartphones and tablets? Which are the best app to create images? The answer is soon given: all those you find indicated in the following list. Have fun!
- 3DC.io (Android / iOS) - quick and easy application to create 3D images. It's free, but offers in-app purchases (starting at € 1,19) to unlock extra content.
- GnaCAD (Android / iOS) - another 3D drawing app that includes some CAD oriented features. It's free, but offers in-app purchases (starting at € 1,09) to add additional features.
- Adobe Cool (iOS / iPadOS) - this is an Adobe app that allows you to try your hand at vector graphics on mobile in a fairly simple and intuitive way. It's free (with € 10,99 in-app purchases to unlock all features).
- GIF Me! Room (Android / iOS) - application thanks to which it is possible to create personalized GIF images using photos and videos, both already present in the gallery and to be taken / recorded at the moment. It's free, but on iOS it offers in-app purchases (at a cost of € 2,29) to unlock additional features.
- GIPHY CAME (Android / iOS) - app offered by GIPHY, a very famous site for creating animated GIFs and sharing, which provides the user with stickers, frames, filters, etc. to create totally customized GIFs. It's free.
- Photor (Android / iOS) - very popular app that allows you to add all sorts of writings to images as well as make endless customizations to photos. It's free, but offers in-app purchases (starting at $ 1,09) to unlock additional content.
- canva (Android / iOS) - application that offers numerous solutions to create images with writings but also many filters, effects, tools and templates to choose from. It's free, but offers in-app purchases (starting at $ 1,09) to unlock extra content.
- Infinite painter (Android / iOS) - app to freely try your hand at creating images and drawing that offers over 80 brushes and numerous tools useful for the purpose. It's free, but the extra features must be unlocked via in-app purchases (starting at € 1,99).
- Procreate (iOS) - great app for creating illustrations, drawing and painting with many tools and functions. It is only for iOS and costs 10,99 euros.