How to create a Google Drive document
Have you ever heard of Google Drive? No? No problem, I'll explain immediately what it is. Google Drive is a storage service in cloud accessible from both browser and mobile app, which also includes a free work suite to create text documents, spreadsheets, presentations, surveys and more with many collaborative functions in real time.
The files that you save on this platform will be stored on remote servers and you can therefore access your documents at any time and from any device that has access to the Internet, simply by logging into your Google account).
The files you create and upload to Google Drive can be shared in a simple way: the system, in fact, can assign each of them a link. Therefore, it will be enough for you to share the link in question to allow other people to access the files of your interest. Of course, you will first need to provide the appropriate permissions to make this possible: for more information on this, go to the last chapter of the guide.
Google Drive is an ideal solution even if you need to share large files. Each account has access to 15 GB free storage space; this threshold can be increased up to as low as 1,99 € per month for 100 GB and up to 2 TB a 9,99 € per month; other solutions and subscription plans are also available. For all the details, I refer you to my guide on Google One, the cloud storage service that also includes Drive.
Google Drive is accessible from any browser, but there is also an official client for Windows, macOS and Linux that allows you to synchronize files on your cloud space (I told you about it in more detail here). Plus, it's available as a device app Android e iOS / iPadOS (to install the latter you just need to visit the links I have just provided you from your device, press the button Ottieni / Installa and verify yours identity, if requested).
From both the browser version of the platform and the app, you will have the option to create documents of various types, which will be automatically archived on Google Drive, ready to be shared and accept changes in real time by other users authorized by you.
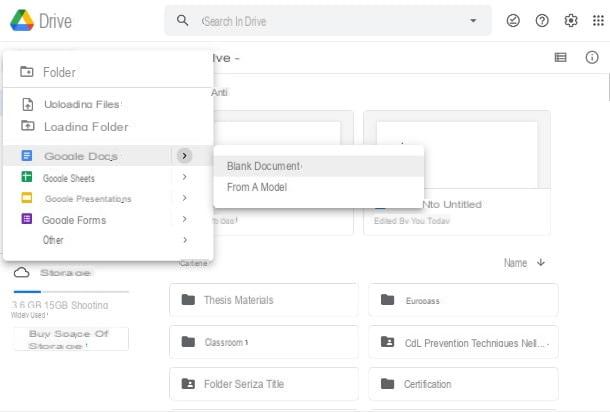
To proceed from the browser, once you have logged into Drive with your Google account, press the button New at the top left. Next, choose the document you are interested in from the list (Google documents, Google Sheets, Google Forms and so on) and finally click on the item Blank document.
If, on the other hand, you want to act from Whatsapp, once you have started the latter, tap the button + located at the bottom right and then press on name the type of file you want to create; for some of them, you will be deferred to specific applications to work on Documents (Android / iOS / iPadOS), Sheets (Android / iOS / iPadOS) e Presentations (Android / iOS / iPadOS).
Below you will find explained in more detail how to act on every single type of document available in Google Drive.
How to create a Google Docs document

Are you going to create a text document, maybe collaborative? Then you need to turn to Google documents: the convenient and functional word processor that offers the possibility to create, modify and format with various writing styles (similar to what is possible with Microsoft Word documents. It also allows you to open and edit existing Word files and share documents in various formats that are automatically saved to other people Google Drive.
First, connect to the main page of Google Docs and, if necessary, log in with your Google account by typing theemail address relating to it and the Password (look here if you don't remember it). Once this is done, you will have direct access to the computer interface. To type text, just click on the empty page and start composing text with the keyboard.
At the top you will find the toolbar with all the text formatting tools. Further up you will find the menus with all the main functions of the service. For example, by going to the menu Modification you can undo and redo the last operation performed; while clicking on the item Inserisci you can insert in the text, drawings, images, tables, graphics and special characters.
Going, then, on Format> Text you have the possibility to change the formatting of the text (put it in bold, underline it, cross it and so on; to change the preset font, press on the item Arial, at the top, and choose the one you think most appropriate from the menu).
How do you say? You are wondering how to create an index on google docs? I'll settle you immediately. First of all, it emphasizes the title of the chapter you want to insert in the index by holding down the left button mouse on the first letter and moving to the right, then go up Format> Paragraph Style> Heading 1 (if it is a sub-chapter click on Header 2).
Finally, go to the page where you want to insert the index, click on an empty spot and then go to Insert> Summary and choose the type of index you prefer from the menu (with page numbers or titles in blue) and that's it. The index will be immediately displayed on the page where you entered it and in the left area of the work page (to update it from time to time just click on it and then press the icon of the circular arrow at the top left). All changes to the document will be saved automatically and therefore there is no manual save function.
If you want to download a copy of the file on your PC, you can do it by clicking on the entry Fillet placed at the top left and then on the item Download. You can choose from various output formats, such as PDF, DOCX and ePub.
If you prefer to proceed from a smartphone or tablet, you will need to install theGoogle Docs app available on Android and iOS / iPadOS. Once you have accessed the app, to create a new document, click on the button + located at the bottom right and, from here, tap on the item New document.
You can then start typing some text on the blank page and change its formatting by clicking on the appropriate buttons at the bottom of the page (or on the button "TO", top right). If you want to insert a link, image or table, tap on the icon + at the top right.
To undo or redo the text changes, press the buttons arrows that you find at the top left. For other functions (setting the spell check, the print layout, the page structure and so on) tap on the icon ⁝ at the top right. Do you want to know more about this app? Then check out my document applications tutorial.
How to create a Google Forms document
Google Forms, the handy Web application of the Mountain View giant, is the right solution for you if you want to immediately create quizzes, surveys and multiple choice questionnaires to share with other people. To use this application you will also need a Google account (and any navigation browser).
At the time of writing, there is no specific application for mobile devices; in any case, the instructions I will give you are also valid for the latter (the operation of the mobile browser variant of this application is almost completely similar to that of the computer counterpart, the only difference is that there are no preset models).
To start, open the form creation page and, if you have not done so previously, log in with your account by typing theemail address and Password related to it.
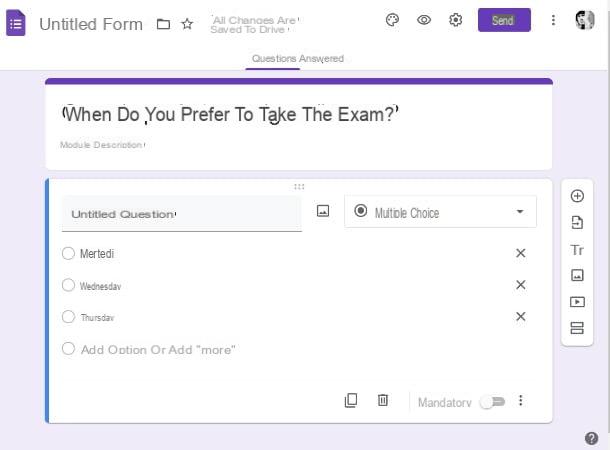
Next, click on the entry Empty at the top left (the one with the icon +) or, if you prefer, you can also select one of the preset templates (Contact Information, Party invitation, Registration for the event and so on) by clicking on the respective previews. By typing some text in the field Untitled module located at the top, you can assign a title to the module you are creating.
By pressing, instead, on the item Multiple choice on the right you can set the type of survey by choosing from those proposed to you in the list (Short answer, Check boxes, Linear scale: do several tests to find the one that best suits your needs). Typing some text in the fields below you can enter the various questions and choice options, depending on the questionnaire you intend to create.
If you want to insert a new question, click on the icon + at the top of the right column of buttons; you can also add videos, images and new sections to the questionnaire by clicking on the appropriate ones buttons located in the same column (if you use the smartphone or tablet version of the service, you will find these buttons arranged at the bottom). Pressing onswitch next to the item Obligatory placed below you can make the answer to the questions mandatory for the people to whom you will send the survey.
To submit the survey, click the button Send located at the top right (from mobile device press the icon of triangle at the top right) and choose the sharing option that suits you best (via e-mail o link). Once sent, you can view the answers by accessing the form again (you will find it in the list as soon as you log in to Google Forms as I indicated above) and clicking on the item Risposte located at the top right, in the form itself.
For more specific information on this service and also to know how to create a form directly on the Classroom platform, read my tutorial on how to use Google Forms.
How to create a Google Sheets document
How do you say? Do you need to submit a report based on some data and are you wondering how to collect them in an orderly way? In this case you can use the web application Google Sheets. It is a tool that gives you the ability to create and edit spreadsheets (quite similar to Microsoft Excel with which, among other things, the application is compatible; which means you can open and edit Excel files with Google Sheets) and share them with your contacts.
Below I will show you how to create a document with this service first from a computer and then from mobile devices. From your computer, first of all open the main page of the web application and, if necessary, log in with yours Google account by entering theemail address and then the Password account.
At this point, to create a new worksheet, click on the item Empty placed at the top left or, alternatively, choose one of the preset models that are proposed to you at the top (To-do list, Annual budget, Monthly budget and so on). Now that you have the spreadsheet in front of you, you can start filling in the various cells that it is divided into.
Above you will find the main ones items from the menu, further down the toolbar for formatting cells and values. By pressing on the buttons arrows placed at the top left you can undo or redo the last operation performed, while clicking on the item Modification, at the top, you can delete cells, rows or columns by clicking on the appropriate ones items in the menu.
Pressing on the item InserisciAt the top, you can add images, graphics, drawings and new columns, rows and cells. By clicking on the item Worksheet with no name and by typing some text, you can give the document a name. By clicking on the appropriate buttons placed under the items I have just mentioned you can change the formatting of the text you enter from time to time in the cells (font, font size, bold, italic and so on). Finally, to create a new worksheet within the same document, just click on the icon + placed in the lower left corner.
Again, all the changes you make to the document will be automatically saved by the system and for this reason there is no specific option for manual saving. To download the document locally, instead, click on the item Fillet (top left) and then on the item Download. You will be able to get a document in PDF, XLSX, ODS and other formats.
If you are going to use Google Sheets from smartphone o tablet you will necessarily have to download the relative Whatsapp from Play Store or App Store.
Once you have started the app and logged into it, press the button + located at the bottom right and then tap on the item New worksheet (or on the voice Choose a model, if you want to use a preset scheme). The app interface is similar to that of its computer counterpart. To start filling in the cells, just tap on each of them. In this way, the text formatting tools will also be displayed (to display them press the icon "TO" at the top right).
To undo or redo the last operation performed, tap on the icons of arrows that you find at the top left; if you want to insert an image, a link or a comment, click on the icon + at the top right. To add a new spreadsheet within the same document, press the icon instead + placed at the bottom right; for other menu items (Find and replace, Explore, Data validation) tap on the ⁝ icon at the top right.
How do you say? Want to know how to add a graphic? In this case I recommend this tutorial of mine dedicated entirely to the topic.
How to create other Google Docs
The ones I've told you about so far are just some of the features that Google makes available in Drive. You must know, in fact, that the service in question also offers the possibility of creating presentations (similar to what you can make with Microsoft PowerPoint).
The service in question is called Google Slides and is accessible through browser (just connect to the main page and, if necessary, log in with yours Google account) or through Whatsapp for Android and iOS / iPadOS mobile devices. With this application you can not only create or edit presentations but also do it together (in a shared way) with your other contacts by sending a specific link or email.
In addition, the app is also compatible with the aforementioned Power point and, therefore, you will be able to open, view and edit presentations also created with this program. For specific details on using this useful platform, I refer you to my tutorial on how to make presentations.
If your intent is, rather, to create freehand notes, perhaps to make a sketch and intuitively represent an idea you have in mind with stickers and images and then share them with your contacts, you can safely use the online application Jamboard accessible via browser and also available on Android and iOS / iPadOS.
How do you say? You want to know if there is also any solution to create images and be able to download them in various formats (PNG, JPG and so on)? Of course yes! Just use Google drawings, the browser application that you can access by clicking here. Even with this practical tool you can share your creations with your contacts in a simple and immediate way. Finally, you are a programmer and need to create one script for the development of simple tools or basic administration operations you can use Google Apps Script.
How to create a shared Google doc
Now that I've shown you how to create a google doc, if you agree, I would also go on to provide you with some simple directions for the sharing of documents created with “Big G” platforms. Again, I'll show you how this option works first on the browser version for computers and then from the mobile apps.
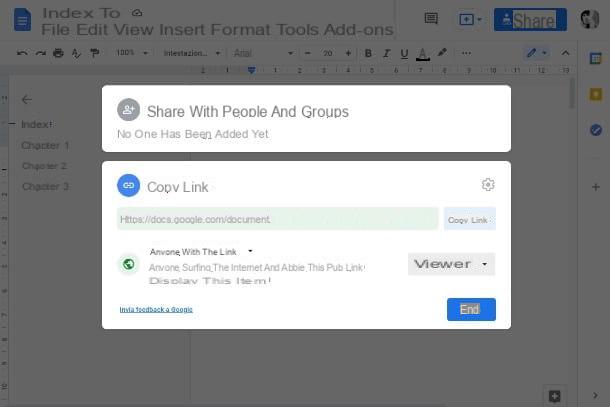
I'll tell you right away that sharing is very simple and works in a similar way regardless of the document you intend to share. Then click on the button Share located at the top right of the Google service you are using and, if you want to share the file with a contact saved on your Google account (for example one with whom you have exchanged at least an email on Gmail), type the name of your Google account (in most cases this corresponds to the email address of gmail) in the field Add people and groups. Once this is done, press the button Editor on the right and choose a role for who will interact with the document (Editor, to also allow him to modify the document; Viewer, to allow it only to view the file, or Commentator, to allow only viewing and adding comments). Finally, click on the button Send, simpler than that ?!
How do you say? Do you want to share the file with a link? Nothing could be easier: on the last screen I mentioned, tap on the item Change to anyone who has the link placed at the bottom. Next, hit the button Viewer located on the right and choose in which role you want others to interact with the file (Viewer, Commentator, Editor). Finally, click on the button Copy link located on the right and paste the same link where you prefer, that's all!
If you want to share a file from Google Drive, once you have logged into the platform, click on the right key mouse onpreview of the document you see in the list of those present and, from here, select the item Share from the menu that opens and follow the instructions I gave you in the previous paragraph (if you want to share the file as a link, click on Share> Change> Restricted> Anyone with the link; for more details about it check out my guide on how to share files with Google Drive).
You intend to share from the Google doc creation apps for mobile devices? Great, in this case, once you have the spreadsheet screen in front of you (no matter which Google app you are using), hit thelittle man with the symbol + that you find at the top right. From here, type the name dell 'Google account of the person you want to share the document with in the entry field Add people or groups.
Next, tap on the item Editor appeared below and choose a role from the menu for the person who will view the document (Editor, Commentator, Viewer) and, from here, click on the icon blue triangle bottom right.
Do you want to share the file via link? Press the icon againlittle man with the symbol + and, from here, go up Unshared> Limited> Anyone with the link, then choose a role by clicking on the item Viewer and finally, tap on the icon of pin for notes at the top right and paste the link where you prefer. Convenient, don't you think? For all the other details on these procedures check the guide on Google Drive that I linked to you above.
Google Formsfinally, the procedure is the one I mentioned at the end of one of the previous chapters of this tutorial.
How to create a Google Doc