How to create labels with Word
Be vuoi scoprire how to create labels with Word, follow the instructions below, valid not only for the classic desktop version of Word for Windows and macOS, But also for Get online and for the 'app in Word for smartphones and tablets.
How to create labels with Word from a computer
If you are using the classic desktop version of Word on your Windows computer or on your Mac and you want to create sheets full of identical labels (i.e. the same label repeated several times on the same sheet), the first step you need to take is to start the famous Microsoft word processing program , by clicking on Start button and then on the relative collegamento present in the menu that opens (on Windows) or by accessing the Launchpad and selecting the relative icon (your macOS).
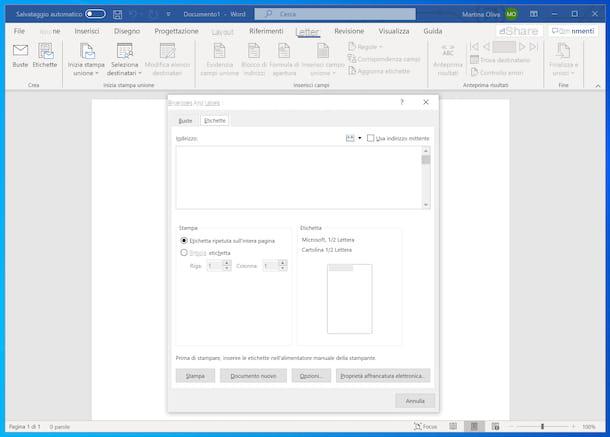
Now that you see the main screen of the software, create a new document by clicking on the entry New present in the side menu and then choose the option Blank document that you find on the right. At this point, to create labels with Word, select the tab Letters located at the top right and click on the button labels.
In the additional window that appears, select the tab labels and click on the button options, to choose the type of labels to be printed from the list of those available in the program.
So, use the drop-down menu Label Provider / Labels, to select the brand of the labels, and of the section Label information on the right, to view all the information on the number of labels per sheet and their dimensions. Also specify whether you are using a page printer or a continuous feed printer by choosing the correct option from the section Printer Information / Printer Type.
If none of the templates proposed by Word seem to meet your needs, click on the button Details located at the bottom left and create custom labels by adjusting all parameters relating to margins, height, page size, etc.
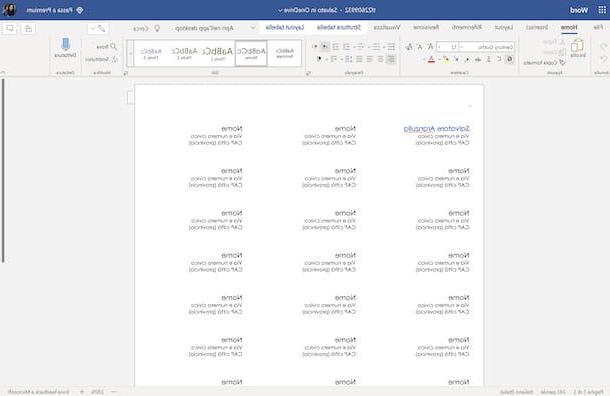
At this point, click on your button OK to confirm your choice and, once back in the main window for creating labels, type the text you want to print in each of them in the field Address / recipient address.
Finally, make sure the option is selected Repeated label on the whole page present at the bottom and press the button Print, to start printing the labels.
How to create labels with Word Online
If you want, you can also create labels with Word Online, the Web version of the famous Microsoft application, which works for free and directly from the browser from any operating system. In that case, however, know that no dedicated functionality is available but you have to use the appropriate ones models which go then converted in the format supported by Word Online (in order to allow document editing): an operation that is not always 100% successful.
Having made the necessary clarifications above, the first step you must take to succeed in your intent is to find the model for the labels you intend to use. To do this, start the browser you usually use on your PC (eg Chrome), visit the page of the Office site with the label templates for Word, locate the template you prefer among the many available, click on its preview and, if it convinces you, go ahead with its download by pressing the button Download.
Once the download is complete, convert the file DOTX obtained in the format DOCX / DOC supported by Word Online (so you have to convert the template into a common Word document): you can do this using any of the tools I pointed out to you in my online converter tutorial.
After conversion, go to the Word Online home page and log into your Microsoft account (if necessary). Once logged in, click on the link Load and open and select the DOCX file related to the template for the labels obtained after the conversion.
Now that you see the Word editor with the template, edit the sample texts of the labels, selecting them and typing what you see fit into them. For formatting and for editing or adding any graphic elements, you can rely on the buttons and menus that you find on the toolbar, at the top.
If you are interested in making labels that are all the same, you just need to make a simple copy and paste, as I explained to you in detail in my specific guide on the subject, while to quickly modify individual textual elements you can use the command Find and replace, which I described to you in depth in my post on how to search for a word in Word.
Once you've finished editing, go ahead and print the labels from your computer by clicking on the menu Fillet located at the top left, by selecting the item Print from the latter and choosing the option Print from the additional menu that appears. If instead of printing the labels directly, you want to save them as a Word file on your PC, click on the menu Fillet, top left, and select the items Save> Download a copy da quest'ultimo.
How to create labels with Word from smartphones and tablets
Let us now how to create labels with Word from smartphones and tablets, using theWord's official app available for Android and iOS / iPadOS, which can be used for free on devices up to 10.1 ″ (otherwise a subscription to the Microsoft 365 service is required, starting from 7 euros / month).
Also in this case, keep in mind that there is no dedicated function for creating labels, so you must use the appropriate models, just as I explained to you in the chapter dedicated to Word Online (taking care, however, to save the template on your mobile device or on one of the cloud storage services supported by the Word app, such as OneDrive or Dropbox).
After completing the above steps, launch the Word app on your device, open the template for the labels you have chosen (by selecting the folder located in the lower right part of the app screen, the location where you previously chose to save the file and then choosing the document itself).
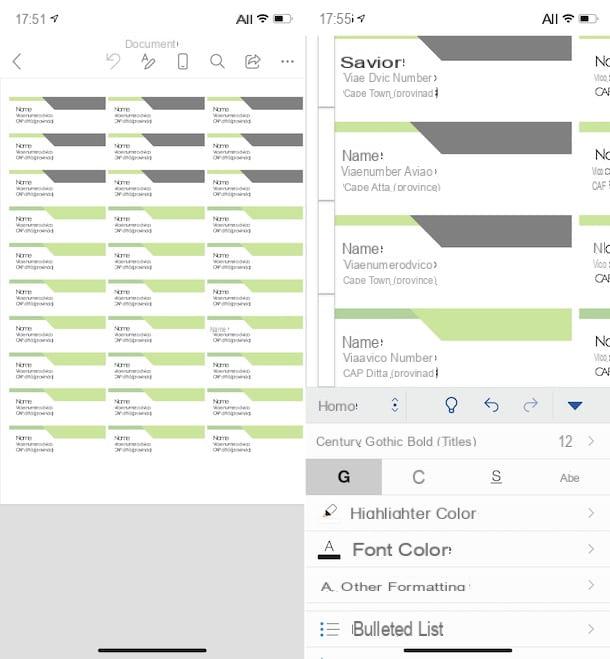
Now that you see the document on the screen, tap on the icon with the "A" and the pencil, to recall the editor functions, and proceed with the modification of the labels by selecting the example texts present in them and typing what you deem most appropriate.
As for formatting, editing or adding graphics, click on the button (...) located at the bottom right (if you use a smartphone) and choose one of the available menus. If you use a tablet, however, you can directly select one of the tabs located at the top.
If you want to create labels that are all the same, you can use the copy and paste function, while to change the individual textual elements “on the fly” you can use the Find and Replace commands.
Once the changes are complete, you can proceed with printing the labels directly from your mobile device. To do this, tap the button (...)at the top and select the item Print from the screen that is shown to you. If, on the other hand, you prefer to save the label file on your device or on one of the supported cloud storage services, tap the appropriate button, indicate the name and location you want to assign to the file and press the button Save.
How to create labels with Word mail merge
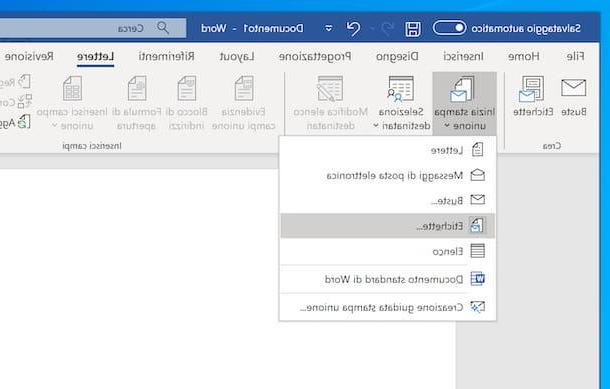
You want to find out how to create labels with word mail merge, i.e. having a different text in each label? If so, if you want to proceed from computer, create a new document in Word and go to the tab Letters, as I explained to you in the passage at the beginning of the guide.
Successively click on your button Start mail merge and select the item labels from the menu that appears. In the window that opens, then select the type and number of labels you want to print on your sheet, as seen above, and click on the button OK to confirm your choice.
Now, go to the tab layout pop-up at the top of the Word window and click on the button View grid, to display the grid with the divisions of all the labels, then fill in the fields of each label with the text you prefer.
If you want, you can also customize your labels by changing colors, sizes, writing fonts or adding images to them. To do this, what you have to do is place the mouse cursor on the label to customize or select the text to be edited and use the standard Word functions, the ones you normally use to edit texts and add images in your documents, as I have explained in my guide on how to use Microsoft Word.
Once the changes are complete, start printing your labels as if it were any Word document, by clicking on the button first Fillet, top left, and then on the item Print Present on the menu if you press.
How to create labels with Word from Excel
You would like to understand how to create labels with word from excel, in the sense that you have an Excel sheet containing the information for the creation of your labels that you would like to import into Word? I'll explain immediately how to proceed. To begin with, open Word on your PC and start creating a new document, as I indicated at the beginning of the tutorial.
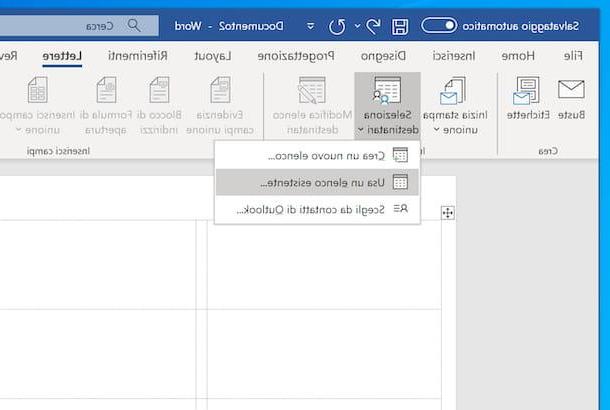
Next, call up and configure the mail merge function, proceeding as I explained to you in the previous step, and click on the button Select recipients that you find in the card layout of Word. Then choose the option Use an existing list from the menu that opens, select the Excel document you want to use, then i spreadsheets of your interest and press the button OK.
Then, select the first label, press the button Insert merge field site at the top and choose the information of the Excel sheet to view, using the menu that appears. Then proceed with formatting the text as usual in Word. Repeat these steps for each label.
When you're done, start printing your labels as you would any other Word document - by clicking the button first Fillet, top left, and then on the item Print, in the menu that opens.
How to create labels with Word