How to create PDF from images on PC
If you have the need to create PDF from images and you use a computer based on Windows, I suggest you resort to the use of JPEGtoPDF: it is a free program that allows you to generate PDF documents starting from all the main image formats: JPG, PNG, GIF, TIF etc. It is very simple to use and does not require any installation to be used.
If, therefore, you are willing to create a PDF with JPEGtoPDF, the first thing you need to do is connect to the download page of the program and click on the button Download, located in the center of the screen.
A complete download, fai doppio clic sul file JPEGtoPDF.zip that has been downloaded to your computer, extract the contents to any folder and start the program JPEGtoPDF.exe.
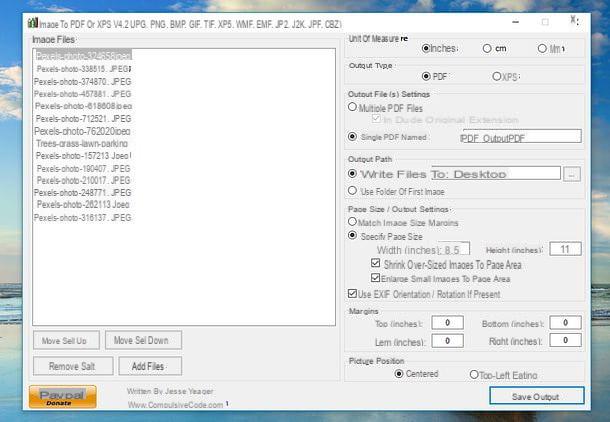
In the window that opens, then presses the button Thêm tập tin and select all the images you want to use to make your PDF document. Alternatively, select the images with the mouse and drag them into the program window.
Subsequently, if necessary, change the order in which the images are arranged by selecting their names in the box located on the left and pressing the buttons Mov Sel Up e Mov Sel Down. Then set the thickness of the margins, filling in the fields of the section Margins, and select the placement you want the images to assume in the PDF by checking the box Centered (to center them) or the box Top-Left Corner (to place them at the top left). If you wish, you can also change the unit of measurement of the various values by checking the boxes in the section Unit of Measure (you can choose between inch, inches e Millimeters), and adjust the page size of the output PDF, using the options available in the section Page Size / Output Settings.
After setting all your preferences, make sure that in the field Output Type the box is ticked PDF and that in the field Output File (s) Settings the box is ticked Single PDF named. Then click on the button Save PDF, at the bottom right, and within a few seconds the PDF file with your images will be generated.
If you deem it appropriate, you can change the name of the PDF file that will be generated and the destination folder of the latter by acting, respectively, on the fields Single PDF File named e Write Files to.
Create a PDF from scanned images
Looking for a program to create a PDF from scanned images? Well, if you have already carried out the scans and, therefore, you have already saved the images of your interest on the PC, you can use the program that I recommended in the previous chapter of the tutorial. If, on the other hand, you haven't scanned yet and want to get a PDF directly from the scanner, you can use NAPS2.
If you have never heard of it, NAPS2 is a free and open source program for Windows, which allows you to scan photos and documents in a very simple way. It is compatible with all major versions of the Microsoft operating system and is also available in version portable, which does not require installation in order to be used.
To get the portable version of NAPS2, connect to the SourceForge page that hosts the program and click on the button I Accept. Then select the folder for the latest software version (eg. 6.1.2) and click on the link naps2.xyz-portable.zip.
A download complete, apri il package .zip obtained, extract it to a folder of your choice, access it and start the program NAPS2.Portable.exe. Enter, therefore, the first picture to be scanned into the scanner tray and click the button Scan.
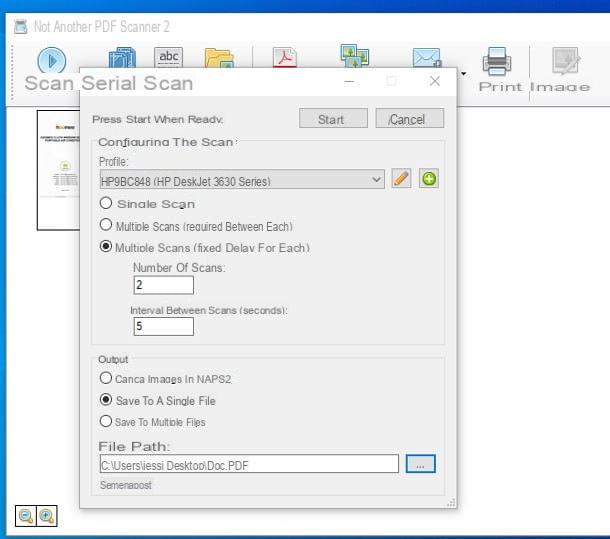
You will be asked to create a custom capture profile (this is only necessary for the first scan): type the name you want to assign to the profile in the field Visualized name; click on the button Choose device and indicates it scanner you intend to use.
Once this is done, specify the page size resolution where you intend to get the scan and use the indicators related to brightness e contrast to adjust these parameters. Then click on the button OK and wait for the photo to be scanned.
When done, insert the second photo to digitize, click on the button Scan and wait for the procedure to finish. Repeat the same procedure for all the images to be acquired and, when you are finished, select with the mouse all the photos to be saved, and then click on the button Save PDF, in high.
Alternatively, you can click on the ▼ symbol located next to the button Scan (top left) and select the item Batch scan from the menu that opens, in order to carry out automatic sequential scans, choosing whether to manually start the acquisition of the next image or to start it automatically according to a timer. More details about this can be found in my tutorial on how to scan multiple pages to PDF.
How to create PDF from images on Mac
If you have one Mac, know that you don't need third-party programs to create PDFs from images - all you need is Preview, the application for viewing images and PDF files included “standard” in macOS.
Therefore, if you want to create a PDF starting from images on your Mac, the first thing you need to do is open the first picture you want to include in the PDF in Preview: if this does not happen automatically when you double-click the file icon, right-click on it and select the items Open with> Preview give the menu that you come purpose.
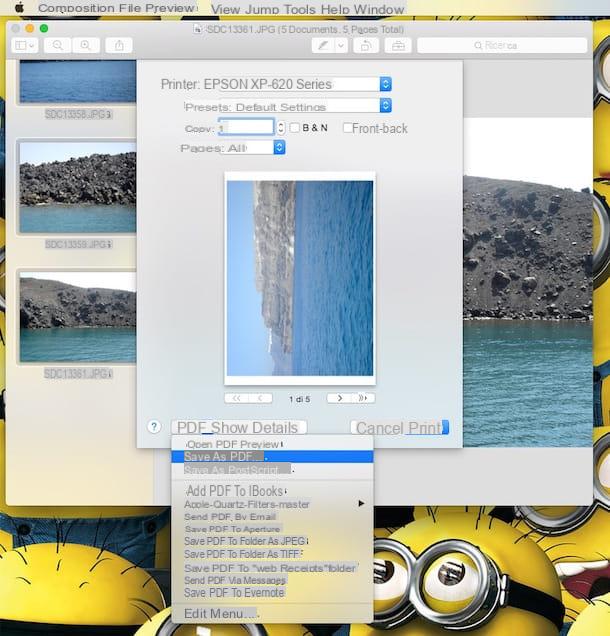
Once the image is displayed in Preview, select the item Miniature from the menu Vista, at the top, and drag all the other images you want to insert in your PDF into the bar that appeared on the side. Once this is done, reorder them as you see fit, using the mouse.
To conclude, click on any of the miniature present in the Preview sidebar, press the key combination cmd + a on your Mac keyboard, in order to highlight them all, and select the item Print from the menu Filletat the top left to open the print screen.
In the window that will open at this point, expand the drop-down menu PDF, lower left; select the item Save as PDF, indicates the folder in which to export the final document and confirms the export of the document.
Keep in mind that, if you need to, you can also transform a single image into PDF: to do this, just avoid adding additional images in the Preview section dedicated to thumbnails.
Create a PDF from scanned images
want create a PDF from scanned images on Mac? Then know that, even in this case, it is possible to use Preview- The macOS default utility for viewing images and PDF files.
To proceed, therefore, start Preview, insert the first picture to digitize and go to the menu File> Import from [scanner / MFP name], top left.
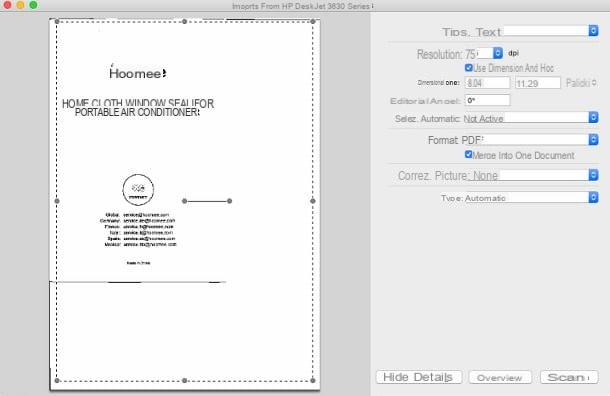
In the window that opens, outline the acquisition area, drawing a rectangle on the sheet preview, indicates in the menu Type that you are scanning aimage e seleziona l'opzione PDF give menu to tendin Size.
Then specify the resolution in which you want to scan, using the appropriate drop-down menu, put the check mark next to the item Merge into one document and, if you deem it appropriate, act on the other available options, to adjust the properties of the image as you see fit.
Per finire, click on your button Scan, in order to start the scan and view the resulting image. Once this is done, enter the second photo to be scanned into the scanner, click on the button Scan, to start scanning, and repeat the procedure for all images to be scanned.
Finally, click on the main window of Preview, make sure that in the left sidebar there are thumbnails of all scanned photos, go to the menu File> Save, at the top left, and save the final file, taking care to select the option PDF in the drop-down menu Size.
If any step is not clear to you and / or you want more information on how to scan multiple pages to PDF, consult the tutorial I dedicated to the topic.
Create PDF from images online
If, for one reason or another, you cannot use the programs I have suggested so far, know that you can create PDFs from images even online, using web services that work directly from the browser. An example? iLovePDF, which allows you to edit and convert PDF files online in a very simple way, also protecting the privacy of users (in fact, the files uploaded to its servers are deleted within a few hours). The service can be used for free and without registration.
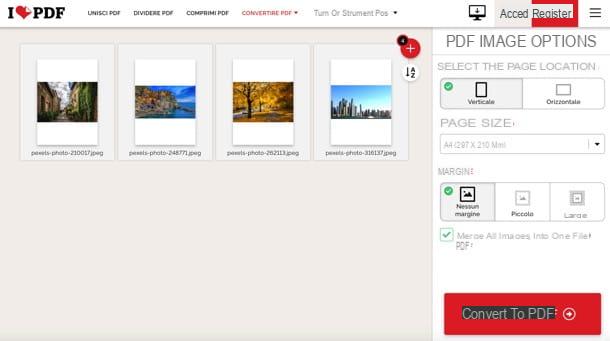
To create PDF from images with iLovePDF, link to this page of the service and drag and drop photo you want to insert into your PDF in the browser window (only JPG files are supported), reorder the photos, adjust the other preferences and click the button Convert to PDF (bottom right), to get your document.
How to create PDF from photos on mobile
How do you say? You do not currently have a computer at hand and, therefore, would like to know if it is possible create PDF from images from mobile? Of course yes: taking advantage of some free solutions for Android e iOS, this can be done quite simply. Now I'll explain in detail how to proceed.
Create PDF from images on Android
A terminal was used Android, you can create PDF from images using Image to PDF Converter, a free application available on the Play Store that allows you to convert multiple images into single PDFs. Its operation is very intuitive.
After downloading the application on your smartphone / tablet and starting it, press the button capacitor positive (+) lead, located at the bottom right and, if necessary, confirm the Permissions related to memory access.
Once this is done, select the images to be transformed into PDF, by tapping on them miniature, and pulsating premiere Done, top right, to confirm.
At this point, if you want, you can reorder the images by arranging them in the order you prefer to be used in the final PDF: to do this, press the icon with the three horizontal lines located at the top right, moves the miniature with your finger and press the button √, top right, to confirm the changes made.
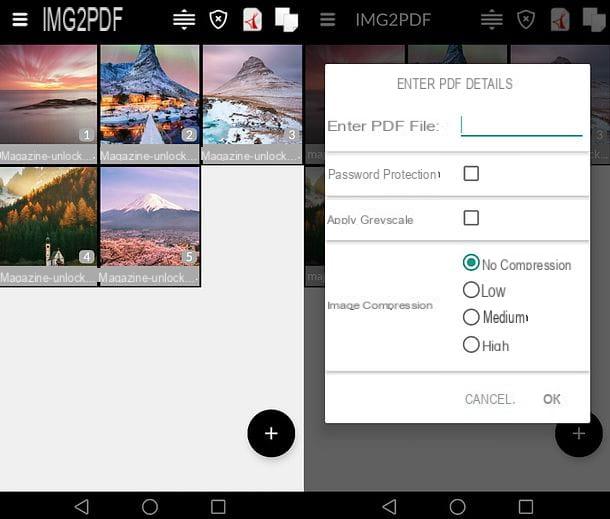
Finally, click on the icon PDF file (always top right), assign a name to the document to be generated, choose which degree of compression to apply to the images (No compression not to apply any compression; low, for low compression; Medium, for medium compression or High, for high compression), check the boxes Password protection e Apply Grayscale if you want, respectively, apply a password or create a grayscale document, and press the button OK, at the bottom right, to start exporting the PDF.
When the operation is completed, pressing theshare icon placed next to the generated PDF you can export it to one of the many applications on your device.
Create PDF from images on iPhone
If you have one iPhone (or a iPad), you can turn your photos into a PDF document without installing external apps.
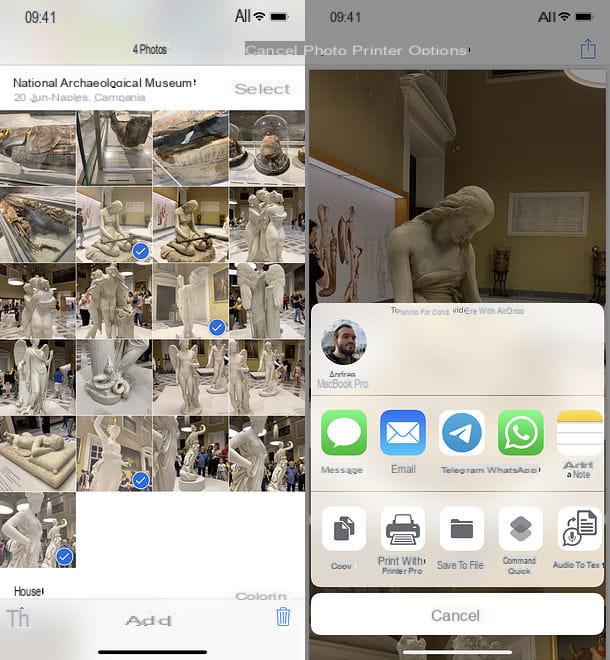
First, launch the application Gallery iOS, tap on the item Select located at the top right and tap on miniature of the images you want to include in your PDF, so you can select them.
At this point, press onshare icon located at the bottom left (the square with the arrow inside) and select the option Print give the menu check if you press.
When you see the print screen appear on the screen, spread two fingers across the miniature of the first photo (as if you wanted to enlarge it): this will open a PDF with all the images you have previously selected.
To export the document, click onshare icon located at the top right (the square with the arrow inside), select the option Save to file from the menu that opens, indicate the folder in which to export the PDF and press the button Add, top right. Easier than that?
How to create PDF from images