How to record audio with iPhone
To record audio with the iPhone, everything you need is already installed on your device: the app Voice memos, i.e. the default iOS application for making voice recordings, allows you to obtain audio recordings in a very easy and fast way.
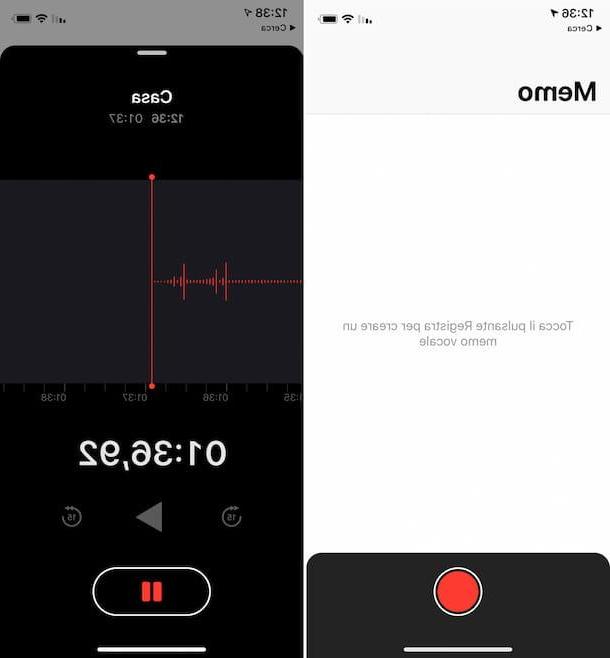
To be able to use it, first take your smartphone, unlock it, access the home screen and tap on theicon dell'applicazione (quella with the black background and the path). Once the main screen of the app is displayed, press on circular red button, located below, to start your registration.
When recording has started, you will be shown the trace of the same, in the lower part of the display. To stop it, press on button with red square appeared at the bottom, while to pause it drag up the black tab located at the bottom of the screen and press the button Pause, down.
Once the recording is complete, you can listen to it again by pressing the button Play that you find under the relative file, on the main screen of the app. You can also fast forward or rewind the recording by 15 seconds by pressing the buttons with the arrow and the number 15, always placed in correspondence with the file.
If you then wish to make changes to the recording, by cutting a part of it or changing its name, click on the button [...] found under the file name on the main Voice Memos screen, select the item Edit your registration from the menu that appears and act on the next screen.
From here, by pressing on the symbol of rectangle, you can edit the audio file while tapping the registration name (above) you can rename the same. Using the button Replace, below, you can replace a portion of the recording with another audio. In all cases, once you've finished editing, tap the button end, per salvare ichangementi.
I also point out that the audio recordings made can be duplicated and shared in other apps: to do this, always press the button [...] that you find next to the clip and select, respectively, the option Duplicate or that Share.
Do you want to delete an audio recording? This can also be done: to do so, tap on the symbol of dustbin that you find in correspondence of the file and that's it. Should you have second thoughts, you can restore the registration at any time within 30 days of cancellation, by tapping on the item Recently deleted, selecting the clip and then the wording Recover.
Record iPhone audio with screen off
If you need to record audio files with iPhone without any people close to you being able to notice it or, much more simply, without having to leave the app in the foreground Voice memos, I inform you that you can also use the latter with the screen off. How you do it? I'll explain it to you right away, it's child's play.
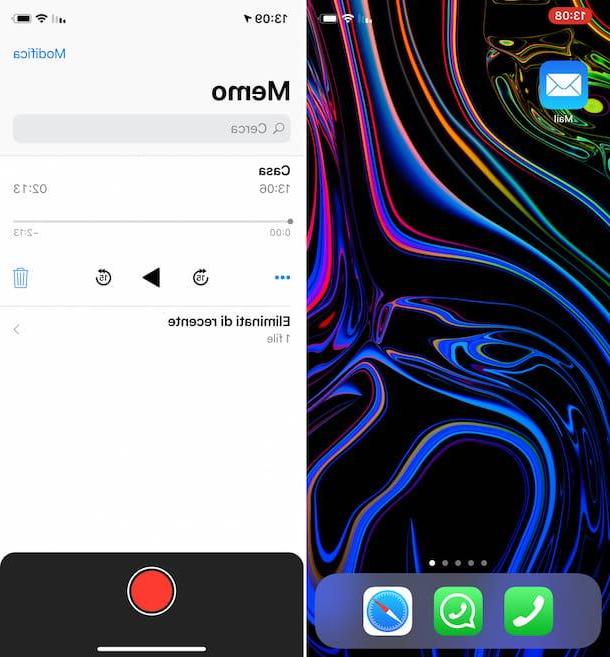
First, open the application on your device and start an audio recording, as I explained to you in the previous step. Then, exit the app screen by pressing the Home button (on iPhone 8/8 Plus and earlier models) or by swiping from the bottom of the screen upwards (on iPhone X and later models).
Once this is done, the Voice Memos app will continue to record without being visible in the foreground anymore. However, you will be able to realize that Voice Memos is running and that it is recording because in the upper left part of the display, in correspondence with the clock, a red indicator with a microphone.
When you want, you can access Voice Memos again by clicking on the aforementioned indicator or by opening the app through his icon present on the home screen, and you can manage the recording from the screen that is shown to you. Convenient, right?
Audio recording from iPhone to PC
You have managed to record audio with your iPhone and now you would like to know how to do it transfer to your computer? I already anticipate that you can do it by exploiting iTunes or iCloud. To know all the details of the case, continue reading.
iTunes
To transfer audio recordings made with iPhone to computer, you can first use iTunes, the multimedia software from Apple that allows you to manage iOS devices from your PC. Up MacOS you find it pre-installed, while on Windows you must first download and install it by following the instructions on what to do that I have provided you in my tutorial on the subject.
To use it for your purpose, then connect the iPhone to the computer using the Lighting cable supplied, wait for iTunes to open automatically and for the device to be correctly identified by the program. If this is your first time doing this, you will need to authorize access to the iPhone, by clicking on the appropriate buttons and unlocking the iPhone, as I explained to you in detail in my guide on how to connect the iPhone to the PC.
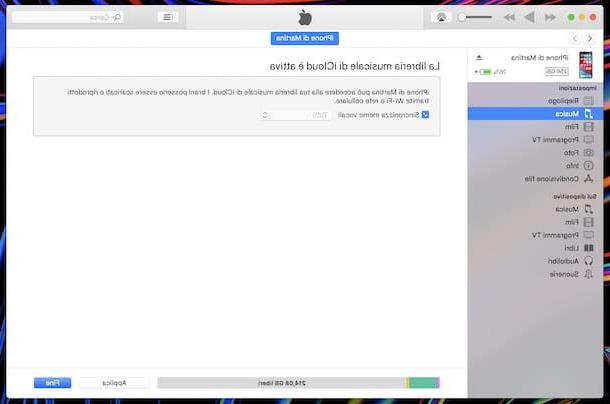
At this point, fai clic sull 'iPhone icon found at the top left of the iTunes screen, select the item Music from the left sidebar, check the options Sync music e Include voice memos and click sul pulsating Apply located at the bottom right, to start the synchronization procedure.
Note that by doing this, the entire iTunes library will be copied to the iPhone. If you want to prevent this from happening, tick the option Selected playlists, artists, albums and genres, choose the individual songs, albums and playlists to transfer to the iPhone and click the button Apply.
If the services are active on your iPhone Apple Music e ICloud Music Library, which prevent you from managing the music library of the device since the music is automatically synchronized on all devices via the Internet, simply put the check mark next to the item Synchronize voice memos and press pulsating end.
Once the synchronization procedure is complete, the audio recordings made with your iPhone will be accessible from the section Music of iTunes. To reproduce them, go to the section in question, selecting the appropriate item from the menu located in the upper left part of the main screen of the program, expand the section Music playlist located on the left, select the playlist Voice memos and double-click on the audio file you want to listen to.
To export the audio recordings outside of iTunes, instead, right-click on the title of those of your interest and select the item Show in Windows Explorer o Show in Finder from the menu that appears. You will then be shown the folder where the voice memos are stored, from which you can copy and manage the files as you see fit.
Anyway, keep in mind that after enabling voice memo sync in iTunes, every time you connect your iPhone to your computer, they will be automatically copied to your PC.
If you prefer to synchronize the iPhone with the PC without physically connecting the devices to each other, as long as they are both connected to the same wireless network, you can do this by proceeding as follows: click on theiPhone icon, at the top left of the iTunes window, select the item Riepilogo from the sidebar and check the option Sync with iPhone via Wi-Fi.
iCloud
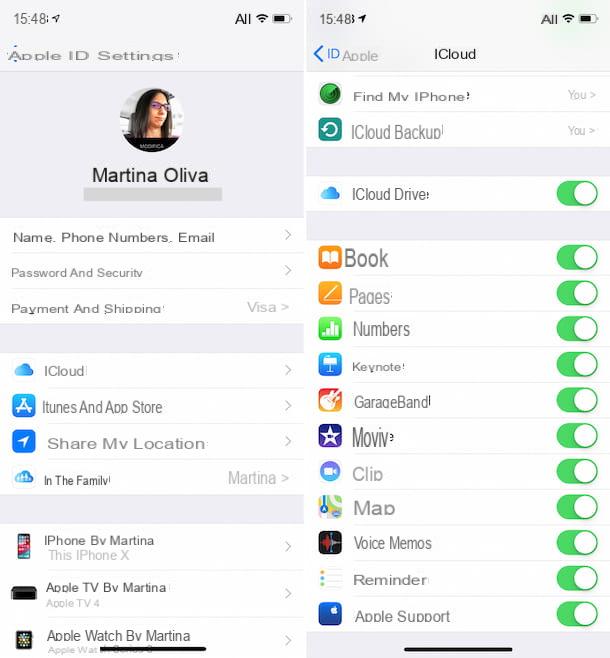
If you own a Mac, you can take advantage of iCloud to transfer recordings made on your iPhone with the Voice Memos app to your computer. In fact, when synchronization via iCloud is active, all audio files created with the Voice Memos app on the iPhone are automatically transferred to the computer and can also be played and managed from there.
To be able to use this feature, first check that you are logged in with the iCloud account on your devices: su iPhone, tap on the icon Settings (Quella with l 'gear) located on the home screen and, if you do not see the you don't know, select the item for log in to iCloud and provide the relevant credentials. Up Mac, click on the icon instead System Preference (Quella with l 'gear) that you find on Dock bar, then on the voice iCloud in the window that opens and, if the you don't know is not visible, click on the item for login via iCloud.
Subsequently, proceed to activate the synchronization of Voice Memos via iCloud: to succeed iPhone, go back to the section Settings iOS, tap on you don't know above, then on the wording iCloud e carries his ON the switch located next to the item Voice memos. On Mac, access instead System Preferenceclick sulla voce iCloud in the window that opens, click on the button options next to the wording iCloud Drive and check the box next to Voice memos, then save the changes by pressing the button end.
Once this is done, you will find all the audio recordings made on the iPhone with Voice Memos on the Mac, always starting the application in question. On macOS, the list of audio clips is visible in the left column of the application window.
How to Record MP3 Audio with iPhone

The Voice Memos app on iPhone records audio clips in the M4A, which can be reproduced without problems by the "iPhone by" itself, by other Apple branded devices and by various other devices, portable and otherwise. However, if you need to create audio clips in a different and more popular format, as in the case ofMP3, you must necessarily resort to the use of third-party solutions, as the default format of Voice Memos cannot be changed.
That said, among the various solutions of third-party developers present on the square, I recommend that you resort to the use of Voice Recorder Pro, a free application (with advertisements) that allows you to make audio recordings in different formats (including MP3) and to make various changes, as well as to share them easily on the Net and through other services.
To download the app on your device, visit the relevant section on the App Store, press the button Get and authorize the download via Face ID, touch ID o Password Apple account. Then, open the application by tapping on the button apri oppure selecting the relative icon which has been added to the home screen.
Now that you see the main screen of the application, tap on the button OK to allow Voice Recorder Pro to access the microphone, then press the button REC located at the bottom right and select the tab Advanced which is located at the top.
At this point, award your bottone [-] che trovi sotto the dicitura Recurd Format until you see the entry MP3 (MPEG), adjust (if you know where to put your hands, otherwise leave everything as it is) the other parameters related to the quality of the recording (Bit Rate, Encode Quality etc.) and press the button Home located at the top right, to start recording.
When you want, you can stop recording by tapping on the button Stop, located at the bottom. To pause, however, press the button Pause, which you always find at the bottom of the screen.
Once you have stopped recording, use the field at the top, under the file size and duration indicators, to assign a name to the file, then select one of the items attached to the menu that is shown to you, in order to choose whether to play the recording (Play), whether to send it by email (Send By Email), your iCloud will save it (Save to iCloud), it will be eliminated (Delete) etc. You can also use iTunes File Sharing to copy songs to your computer.
In any case, all the recordings made are listed on the main screen of the app: by tapping on the relative title you can reproduce them, share them or modify them, while pressing the button with the pencil and paper (top left) you can get rid of it by tapping onred indicator next to the name and then on the button Delete that appears on the right.
If you can't find a specific recording, you can search through the various files by keyword, by tapping on the symbol of magnifying glass, at the top left, while pressing the adjacent button you can change the way they are sorted in the list. To change the app settings, instead, press the button with the ruota d'ingranaggio, located at the top right.
How to record screen with iPhone audio
For the sake of completeness of information, always regarding the possibility of recording audio with the iPhone, I would also like to explain to you how to perform a screen recording of the "iPhone by" including the sound. To do this, you just need to use the function Screen recording included in iOS, starting with version 11 of the operating system.
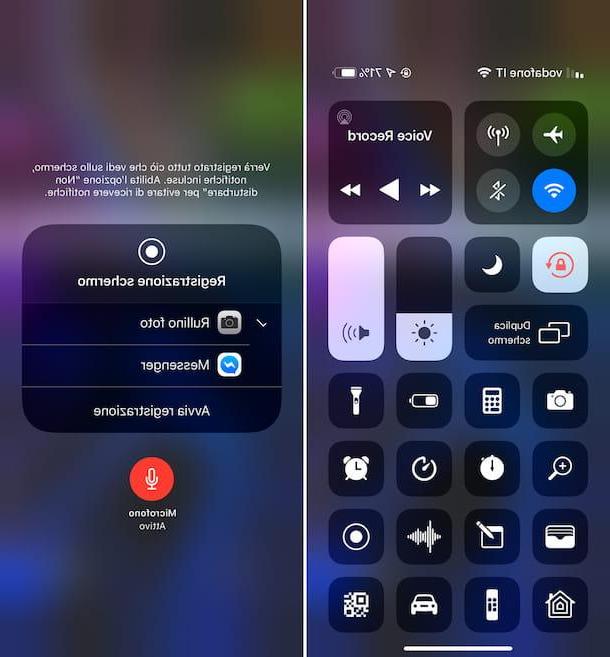
To use it, call the Control Center on iPhone by swiping down in the upper right corner of the display (on iPhone X and later) or from the bottom edge of the screen to the top (on iPhone 8 and earlier). Then, press firmly / sustainably on theicon representing the two concentric circlesselect l 'microphone icon in the new screen displayed (you will see the wording Active Microphone and its icon will be colored with red) and, finally, tap the button Start recording.
After a short countdown, the display recording will start. This will be reported to you in the Control Center as well as via thered indicator at the top of the display with theScreen Recording icon.
When you want, you can stop the screen recording by calling the Control Center and pressing onScreen Recording icon, or by pressing onred indicator located at the top left and tapping on the button Stop in response to the notice that appears. All the recordings made will then be visible in the app Gallery of iOS.
Can't find the button in Control Center to start screen recording? To solve, select the icon Settings present on the home screen of the device, tap on the wording Control Centeryour complaint Customize controls and press pulsating [+] che trovi in corrispondenza della voce Screen recording.
How to record audio with iPhone