Preliminary information
Before going ahead and getting to the heart of this guide on how to record Mac screen with internal audio, let me explain the ways in which everything can happen. Typically, screen recording programs allow you to capture computer audio input, such as that coming from the microphone.
On Mac, however, it is not possible, at least not natively, to include in the recording the sounds played by the computer (system audio, sounds played by running programs, and so on): unlike Windows, in fact, the operating system of Apple does not implement a simple method to achieve this.
This, however, does not mean that this is not feasible: there are in fact software that can transform the output sounds into input sounds, making the operating system believe that it is recording from the microphone or, in general, from an input device. The theme of this guide will be, precisely, to illustrate the operation of the best software of this type, then explaining how to integrate everything into the programs dedicated to screen recording.
Enable audio capture
The first step to be able to record the Mac screen with internal audio is to create a virtual audio driver, which will "transform" the internal sounds of the Mac into an input device, to be combined with the internal speaker and "fed" to the recording program. There are several programs to be able to succeed in this venture: below you will list some of the best.
BlackHole
The first solution I want to tell you about is BlackHole: it is a free and open source software that, within a couple of clicks, allows you to create a virtual audio driver through which to enable the recording of system sounds through other programs.
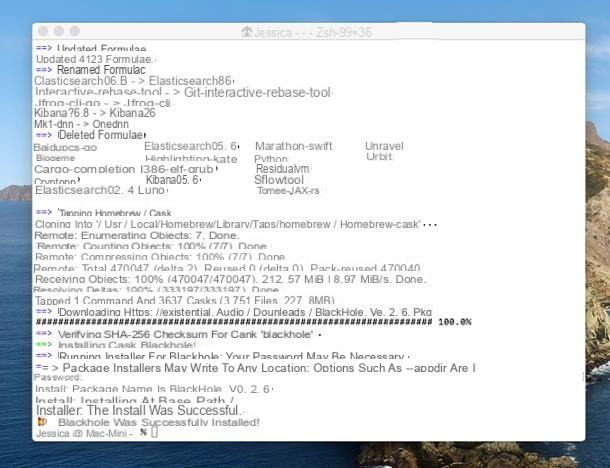
To get it, first launch the terminal macOS, calling it from the menu Or> Utility, issue the command / usr / bin / ruby -e "$ (curl -fsSL https://raw.githubusercontent.com/Homebrew/install/master/install)" and press the key Submit on the keyboard, in order to start the installation of the package manager Homebrew. When prompted, enter the Mac password and press the button again Submit.
At the end of the setup, install the BlackHole software, issuing, again in the Terminal, the command brew cask install blackhole, followed by pressing the key Submit; again, if prompted, enter the Mac password and press the button again Submit, to finish installing the program.
We are almost there: the last step is to have the audio of the Mac be reproduced both through the speakers and through the virtual input of BlackHole. To do this, open the utility Midi Audio Configuration, recalling it from Launchpad or from the menu Or> Utility Finder (top).
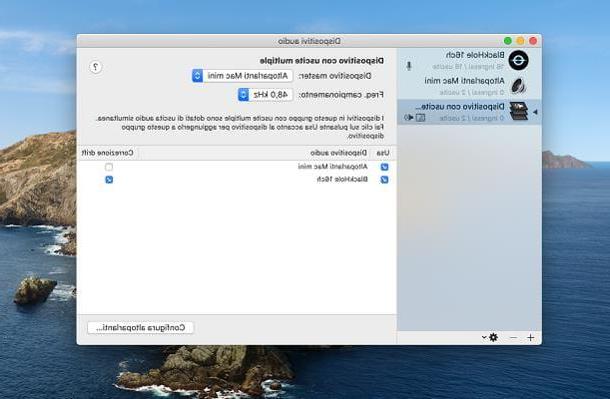
Pray click on your button [+] located at the bottom left, select the item Create device with multiple outputs from the menu that is proposed to you and deselect all the boxes located in the next screen: do this so that the devices are added in the exact order, to avoid problems.
Once this is done, put the check mark next to the item Mac speakers (or any other speaker you are using), at the column Use; then repeat the same operation with the box next to the item BlackHole 16ch and, finally, put the check mark inside the box Drift correction, corresponding to BlackHole 16ch.
Finally, right-click on the entry for the Device with multiple outputs just created (located in the left sidebar), select the item Use this device for audio output from the displayed menu, then repeat the same operation selecting, this time, the options Play alerts and sound effects through this device. Finally, right click on the BlackHole entry and then on the option Use this device for audio input resident in the menu that appears.
The new audio driver is ready: to record the internal audio of the Mac, all you have to do is select the device BlackHole (16 ch) as an incoming audio source within the screen recording software of your choice. We will talk about it again shortly.
AudioHijack + Loopback
Another valid option to be able to record the internal audio of the Mac involves the use of software Loopback e AudioHijack: the first, in particular, allows you to create a new audio driver; the second, on the other hand, is used to use the system audio as an input source (allowing, in fact, its recording).
Loopback and AudioHijack are two paid programs, but they can be used for free with some limitations: the free versions in fact provide for the superimposition of a noise after the first 10 minutes of recording. All clear? OK, let's proceed.
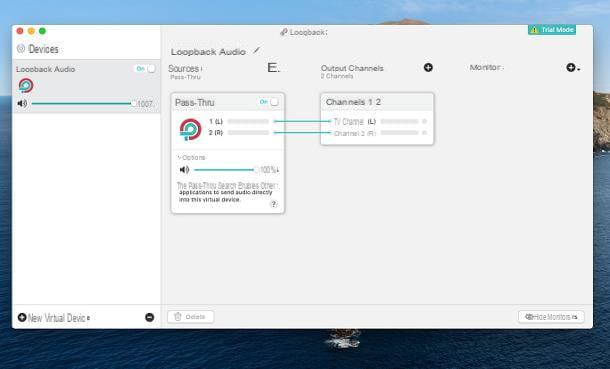
To get started, connected to the Loopback website, click on the button Free download and wait for the archive containing the program to be downloaded to your computer. When the download is complete, open the downloaded package, to extract its contents, and drag the program file from the folder Download to the folder Applications of the Mac. Once this is done, start the executable of Loopback and click on the button Next five consecutive times to create the audio driver.
Now, open the utility Midi Audio Configuration, calling it up from the menu Or> Utility macOS, and create a device with multiple outputs as I showed you in the previous section of this guide, but using the driver Loopback.
After this step, connected to the Audio Hijack website, click on the button free Download, extract the executable file from package .zip obtained and copy it to the folder Applications Mac. Then start the program you just copied, click on the button install, enter the Mac password in the appropriate field and complete the setup by clicking on the buttons Install, Next e Close Tour.
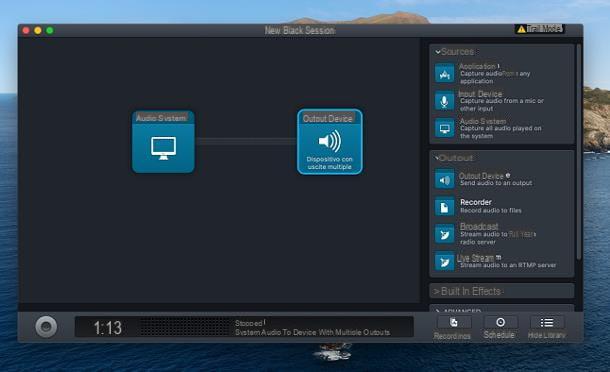
If everything went well, the Audio Hijack home screen should open: click on the button Create New Session and then Blank Session, so as to be able to define the acquisition parameters. Once in the new screen, locate the button System Audio from the card Sources (on the right) and drag it to the large left pane of the program; then repeat the operation with your voice Output devicesby dragging it to the right of the button added just now. If all went well, the two boxes should now be connected via a line.
At this point, you are ready to acquire the internal audio of the Mac: leave the Loopback and Audio Hijack windows open and remember, when configuring the program, to select the driver Loopback as an input source. We will be back soon.
Programs to record the Mac screen with internal audio
After setting up your computer for system audio capture, it's time to explain how to record your Mac screen with internal audio using some programs designed for the purpose.
Snapshot Screen
The first software I recommend you to try is Snapshot Screen, present "standard" on all Macs equipped with macOS 10.14 Mojave and later; therefore, if you are trying to understand how to record Mac screen with Catalina internal audio or any later editions of the Apple operating system, I would say you are in just the right place.
Before proceeding, if you have chosen to use Loopback and AudioHijack for audio capture, call up the latter window and click on the button depicting a hoops, in order to start the session. I remind you that, if you are using the free version of the software, after 10 minutes from the start, a “disturbing” noise will be superimposed on the recorded sounds.
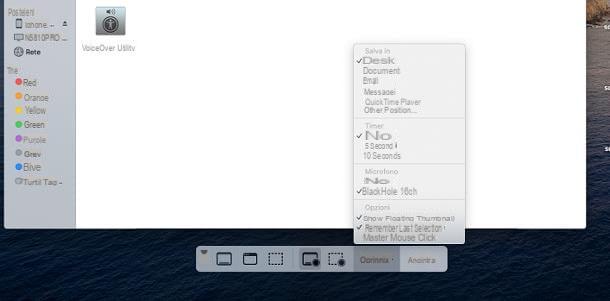
Anyway, to launch the Screenshot, press the key combination cmd + shift + 5 on the keyboard, or use the menu Or> Utility Finder to access its icon. Following this operation, the program toolbar should open at the bottom of the screen: to capture the entire desktop, click on the button Record the entire screen (The rectangle with circle); to acquire only a portion, click on the button Record your selection (The dashed rectangle with circle).
At this point, click on the menu options of the program, locate the section Microphone and select the input source that's right for you (BlackHole 16 ch or Loopback, depending on the audio capture system you have chosen to use). To start screen recording, click on the button Register; to stop, press the button Stop (Quello forma di square) that appears in the Mac menu bar, near the clock. The file will automatically be saved on the desktop.
OBS
Another excellent program dedicated to screen capture is OBS, also known as Open Broadcaster Software: it is a versatile and feature-rich software, suitable for those looking for more advanced tools than those available on the Snapshot Screen (eg the ability to add video from the webcam).
To download OBS on Mac, connected to the software website, click on the button macOS [xx.yy] present under the heading OBS Studio and wait for the program installation file to be downloaded to your computer.
Once the download is complete, launch the fillet obtained and, using the window displayed on the screen, drag the program icon into the folder Applications on your Mac. To start the software, double-click its icon and press the button apri.
If everything went well, the application should start automatically: then click on the buttons OK e Yes and complete the guided configuration procedure, taking care to select the option Optimize for recordings only, I don't do direct.
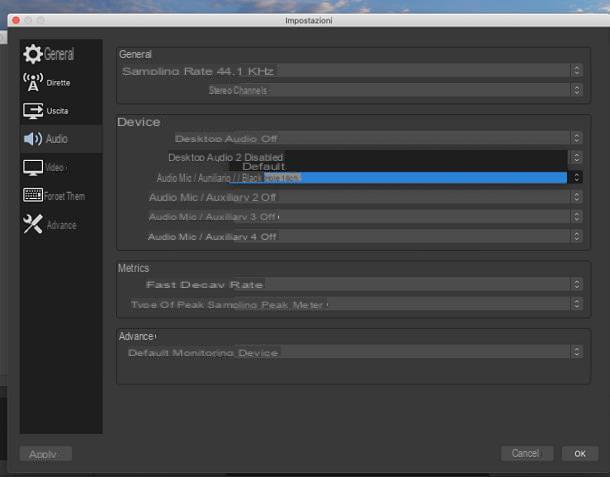
At this point, you need to configure the program for capturing audio from the computer: to do this, click on the button Settings resident at the bottom right, select the item Audio (located in the left sidebar) and set the drop-down menu Audio mic / ausiliary on the audio source you have chosen to use (BlackHole 16 ch or Loopback). Confirm the changes by clicking on the button OK per due turn consecutive.
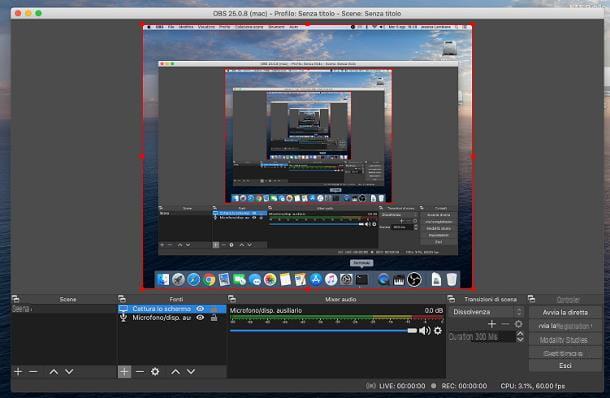
You're finally ready to record your screen! Click the button [+] located at the bottom of the box References and select the item Capture the screen, to acquire the entire Desktop, or Capture the window, to capture video of a given window only. Then repeat the operation again, this time selecting the item Capture incoming audio: put the check mark next to the item Add an existing oneclick sulla voce Microphone / devices auxiliary e premium pulsating OK but I will modify it.
When you are ready, click on the button Start recording to start capturing the screen; to stop shooting, click on the button Stop recording. Remember that, if you have chosen to use Audio Hijack as an acquisition system, you must start the session created by clicking on the button in the shape of hoops, located at the bottom.
For further information on Open Broadcaster Software, I refer you to reading the in-depth tutorial I have dedicated to the topic, in which you will find lots of useful information!
Other solutions to record Mac screen with internal audio
If the programs I have talked about so far have not been able to satisfy your needs, you will be pleased to know that, on the Net, there are numerous other solutions capable of recording the Mac screen. Here are some of them.
- QuickTime Player - is the historic multimedia player included in macOS. It also includes a screen recording feature, which I told you about in depth here.
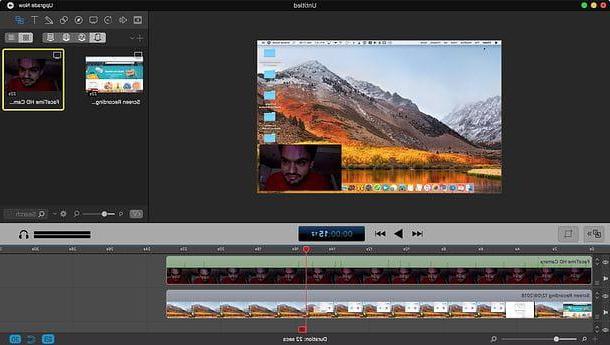
- Screenflow - it is a program entirely dedicated to screencasts, which allows, among other things, to edit and edit recordings in a simple way. The software costs $ 129, but is also available in a free trial version, which does not provide limits on use but affixes a watermark to the registrations made.
- Camtasia Studio - is one of the best programs dedicated to computer screen capture. It includes a video editor that allows you to edit, enhance and edit your recordings. The program is paid, costs € 269,05, but can be tried for free for a period of 30 days. More info here.
For more information about the useful programs to record the screen on Mac, I refer you to reading the specific tutorial I have dedicated to the topic.
How to record Mac screen with internal audio