Photobox
One of the first solutions I recommend you try to create a photo album is Photobox, a very renowned service in the field of photo printing that offers a very wide choice both in terms of the type and prices of the albums.
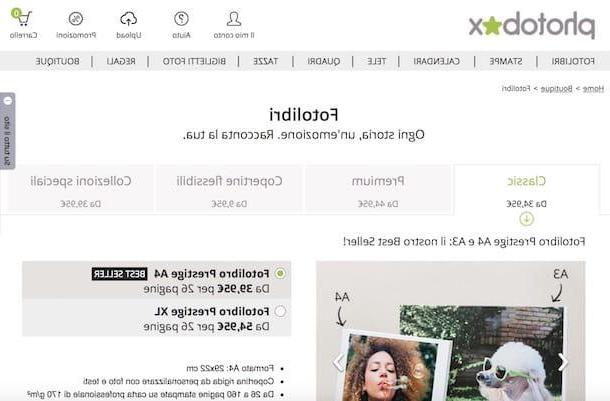
To create an album with PhotoBox, click here in order to link to the section Photobooks of the site and select the tab relating to the type of album you want to make (eg. Classic, Premium, Flexible covers, Etc.).
If, for example, you want to make a traditional photo album, click on the item Classic, then select the size of your photo book using the options on the right (eg. Photobook Prestige A4 o Prestige XL), click on the green button See the Book to preview what your photo album will look like and, on the following pages, click on the button I create my book per due turn consecutive.
At this point, you will be asked to enable Adobe Flash Player to proceed with the creation of the photo book. If you want to activate the plugin (if you don't know how to download and activate Adobe Flash Player on your browser, read the insights I have just linked to you) click on the green button Continuation and then follow the instructions you see on the screen; if you don't want to activate the plugin, click on the link instead Try our new creation tool.
Now, import the photos you want to make the photo album with by clicking the button Upload photos and choose whether to upload them from PC or from one of your online profiles (Facebook, Instagram, Flickr, dropbox o Google Plus). After uploading the photos you want to use for your project, click on the green button Upload starts in order to complete the upload and click on the button Back to my photos from the box that opens. Then click the button Tutto, in order to use all the photos uploaded and then click on the green button Create the Photo Book I will continue.
In the box that appears on the screen, you will be asked to choose whether to create the photo book manually (by clicking on the green button Manual creation) or whether to create it automatically (by clicking on the orange button I discover my photo book). After making your choice and possibly changing the layout of the photo book, the position of the photos and adding texts and illustrations, write the title of the book in the appropriate text field and then use the arrows (<) e (>) to browse it virtually.
As soon as you are satisfied with your work, click on the orange button To sort, possibly improve the quality of the photo book by selecting more valuable materials (which of course will raise the purchase price) and then confirm your order by clicking on the button again To sort. On the page that opens, complete the procedure by selecting the delivery details and register for the service by filling out the registration form with your name, email and other personal information. Once you have logged in to the service, indicate the payment and shipping method you prefer and that's it.
I remind you that PhotoBox periodically offers offers that allow you to save on your purchases (sometimes they are available discounts up to 50%). If you want to know more, visit the section dedicated to promotions on the PhotoBox website.
digitalpix
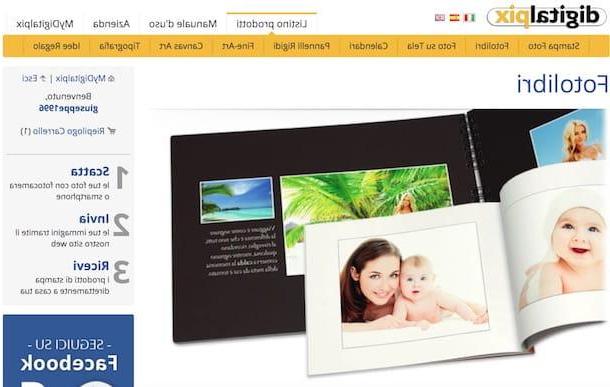
digitalpix is another solution you should consider if you want to make quality photo albums. Also in this case, to create a photo book it is sufficient to register on the site, select the type of album you prefer, then proceed to your order and wait for it to be delivered to your home. For new members there is a 10 euro discount on the first order.
To create photo albums with Digitalpix, connected to its home page and click on the item New user? Sign in! located at the top right. On the page that opens, enter the data requested (name, surname, username, e-mail address, etc.), uncheck the item I authorize Digitalpix to send commercial and promotional communications to the e-mail address indicated and, after reading the information on the processing of personal data, click on the option first Accept and then on the button Go ahead and prove that you are not. Finally, enter the code shown in the image and confirm the registration by clicking on the button Confirmation.
Within a few minutes, an email will be sent to the email address you indicated above, in which you will be provided with the login credentials of your account: enter them in the text fields username e Password and click on the button OK.
Once logged in, click on the link Create a new order and, on the page that opens, click the button Add images. Then select the photos you want to upload (you can only upload JPEG or TIFF images of max 50MB each) and click on the button Send to proceed with their upload.
After uploading the photos, click on the button Continue, click your capacitor positive (+) lead Other products and, on the page that opens, select one of the items corresponding to the photo albums (eg. Photo Books on Photographic Paper, Paper photo books o Wedding photo albums) among those located in the first column of the box Select a product, then select one of the sub-categories of photo books in the second column of the box, choose one of the proposed albums in the third column and then click on the button Continue.
At this point, you will be guided in the creation of your photo album: type, therefore, the title and number of copies to be printed in the appropriate text fields, click on the button Continue, click here Add images (if you want to upload more images) or click the button Choose from the images already uploaded in order to use the photos you uploaded previously.
After selecting the images to be used, make sure that they are sufficient for the creation of the photo book (information on the amount of photos you can upload will appear on the screen), click on the button Send and wait for them to load.
Once you have completed uploading the photos and / or having selected those previously uploaded to the site, click on the button Continue that appears in the box. On the next page, check that the order of the photos is what you prefer and, if you need to reorder them, click on the button in the shape of cross under each thumbnail (by holding down the left mouse button) and move the photos in the desired order. Then click on the button Save located at the bottom and, on the next page, click on the button Continue with the purchase. Then enter i billing and shipping data, select a payment method valid and follow the instructions that appear on the screen to complete the order of the album.
Photosi
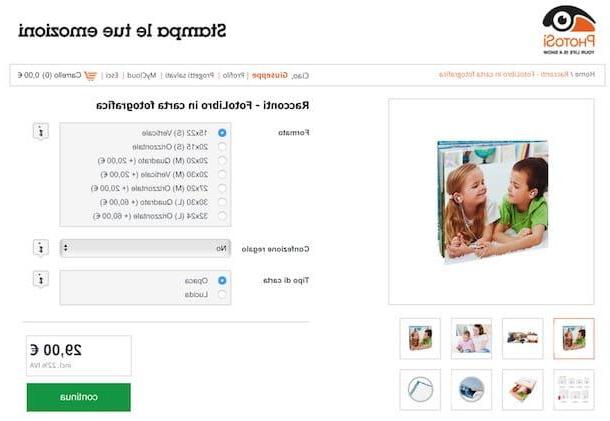
Another online service that allows you to create photo albums quickly and easily is Photosi. It is a site specialized in printing photos and in the creation of numerous graphic works: from photo calendars to accessories for animals, through tickets, covers and much more. For new members there is a 10 euro discount on the first order.
To make a photo album with PhotoSì, you must first register for the service. Then click here to connect to the PhotoSì home page, click on the link SUBSCRIBE located at the top and create your free account by filling out the registration form with the required data (name, surname, email, etc.) and then clicking on the green button SUBSCRIBE. Within a few seconds, you will receive an email containing a link: click on it to activate your account, confirm your details and then proceed to create the album.
Once logged in, connected to the section of the site dedicated to photo books, identify the type of album you like best (eg. Photobook Events, FotoBook Moments, etc.) and, after having seen the characteristics that are explained in the product sheet, click on the green button Create now to proceed with the actual creation of the photo book.
On the page that opens, select from the menus on the right the format, kind of paper, cover type and possibly the gift box to apply to the photo book and then click on the green button Continue. At this point you will be asked if you want to create the album through themanual pagination or through theautomatic pagination.
If you don't have much experience in making photo books, I suggest you click on the button Automatic pagination and follow the guided procedure to complete the operation: upload the photos you want to make the album with, create the photo book cover by selecting one of the uploaded photos and choose one of the graphic themes from those proposed in the left pane.
As soon as you are satisfied with the result, click on the button end and, from the box that opens, click on the button Personalize the photo book in order to apply some customizations such as adding frames and backgrounds or click on the button Add the PhotoBook to your cart not to apply any customization and go directly to the purchase.
Now, follow the instructions you see on the screen regarding the choice of the gift box (you do not have to add it necessarily) and to proceed to upload the images you have included in your project. On the page that opens, check that the products in the cart have the characteristics you have previously chosen and click on the button Continue.
Then enter the discount code that you received during registration (if you are a new customer) in the appropriate field, click on the green button Apply and then on the button Continue located at the bottom. Finally, complete the order by indicating the correct shipping details (if you want you can also choose to collect the photo book at a partner store) and a valid payment method. Easier than that ?!
Other solutions to create a photo album
Haven't the solutions I talked about in the previous paragraphs particularly convinced you? Don't worry, there are many other sites to create photo albums that you can turn to. Take a look at the ones listed below - I'm sure you'll find the service that's right for you.
- 12Print - is another popular website that allows you to make photo books quickly and easily. Furthermore, new users who register at 12Print are entitled to a welcome bonus thanks to which it is possible to print 25 photos in standard format for free. If you want more information on how to create photo albums with 12Print, read the tutorial dedicated to printing photos online.
- Photocity - it is another web portal thanks to which it is possible to create photo books for multiple occasions and anniversaries. Furthermore, new users who register for the service can obtain discounts of 30% applied to photo books. For more information on how to best use this service, read the guide dedicated to sites for printing photos.